DIY with Quantum Boards

BobCajun

Well-Known Member
Another thing to try is bottom light. I just started using about 12w /sq ft of LED screw-in bulbs in Y sockets between the pot tops. You'd be amazed how it lights the plants right up when viewed from above. Should be all solid buds now. It's 7 weeks in when I started this. It'll be interesting to see how it effects yield. All it took was four 100w replacement bulbs, two in each Y socket. I'll have to wait a few days to see if it causes any burning, it's not unusually hot in that area though, just the sudden light increase may do some bleaching.

QB boards could work for that, since they don't get very hot. Could hang them between plants too, for a side lighting effect like a vertical grow. Lighting only from the top seems like wasting the whole bottom part. I'm sick of only the top part being usable and all the lower branches being wasted on fluff.
 

ganjamystic

Well-Known Member
is there a trick to tinning stranded wire??? I can't get this to work to save my life... I'm trying to put together my lights, but to connect the power cord to the AC side of the driver using the waterproof connectors, I need to tin the stranded wire on the driver and the power cord. I've literally been trying to get this to work for two days now and I just can't figure out what I'm doing wrong. I've watched youtube videos and looked at several tutorials with pictures online and every one shows the exact same thing and makes it look so simple but I cannot get it to work for some reason!!! I'm trying to heat the wire with the soldering iron and then touching the solder to it but it WILL NOT melt and coat the wire!! I can only get the solder to melt if I touch it directly to the iron, but then it's still really hard to get a droplet to stick to the wire or coat it... it just beads up and drops off.. I've wasted so much solder and I'm losing cm of cable with every failed attempt..... what am I doing wrong here?? I'm using a 55W soldering iron set to 430 C and lead-free rosin-core silver solder that melts at 422 C.... help! I'm so frustrated... I'm literally at the point of wanting to just sell everything to someone who's more DIY inclined because I'm honestly hating this and really just wishing I'd bought a pre-assembled light... :/
 

ganjamystic

Well-Known Member
I realize now that I didn't save any money and definitely cost myself a lot of time by trying to buy boards and heatsinks and drivers and a soldering iron and all the connectors and cords and everything separately and build this thing myself... I know it's easy and fun for a lot of people, but this was my first DIY attempt and I realize now I'd much rather have just bought a light that was already built by someone who knew what they were doing... or at least bought a kit that was 100% ready to just assemble and plug in with no soldering necessary...
 

pop22

Well-Known Member
Run the wires into a project box and use wagos or wire nuts. Not soldering needed! I mounted my drivers on a board and wired everything there, in project boxes or outlet boxes with solid covers.

is there a trick to tinning stranded wire??? I can't get this to work to save my life... I'm trying to put together my lights, but to connect the power cord to the AC side of the driver using the waterproof connectors, I need to tin the stranded wire on the driver and the power cord. I've literally been trying to get this to work for two days now and I just can't figure out what I'm doing wrong. I've watched youtube videos and looked at several tutorials with pictures online and every one shows the exact same thing and makes it look so simple but I cannot get it to work for some reason!!! I'm trying to heat the wire with the soldering iron and then touching the solder to it but it WILL NOT melt and coat the wire!! I can only get the solder to melt if I touch it directly to the iron, but then it's still really hard to get a droplet to stick to the wire or coat it... it just beads up and drops off.. I've wasted so much solder and I'm losing cm of cable with every failed attempt..... what am I doing wrong here?? I'm using a 55W soldering iron set to 430 C and lead-free rosin-core silver solder that melts at 422 C.... help! I'm so frustrated... I'm literally at the point of wanting to just sell everything to someone who's more DIY inclined because I'm honestly hating this and really just wishing I'd bought a pre-assembled light... :/
 

ganjamystic

Well-Known Member
Run the wires into a project box and use wagos or wire nuts. Not soldering needed! I mounted my drivers on a board and wired everything there, in project boxes or outlet boxes with solid covers.
so it's ok to just twist the stranded wire when using wagos? I'm using wagos for the DC side, but the stranded wire coming out of the driver is already tinned on that side (because I didn't have to shorten the wires like I did on the AC side to try to use the waterproof connector) and then I'm using 18awg solid core wire to connect the driver DC to the boards... I was wondering if I could just twist the wire really well and use the waterproof connectors without tinning the wire... but everything I read online seems to suggest this would be unsafe because a stray stranded could cause a short or something like that....
 

ganjamystic

Well-Known Member
You probably shouldn't be tinning stranded wire.
you mean me specifically because I have no idea what I'm doing? or in general?... because everything I'm reading online says to twist and tin stranded wire before inserting it into a connector where it has to be wrapped around a screw or tightened down with a screw like in these waterproof connector things...
 

ttystikk

Well-Known Member
I realize now that I didn't save any money and definitely cost myself a lot of time by trying to buy boards and heatsinks and drivers and a soldering iron and all the connectors and cords and everything separately and build this thing myself... I know it's easy and fun for a lot of people, but this was my first DIY attempt and I realize now I'd much rather have just bought a light that was already built by someone who knew what they were doing... or at least bought a kit that was 100% ready to just assemble and plug in with no soldering necessary...
Did you try a bit of flux on the wire to help the solder transfer?
 

ganjamystic

Well-Known Member
I mounted my drivers on a board and wired everything there, in project boxes or outlet boxes with solid covers.
even more stuff I would have to buy!!.... the whole point of my decision to DIY was to save money, but I've ended up spending even more than if I'd bought something pre-built...
 

wietefras

Well-Known Member
you mean me specifically because I have no idea what I'm doing? or in general?... because everything I'm reading online says to twist and tin stranded wire before inserting it into a connector where it has to be wrapped around a screw or tightened down with a screw like in these waterproof connector things...
Well it depends on the application, but for instance for use in screw terminals you shouldn't tin the strands.

Tinned wire can work itself loose under screw terminals.
 

ganjamystic

Well-Known Member
Did you try a bit of flux on the wire to help the solder transfer?
no, I thought that wasn't necessary with rosin core solder... am I wrong?
Well it depends on the application, but for instance for use in screw terminals you shouldn't tin the strands.

Tinned wire can work itself loose under screw terminals.
so it's safe to just twist the wires, insert them into the connectors and screw down then?? I really hope so.. so I can get these things built and hung up already... I'm going crazy over here
 

wietefras

Well-Known Member
no, I thought that wasn't necessary with rosin core solder... am I wrong?

so it's safe to just twist the wires, insert them into the connectors and screw down then?? I really hope so.. so I can get these things built and hung up already... I'm going crazy over here
Yes, twisted is much safer than tinned. Best would be to use end caps, but that requires special crimping tools.

Here is some explanation: http://reprap.org/wiki/Wire_termination_for_screw_terminals
 

Seedjunky

Member
What I told you is correct. Split the DC output with a 3 way wago or the like. Put 2 304 in series first board gets + from driver. Connect first board - to second board +. Second board - returns to driver -. Do this for other 2 boards and your will have 1050 at each board.
Thanks Stephen I'm only use to wiring in series.. never doubted your answer for the record but when searching the hlg website I came across this pic of how to wire and gettin from others opinions is has confused me. Anyways at the end of the day all I'm wondering now ,does this picture from hlgs website accomplish what your trying to explain to me? With the 4802100b. Thanks and final question about this lol
 

Attachments

ganjamystic

Well-Known Member
Well it depends on the application, but for instance for use in screw terminals you shouldn't tin the strands.

Tinned wire can work itself loose under screw terminals.
Yes, twisted is much safer than tinned. Best would be to use end caps, but that requires special crimping tools.

Here is some explanation: http://reprap.org/wiki/Wire_termination_for_screw_terminals
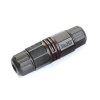
ok just to make sure we're on the same page, these are the connectors I'm using: upload_2017-7-29_16-57-1.jpeg

you're saying the correct way to attach stranded wire to these is just to twist the bare strands and screw them down under those screws with no tinning? I just want to make sure because in LED Gardener's video (which is also on the HLG website), he tins the leads before inserting them into these connectors
 
Last edited:

Tbernard

Member
You don't have to tin them, it's just slightly better if you do.

If you are struggling with the solder gun
Heat it up.
Make sure the tip is completely clean.
Melt a small amount of solder on the tip. <--important, should be shinny
Lay the tip across the stranded wire to maximize surface area in contact for 5-10 sec
Dab the solder to where the iron tip meets the wire and it should flow.
Draw the solder along the wire by slowly running the tip towards the end.
Using a small gauge solder for this helps.

Solder is conductive... it doesn't have to be a masterpiece.

But again, you don't have to tin them
 

Stephenj37826

Well-Known Member
ok just to make sure we're on the same page, these are the connectors I'm using: View attachment 3986662

you're saying the correct way to attach stranded wire to these is just to twist the bare strands and screw them down under those screws with no tinning? I just want to make sure because in LED Gardener's video (which is also on the HLG website), he tins the leads before inserting them into these connectors
Flux is what you need to tin bond. Also the tools you bought will work on the next light and the next one too. As you get into DIY you start learn to DIY other things as well as fix stuff you wouldn't have maybe tried before. I've got small children MR. FIX IT IS MY NAME LMAO.
 

ttystikk

Well-Known Member
Flux is what you need to tin bond. Also the tools you bought will work on the next light and the next one too. As you get into DIY you start learn to DIY other things as well as fix stuff you wouldn't have maybe tried before. I've got small children MR. FIX IT IS MY NAME LMAO.
That's right kids! Break it- and then take it to DADDY!
 
Last edited:

Moflow

Well-Known Member
ok just to make sure we're on the same page, these are the connectors I'm using: View attachment 3986662

you're saying the correct way to attach stranded wire to these is just to twist the bare strands and screw them down under those screws with no tinning? I just want to make sure because in LED Gardener's video (which is also on the HLG website), he tins the leads before inserting them into these connectors
No tinning required
:cool:
 

ttystikk

Well-Known Member
ok just to make sure we're on the same page, these are the connectors I'm using: View attachment 3986662

you're saying the correct way to attach stranded wire to these is just to twist the bare strands and screw them down under those screws with no tinning? I just want to make sure because in LED Gardener's video (which is also on the HLG website), he tins the leads before inserting them into these connectors
I have dozens of these connectors and not one of them is tinned.
 
Top