Dr. Bigbud
Well-Known Member
So I'm cheap as hell and I don't wanna shell out 10 bucks for each duct flange so I made my own. I took some materials that I had laying around and made these strong custom duct flanges for my Hydrofarm reflector, or any reflector for that matter. Check it
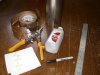
You will need the following tools:
4 inch aluminum duct extension ( at home depot, the sheet can be folded and connected together to make the duct.)
tin snips
straight edge
marker
aluminum tape
rubbing alcohol
paper towel
Optional but might be required: Band aids
Instructions:
Step#
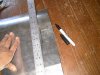
1) measure out about 1-2 inch piece of ducting. Using the straight edge and the marker make a line around the ducting.
2) WARNING! BE VERY CAREFUL WHEN CUTTING AND HANDLING!! PUTTING FORCE ON THE DUCTING CAN CAUSE YOUR HAND TO SLIP AND YOU CAN SEVERELY CUT YOUR SELF, LIKE A 2-3 INCH GASH! HANDLE WITH CAUTION.
Use the tin snips to cut as straight as possible down the line. Connect the sheet into a circle.
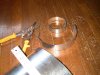
3) With the paper towel and alcohol clean both the nelwy made ring and the area over the reflector where you will attach the flange.
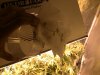
4) Apply aluminum tape and position duct in place. Make sure its a circle and not an oval or your duct wont fit. You can shape it by putting flexible duct on it. Seal all the edges with aluminum tape as neatly as possible. Make sure your press the tape down firmly.

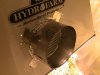

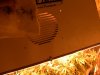
You have now completed Dr. Bigbuds directions to making strong duct flanges. These flanges are when taped down properly will be very strong, you can lift one side of the reflector by the flange and the ring can take the compression of a metal screw down clamp found in hardware stores. I hope this has been useful to you!
Completed setup: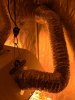
You will need the following tools:
4 inch aluminum duct extension ( at home depot, the sheet can be folded and connected together to make the duct.)
tin snips
straight edge
marker
aluminum tape
rubbing alcohol
paper towel
Optional but might be required: Band aids
Instructions:
Step#
1) measure out about 1-2 inch piece of ducting. Using the straight edge and the marker make a line around the ducting.
2) WARNING! BE VERY CAREFUL WHEN CUTTING AND HANDLING!! PUTTING FORCE ON THE DUCTING CAN CAUSE YOUR HAND TO SLIP AND YOU CAN SEVERELY CUT YOUR SELF, LIKE A 2-3 INCH GASH! HANDLE WITH CAUTION.
Use the tin snips to cut as straight as possible down the line. Connect the sheet into a circle.
3) With the paper towel and alcohol clean both the nelwy made ring and the area over the reflector where you will attach the flange.
4) Apply aluminum tape and position duct in place. Make sure its a circle and not an oval or your duct wont fit. You can shape it by putting flexible duct on it. Seal all the edges with aluminum tape as neatly as possible. Make sure your press the tape down firmly.
You have now completed Dr. Bigbuds directions to making strong duct flanges. These flanges are when taped down properly will be very strong, you can lift one side of the reflector by the flange and the ring can take the compression of a metal screw down clamp found in hardware stores. I hope this has been useful to you!
Completed setup: