DiY LED - Cree XPE XTE XML2 - Luxeon ES - Oslon SSL

Someacdude

Active Member
Another thing, Ive used solder for years to attach heat sinks etc.
Can you get the thing fluxed up and isolated heat the metal base, quickly apply solder and drop the sanded /fluxed led right into the pool of solder?
 
Yeah I have an SMD rework station with hot air that i'd love to put to use to speed up mounting... I believe there is a flux pen that has solder that can then just be heated by hot air... but i'm not totally sure! :). For isolating the electrics I may use "sugru" or something similar which sets to electrically insulating, waterproof, silicone rubber... can make anything for it, custom rubber dampeners or anything :).

And it looks like those flashlights use CREE XP-G2 (which I saw guod mentioned he was using for CW and WW in his next panel although this way back in may) /XM-L2 for Neutral white I believe are good (4200k) and XM-L's appear to be quite good for cool white, warm white & neutral white. A friend actually had a bike headlamp he showed me yesterday (not sure on the cost of it) but it has a CREE-LED which looked quite cold in it and also powered by similar batteries as those torches... although much cheaper I guess because those products are damn pricey :).
 

SupraSPL

Well-Known Member
The XPG2 is pretty sweet relatively speaking but it tends to be more expensive than the XTE and XML2. The XML2 is the the top dog in terms of efficiency so for our application seems the best option.

700mA 50c:
XPG2 R4 bin 4000K (36.4%)
XML2 T6 bin 4300K (43.2%)
XML2 T5 bin 4100K (40.1%)
XML2 T5 bin 3000K (40.6%)

I use the XML2 T5 4100K in all my flashlights. Provides much more usable light than cool whites for whatever reason. I imagine the 3000K would be even better but I haven't got my hands on any of those yet.
 
I really like your ratio/numbers of LED's on each module, I see a large bump in the deep red ratio compared to other panel arrays whilst still hitting a little of that green and yellow area (from a guess, but not comparison individual chip data :( lol.). I've added it to my thread ish... as much as I could with rubbish web tools and not being able to select 1.5 blues to get the ratios lol. I'll go back and pay more attention to the way you've laid it out to. Heavily weighted to flower I imagine :D. Sure with a few less of the reds running it may be suitable for vegging though?
 

glennorch

Active Member
Amazing pannels man! That's a huge heatsink... what's the size you need to keep 50w of leds at such low temperatures?

Vibes! :)
 

SupraSPL

Well-Known Member
with a few less of the reds running it may be suitable for vegging though?
Yes those are definitely geared toward flowering. I have seen great results with 600 HPS I wanted to recreate that spectrum but with lots of extra blue. The difference in trichomes is night and day when the same cuttings are compared.

Vegging is what LEDs do best. You are correct I just added more blue for the vegging spectrum and used heatsinks with shallower fins to spread the LEDs out more. Since the XML2 T5 4200K have come down in price I am thinking they will really help out the vegging lamp gain in efficiency. I will swap out the XTE WW and put in XML2 NW. Some of my vegging lamps need to be updated anyway so I will experiment with that after the flowering modules are all complete. Only 5/12 flowering modules running so far, lots of work to procrastinate.
 

SupraSPL

Well-Known Member
Thanks GN how are yours coming along? I use 110cm2/watt and those heatsinks are 5450cm2 each. I was getting heatsink temps of 38c but at one point I removed 2 reds and now heatsink temps are about 30c. That is a huge drop but the incoming air is slightly cooler this time of year too.
 

budbro18

Well-Known Member
Looks awesome! i was gonna DIY but ended up just grabbin some multichip or cob boards i found that were a pretty good price. I like the diy stuff and it looks like its growin really well!

Subd for this one
 

Someacdude

Active Member
Btw, thanks for getting the entire list together, i have no problem with the soldering and fabbing, i just had no idea what to use, how do you like them so far?

I cant remember what a 4x8 sheet of diamond aluminum cost be last time but im thinking about just taking the whole ceiling space with a couple lol
 

SupraSPL

Well-Known Member
Someone was asking about the driver boards. This one handles ~350 watts. Large LED setups can easily become a rats nest of wires. This barely helps keep it under control, Ill take what I can get. The drivers do get very hot and it is nice to have them outside the grow room. Each driver can be turned off by disconnecting the hot wire but I did not bother putting a switch on each one because I intend for them all to be in use once all the modules are finished. I used bare .25" slider connectors and crimped each by hand, tested to make sure there are no loose connections then wrapped in heat shrink.
IMG_9629a.jpg

Just above the frame of the picture each driver is connected to a pair of wires by another set of slide connectors and a 1 amp ATC fuse is inline on the led string. The wires are are all color coded so I know what wire goes to which module in the room.

I ordered all the wiring, shrink tubing and connectors from elecdirect.com. It is a much cheaper and more compact approach than using wall plugs and switches for each driver. It is also much cheaper than using molex connectors. Molex is awesome but I have several hundred of connections.
 

budbro18

Well-Known Member
Lookin good! all you need is a tent to really maximize your lights.

I see you dont have any fans on the heat sinks. Are they just big enough not to need them or are heat sinks just for extending the life of some??
 

CannaBare

Well-Known Member
Figured it is about time to update the original thread. The total project will be 750 input watts. Actual LED dissipation will be about 600 watts. Total cost for materials was about $2500. The goal is to replace a pair of 600 HPS to reduce heat and increase yields a bit.

There is also 100 watts of LED for vegging. Surprisingly this is more than enough to veg for a 2400 watt flip flop HPS grow.

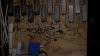
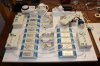
The heatsinks are from Heatsink USA and they are getting more expensive over time but still the cheapest I have found. I use passive cooling and shoot for a Tj of 50c so the heatsinks are huge (110cm2/watt). The drivers are from ebay and Fasttech, all 700mA. Leds were ordered from Cutter, Steve's LEDs, LEDgroupbuy, Fasttech and ISLED. Wiring, heatshrink tubing, slide connectors, fuses etc from Elecdirect.

This is the layout of one 50w module. Everything is running at ~700mA. Amazingly heatsink temp has been about 35c or less. Incoming air is 22C and canopy temp is 28C with a bare 600 HPS in the room.
(8 ) Cree XTE warm white R3 bin (32%)
(3) Luxeon ES deep blue M4R bin (55%)
(6) Cree XPE 630nm red P3 bin (42%)
(2) Luxeon ES deep red EX6 bin (38%)
(2) Luxeon ES deep red EX7 bin (38%)
(6) Oslon SSL deep red 3T bin (42%)

View attachment 2903195View attachment 2903214

The reds are all on the same string and the white/blue is on its own string. So there are (2) drivers for each module (24) drivers total.

This design is already almost outdated since the XML2 have come around but they are only slight improvements so I will probably complete the project as is for now.
Hey Supra, quick question how did you pick what amperage to run the LEDs at? AND when designing the light how did you calculate par levels?
 

SupraSPL

Well-Known Member
Lookin good! all you need is a tent to really maximize your lights.
I see you dont have any fans on the heat sinks. Are they just big enough not to need them or are heat sinks just for extending the life of some??
This is an 6X6 tent but its a 4X4 canopy in the corner of the tent so it only benefits from 2 reflective walls. I considered adding something to help with reflection toward the top of the canopy. It should be possible without interfering with airflow too much.

The heatsinks are sized based on the overall efficiency of the emitters and dissipation wattage. My target junction temp is about 50c. I chose 50C on the theory that it is a good value point in terms of longevity (lumen maintenance) and efficiency. This is especially important for the reds. So I am using 110cm2 for a 41% efficient lamp and getting max heatsink temps of about 35c when the HPS is also on, 30C if the HPS is off (incoming air is 22C, ambient is 27C). So it was designed for passive cooling but in practice the heatsinks do get some airflow from the circulation fan (a 55w ceiling fan in each 8X8 tent).
 

SupraSPL

Well-Known Member
Hey Supra, quick question how did you pick what amperage to run the LEDs at? AND when designing the light how did you calculate par levels?
I chose 700mA based on a value point in terms of efficiency, led cost and how far I could reach into the canopy. It is also convenient that there are many affordable 700mA constant current drivers to choose from.

Originally this formula came from KNNA. He based the design on an estimation of PAR watts by calculating radiometric efficiency from manufacturer data sheets, although he did some radiometric testing and last I heard from him he was building an integrating sphere. Since we no longer have his guidance, I have been updating the formula based on the data from the best LEDs available to us.

It is easy to calculate for deep red and deep blue because manufacturers give us the output in watts. But for LEDs that use lumens we are forced to estimate and convert to watts using LER. Lumens are weighted for human vision so we have to unweight them and convert to watts or PPF. For 630nm reds this is reasonably simple but in the case of white LEDs this becomes a calculus problem. KNNA and I have always estimated the LER for various whites but Mr Flux actually did the calculus and conversions which is a great service to all of us DiYers!

As far as absolute PAR at the canopy (PPFD) I have never measured or calculated it (I will in a moment). KNNA used to guide us by recommending a certain dissipation wattage per sq ft of canopy, based on his early lamp designs. He pointed out that lower wattage was more efficient but for higher yield in a limited space or if larger colas are desired, we could increase that number. Of course our lamps are more efficient now (41% vs 26%) so those numbers needed to be updated.

Further complicating things, I move each (50w) module up and down and change their angles as needed. I also change the canopy from time to time by bending colas or tying the plants so this is very much an estimation. Ideally I would use 300watts of LED dissipation for a canopy of about 3'X3'. So that is 33w/sq ft. or 300W per m2. Since the lamps are 41% efficient, that works out to 123 PAR watts/m2 (a bit less due to stray photons).

In order to take this any further and convert to PPFD, we would need to take spectrum into consideration again. It could be done on paper but to verify all these estimations we need a very accurate way to measure the SPD and the photons in each part of the canopy. At this point I invoke the law of diminishing returns and I find it much cheaper to use empirical testing instead. In other words, this level of light will yield 2X or more the grams per watt of a bare 600 HPS and nug size is comparable.
 
Top