If you dont mind spending a few dollars for quality and ease of construction, I like what I just built today (everything at Lowes unless noted):
Base is a red cedar post cap, Maine Ornamental Newport (4x4, flat top) $8.57
Utiltech 120 V 20 watt puck light $9.32
FEIT 100 watt halogen bulb G8 base $4.98
Lutron Slide Dimmer for CFL/LED/Halogen bulbs (this plugs into the wall, and the puck light plugs into this) $12.97
Inhalation tube (you could use a whip, but I just plugged in an 18" vinyl tube) $.40
3 inch stainless steel chinoise (fine mesh strainer) $6.95 chefstoys.net
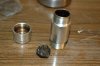
The secret ingredient: 3" diameter x 1.75" stainless steel ring $4.80 chefstoys.net
Optional: Cooper DPP300W thermometer $22.10 chefstoys.net
Cost: $60 plus the thermometer if you want to use it.
Oxo Pop .9 qt acrylic container $10.99 Bed Bath Beyond
Tools:
Drill with a 2.5 or 2.75" hole saw and a bit that your tube will fit snugly in (1/16" narrower than the OD of a flexible tube or the same size for a stiff mouthpiece/tube)
Razor blade
Heavy duty bolt cutter or Dremel with a metal cutting blade
Optional: Circle cutter (I use a Dremel plunger router attachment)
Optional: 1/32" drill bit
Construction (time about 15 minutes because everything fits so well)
Drill a 2.5" hole in the center of the post cap, and cut a notch in the base for the cord from the puck light (razor blade, drill or Dremel sander)
Optional: Cut a 3" round groove centered on the 2.5" hole in the post cap, this holds the Stainless Steel ring in place, but isnt necessary if you arent prone to knocking the base
Cut a small piece (1/16" or so) from each corner of the top ledge of the post cap with a razor blade.
Remove the protective cover from the puck light and change to the 100W bulb
Drill a hole in the side of the Oxo Pop near the bottom (top when inverted onto the base)
Cut the chinoise" handle and "lip rest off", leaving about 3/8" on each side
Optional if your anal about temperature when your using it: Drill a 1/32" hole through the oxo pop and then through the Stainless Steel ring, right at the level of the top of the post cap. (Place the ring on the post cap and then invert the oxo pop onto it, drill the oxo pop and mark the ring, take the ring out and drill it separately)
Assembly:
Plug the puck light into the dimmer, turn the dimmer all the way off (push the slide toward the cord end) plug the dimmer into the wall
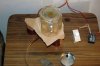
Place the post cap over the puck light, cord running through the notch
Place the stainless still ring in its groove, or center over the hole in the post cap
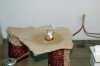
Place the chinoise inside the ring. Place whatever you're vaporizing in the chinois
Insert the tube/whip into the oxo pop
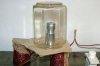
Invert the oxo pop onto the post cap. It will just fit (with the corners nipped off) and is pretty stable. You have to orient the chinoise handles diagonally inside the oxo pop)
Slide the optional thermometer into its holes.
Turn the dimmer up to about 80-85% and after 4-5 minutes you're ready to go with some very awesome vapor.
Assembled in this way the chinoise sits pretty far above the bulb. This keeps it from burning at the bottom. Meanwhile the stainless steel ring that surrounds the strainer heats up and supplies extra heat to vaporize all around the product. It also draws some heat away from the puck light and the wood base (though you may want to wet the base before each use so the base doesnt burn.) The hole for the puck light allows enough air if youve got good lungs. If not a couple of notches around the bottom of the post cap (like the cord notch) will make an easier draw. You could also drill an air hole or two vertically throught the post cap inside the dimensions of the inverted container.
I found at 80-85% of full power the interior of the strainer heats to 350 degrees F and maintains that temperature very well. If you dont use a thermometer you can judge by condensation inside the container vaporizing. You'll have to play with it a little if you dont use the thermometer while vaping. The container doesnt get hot at all, so any concern about using an acrylic container is off base imo.
Everything that gets very hot and/or touches your product is stainless steel, no aluminum
 56.5 KB Views: 367
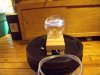 58.7 KB Views: 365
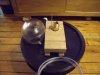


![IMG_0399[1].jpg](/data/attachments/450/450142-a6f507132e48fe4c15377b26d1f89dcd.jpg)
![IMG_0400[1].jpg](/data/attachments/450/450143-cb4622ab6eae87ba00c590edeb99dc97.jpg)