DIY Flower Room w/pics from start to finish

GroErr

Well-Known Member
Hi all, recently finished my flower room. Thought I'd post the build/pics, perhaps give some folks ideas, I know I picked up a bunch of ideas from others here, used some as-is, modified others. Found it helpful having so many builds/pics in here, hopefully this will trigger some creativity or get you up off you ass and get'r done - lol

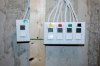
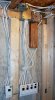
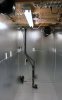
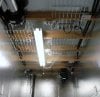
I'm in this house for probably 10 years + so was not concerned about spending a couple of dollars and some time to put this together. Tearing it down will be a pain, mainly the electrical, as you'll see I went a bit overboard with that. But whatever, I wanted a nice and functional room so I can concentrate on growing vs. maintenance.

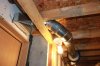
Disclaimer: I am by no means an avid DIY guy. In fact 90% of stuff I need I "outsource", aka I'm a lazy bugger and would rather pay someone to paint, do flooring, fencing, whatever. For obvious reasons, I needed to keep this build quiet, so my typical "outsource" arrangement and calling contractors was not an option. Everything in here was built using some existing, basic tools I had on-hand, circular saw, level, a square, hammer, drill, screw drivers etc., nothing fancy and can't think of anything other than materials that I bought to do the build.

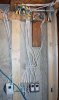
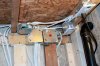
That Google dude was my best friend as always. That's how I learned to do my electrical which was the most difficult and time consuming, had never touched an electrical panel, switch, wired anything, ever :) The rest was basic measuring, cutting, and a lot of planning before those cuts happened!

Total Cost: $1,100 for the room build, that doesn't include my existing lights/equipment which were around another $1,000 in lights and various peripherals. I had spent another $250 building a DIY cabinet (2'x4'x5.5') prior to this build which will now be my veg cabinet. Took me about 4 months from start to finish, a little at a time and bought materials incrementally so basically out of pocket.

Ok, here goes, first couple of pics, before and after, plus first/current runs in the new digs. Will post several other posts with pics of the build to get around the 10 pics/post limits. Will comment on the design/build details in those follow-up posts.

Feel free to ask/comment/hate, I'm easy, and thick skinned for those haters out there - lol

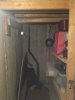
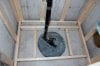
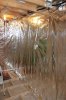
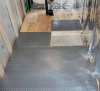
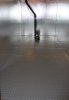
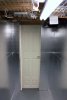
Before: A totally useless cold room in my basement, typical storage area, storing useless crap...
01-Cold Room - Before.jpg

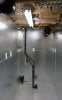
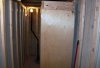
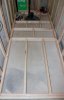
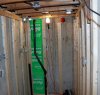
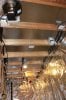
After: 4' W x 9.5' L x 7' H Zen Room :)
41-Flower-Room-Finished!-1.jpg

First Run (now curing):
44-Flower-Room-UpAndRunning.JPG

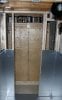
Current run, still vegging this for a couple of weeks in here, using the veg cabinet for clones and waiting for some new lighting (CMH + DIY LED's next run):
2xBB-2xPPP-1xJTR-Snapshot-Week6-Veg-1.jpg

Cheers :bigjoint:
 

GroErr

Well-Known Member
So, the room I chose had a couple of challenges but also some nice benefits.

Challenges:
Sump Pump hole/pump which for practical reasons cannot be moved. Concerns here included trying to maximize the floor space, and possible humidity issues from having water in the room (sump pump hole always has some water in the bottom). Additonal issues were good/bad, the fact that it's a cold room in the basement can be both good and bad. Good, it's cool, bad, it's way too cold with 9" concrete walls and poured concrete ceiling, particularly in the winter. Temps where I am can fluctuate from highs of 100+F in summer with very high humidity, to -30F in the winter with extremely dry air. Also had to be concerned with the flooring being too cold, so built a sub-floor to elevate the plants and maintain acceptable root temps.

Benefits:
The sump pump/hole gives me some options for draining e.g. I have a dehumidifier in there for the summer months as humidity averages 70-90% outside. i simply hooked up a drain hose to the drain pipe so no worries/maintenance for the dehumidifier. Also allows me to use this as a drain if I ever decide to try any form of hydro grows. As you'll see, I also allowed a couple of false floor spots, where I would put a res or two, directly on the concrete floor to maintain cool res temps. For some reason, when they build these cold rooms, they tend to put a vent in, NICE, had an existing 4" hole in the top-right-back wall venting outdoors :)

In the end, I decided that the room had to be well insulated to reduce the extreme weather/seasonal fluctuations. The native/bare room never got too hot, but hot enough at 73F max., and did fluctuate with temps and outdoor humidity (put temp/humidity sensors in there for a bit to gage what I was dealing with). Plus in the winter, that room got down to 48F at its coldest, not good.

Insulation/heat/humidity controls designed into build:
  • A sub-floor to keep the plants off the concrete floor. To allow for future hydro/aero, 2x false floor panels were designed to slip in/out as needed about 1/2 way into the room.
  • Both outside walls and ceiling (ceiling has outside exposure as it's the concrete pad for the sliding door entrance at the back of the house) were insulated with 1" DuroFoam insulation which has a reflective vapour barrier for use with concrete/basement walls. You'll notice the inside walls are this material as well. So the outside walls have 1" with the vapour barrier facing the concrete, plus 3/4" flipped inside-out, acting as both insulation, and the reflective surface for the inside/concrete walls. In between the outside insulation and inside insulation is yet another reflective vapour barrier to seal everything off. I used the 3/4" insulation with the reflective surface facing in for the ceiling as well, not needed but looks cool and makes the room real shiny like - lol
  • To be able to insulate (and to attach things later), I needed to stud the walls. But because the room was narrow (53" wide inside the bare walls), I studded the 2x4's flat to the wall. Pain in the ass but gained about 4" in width of the overall finished room. Had to drill pilots and use concrete screws for every hole in the studs attached to the concrete walls, don't want to do that again for a while :(
Here are some of the pics related to the initial phase of getting the room studded and the sub-floor. At least one pic has my original DIY grow cabinet in there as it was running a cycle and I had to work around it until it was finished. That cabinet now sits just outside the new room, with just enough room in between the new room and the cabinet to open the doors of either room, and use it for some storage, and drying between runs when both rooms are in use.

Notice the framing around the sump-pump, there is method to my madness. It was framed that way so I could maximize the floor space, ended up building removable inserts so if I ever need to replace the pump or do any other work in there I can do it without ripping things apart. About 1/2 way into the room, the floor frame has 2 slots/boxes framed, they hold removable panels, allowing me to sit a res or two directly on the contrite floor to keep the temps down. You'll see them in posts to follow when I get to installing the flooring.

Once the sub-floor and walls were studded, I started on the electrical (next post).

02-Walls-Studded.JPG 14-FloorFrame1.JPG 16-FloorFrame3.JPG 17-Sub-Floor-Frame-Finished.jpg
 

GroErr

Well-Known Member
Next came the electrical rough-in. This was the most time consuming as I went a little overboard but I wanted safe electrical, convenience, and I prefer timers to automated inbound/exhaust controllers, particularly where I am where the temps and humidity are so extreme. I found that using controllers (e.g. I have a Titan humidity controller) I don't always get the air exchange I want, if temps or humidity don't drop/fluctuate much, I'm not getting fresh air into the room, or at least not as much as I prefer. So I used timers. But not cheap timers or at least not cheap/unreliable timers. Plus most mechanical or digital timers that plug into an outlet have limitations, whether it be the number of programs, or capability/handling of AMPS/Wattage, or both.

My solution/design was to use 120v direct-wired in-wall timers. I chose the Levington Vizia series which can handle up to 1800W/15A per timer, can operate LED's, CFL's, CMH fixtures, as well as of course inline fans, pumps etc. They run about $33/each so not bad, can handle up to 50 on/off programs per 24 hr period, and have an override function (either on or off) by simply pressing the pad and holding it. They're also super-easy to program, I can literally change 24 programs in less than 3 minutes now if needed. In total I have 5 of these installed/wired controlling 16 outlets throughout the room. All outlets are at 4ft off the floor, or in the ceiling for safety.

The electrical design includes the following:
3 separate 15A/120v circuits coming from the main panel, split to handle loads and spread them throughout the circuits. So one is dedicated to lights only, another is split between circulation fan plugs and exhaust/dehumidifier plugs, another for incoming air/inline fans and future pump outlets.

Where it got elaborate/complicated was the next phase in the electrical design. I f'n hate extension chords, bare wires and even power bars hanging around the plants/water, just scares me plus looks like crap. So I wired a total of 16 outlets throughout the room. Some standard outlets for miscellaneous stuff, or plug-in timers I may want/use for specific things from time to time (e.g. playing with 730nm initiators next which only need to come on for 10 minutes at the end of a light cycle). The rest of the outlets are wired through a timer dedicated to specific functions and colour-coded accordingly. I mentioned 5 of these in-wall timers, there's one for lights which goes to 4 dedicated outlets assigned to lights throughout the room, one timer for inbound air from the house (covered later), one for inline exhaust fan, one for circulation fans, one for pumps later or using it for whatever on override. Each one of these timers controls the outlets associated with them, so when the lights come on, the timer triggers the outlet itself to on or off mode, not the devices. So for instance, 4 light outlets, can have 4 LED panels attached in different areas of the room, the timer is set once to say 12/12 and all lights connected to the red outlets come on/off at the same time. Works fantastic, only limitation is that with LED's the total load on that timer has to be less than 800W actual load, doubtful that I'll exceed it but all I'd do is add another circuit/timer and split the loads.

Here are some pics of the electrical rough-in, timers etc. Notice the colour-coded outlets, they are assigned back through the wiring to specific timers. Remember, all timers/outlets can be on override on or off by simply pressing and holding the appropriate timer button...

04-Electrical-Rough-In-2.JPG 06-Electrical-Rough-In-4.jpg 07-JunctionBoxes-Done.JPG 08-Timer-Panel1-Done.JPG 09-Timer-Panel2-Done.jpg
 

GroErr

Well-Known Member
Heating and Air Conditioning:
At the beginning of last winter, around December the veg cabinet in the uninsulated concrete room got really cold during lights out, like down to 55F. To get the temps back up to 60F I tried a little block heater, good one, but 1500W with low/medium/high settings. I had an energy usage meter and plugged it into the timer while it was maintaining the temps at 60F. Would have cost me $60-$80 a month to heat with that thing. That's when I decided I'd tackle tying into the furnace plenum, I could then extract/pull filtered furnace air into the room.

There's s small header above the door coming into the cold room from the basement. Framed 2x4 construction, drywall. I cut through there to access the furnace plenum, cut and installed a vent, reduced down to 4", extended it to the room. Cheap, heat in the winter, air conditioning in the summer. Costs me about $10/month if I run the inline fan 24/7, which I rarely do, usually on a timer so probably runs $5-$6/month :)

Incoming fresh air:
I extended the vent into the new room through the side wall with standard steel venting rubs and elbows. Built a frame for it in the side wall, sealed all around it with insulation and spray foam insulation for a good seal. The inline fan never runs on anything but the lowest setting on the variable controller and brings in nice clean/dry air, makes it easy to maintain temps and humidity. I installed an inline and an external dampers to make sure there's no chance of back-draft into the house.

Exhaust:
With the 4" vent going outside I mentioned earlier, on the far top-right side of the room, opposite the incoming furnace air, it creates pressure and naturally sucks air out the vent going outside. This makes the inline exhaust very efficient, never get overworked. The 4" exhaust always runs on the lowest setting for the variable speed controller.

Here are some pics showing the vents/plumbing I'm referring to above. First pic shows the vents coming in from the furnace, second shows the finished vents. Incoming top-left, exhaust bottom-right:
13-AirCond-Heat-Intake-FomFurnace.JPG 42-Flower-Room-Finished!-2.JPG

Insulation, vapour barrier and inside wall with door frame roughed in:

Once the electrical was done and tested, I got to the insulation. Insulated only the outside walls and ceiling, any exposed to anything from the outside. If needed the DuroFoam inside "walls" are easy to remove, insulate the inside walls and put them back in a matter of minutes. So far, maintaining temps and humidity through the winter, spring, and now some days have hit into the 90's has been easy. Towards the end of last run I had to move two additional plants into the corner and was running 600W of actual draw in LED's with absolutely no issues keeping the temps and humidity where I wanted it, looks great so far.

Then I built the frame for the wall and door. That's the only inside wall. Mainly for noise but also to fully enclose/seal the room other than incoming air and exhaust inline fans. Insulated the two side walls between the opening for the door with 3" styrofoam insulation.

For the inside wall, I also sprayed that expanding foam insulation along all corners where the studs touch the walls, and above the door/wall frame.

Some pics showing different stages of insulation. The reflective stuff is the vapour barrier, I was like $80 for a roll 104' x 52", could be used as-is, I used it to re-line my veg cabinet around the inside 2x4 construction, very pliable and easy to work with. The reflective DuroFoam insulation is much better though, it's like a mirror when you step back a foot or two from it. There's a pic showing the insulation in the ceiling, every surface in the room is pretty well reflective:
19-Insulation-Start.JPG 25-Wall-Insulation-1.jpg 27-Vapour-Barrier-Finished-1.jpg 29-Insulation-Ceiling-Finished.jpg 37-InsideWall-DoorFrame.jpg 40-DoorFrame-InsideWall-3inInsulation.jpg
 

GroErr

Well-Known Member
Sub-Floor and Flooring:

Next the floor sub-floor was installed and flooring. The flooring is that heavy vinyl flooring used directly on cement, like garage floors, it's tough, should last a while and easy to clean. It took a bit more work to do the sub-floor and flooring because I wanted those removable panels in the floor. Plus the sump pump needed removable panels for maintenance. Worth the flexibility though later.

Pics of the flooring stages:
30-SubFloor-ResCover1.jpg 32-SubFloor-Sump-Cover-1.jpg 34-SubFloor-Finished.jpg 36-Flooring-ResCover-1.JPG

Flooring Finished and Initial Lower DuroFoam "Walls" Installed:

At this point I had some plants ready to go into flowering. I kept the cycle at 14/10 for about 8 days during daylight hours so I was able to finish the inside wall, seal it, put the ceiling racks in to hang the lights, and hung the door.
Left it at this stage until I finished that run a couple of weeks ago. Then finished the rest of the walls, sealed all cracks, cleaned it up and put the current set of plants coming up.

Semi-finished room for first run:
38-Flooring-LowerWalls-Finished.jpg

Finished Room last weekend:
41-Flower-Room-Finished!-1.jpg 42-Flower-Room-Finished!-2.JPG 43-Flower-Room-Finished!-3.jpg

Snapshot today from the Foscam monitoring camera with the next run coming up in two weeks or so with a new Sun System LEC 315w Light Ceramic MH Fixture 120v, will be adding some LED's for side and end lighting, running about 500W of combined 3100k CMH Philips Elite Agro and LED's. Should produce some nice bud :)
2xBB-2xPPP-1xJTR-Snapshot-Week6-Veg-1.jpg
 

GroErr

Well-Known Member
Some additional details on equipment for monitoring and maintenance that make my indoor growing environment a little easier and tips based on my first year's experience indoors. I had grown for years outdoor but other than growing mom's/clones for outdoor had never completed full rounds including flowering until this past year.

Vegging Lights:
Pretty well any light can veg. CFL's, LED bulbs, Fluorescents (T5's etc), LED's, MH, HPS whatever.
When I decided I would grow indoors, the timing was right to try newer techs. Tried a few different cheap/Chinese panels. Even the worst of the Chinese panels vegged well. The only real caveat with LED's is longevity and warranty. In my trials I found the following panels which veg very well, at a low cost both to purchase and operate.
LG by TOPLed
IMO, for vegging, which is when you're running your lights the longest period, thereby paying the most in hydro/KWhr's, the LED's are my top choice. Besides being efficient cost-wise, they produce tight nodes and are great for training shorter but thick/bushy plants. My son has used T5HO for vegging and HPS for flowering for about 10 years (that he'll admit to - lol) and based on what he's seen with my grows, has recently switched to LED's for veg, he'll be using HPS for flowering until he sees the results of my latest acquisition (Philips/LEC CMH) and my soon to be built DIY Cree LED panels.

Flowering Lights:
That said, I wouldn't recommend these or any low-end LED panels for flowering based on my experience. They can produce buds, even these LG panels, grew out some beautiful plants, lots of bud sites etc. BUT, the yield was low due to the buds being "fluffy", no density, no weight. So unless you're Ok with small yields e.g. personal grow in a small closet/box, I'd recommend you look at alternatives, or go with proven flowering panels like Area 51, Apache Tech or Hans. There are a couple of relatively newer kids on the block that spec-wise look like potential winners, those include the Onyx Bloom panels (all CREE, 2700k), and EShine Growsun panels, both are in the higher price range though, similar to Area 51 which has been proven to produce many times by many growers right here on RIU. And cannot leave out DIY panels in this group, if you're willing to roll up your sleeves and get your hands dirty a bit, the Cree 3070 COB's are relatively easy to work with and build yourself a quality panel.

After my first year and testing a few different configs, my go forward lighting technology will be the LG LED panels for vegging, and a combination of the Philips Elite Agro CMH, and DIY LED's with Cree 3070 COB's. That combination are about the most efficient lighting available right now and should produce a good blend of quality bud, plus reasonable yield. Of course this changes but after a lot of research, these are about the best options out there as alternatives to traditional hps/hid. Not knocking hps/hid as they're proven producers, they're just about the most inefficient (cost per KWhr used, PAR, heat issues) technologies out there and difficult to manage from a heat perspective, particularly in small grow areas/cabinets.

Cooling/Heating/Humidity Management:
I have to mention timers again here. Cheap timers can ruin or affect your grow. Do not cheap out, if you want digital, spend a couple of dollars on good one's, otherwise stick to mechanical timers and find some recommended brands.

In my case, using LED's for veg and LED/CMH combo for flowering, serious heat management is not an issue. I can easily manage the environment in this 4x9.5x7' room with 4" Inline Fans. If there's one thing that I spent some effort/time on and would recommend highly is to somehow tie into your house furnace/air conditioner. I now it's not always practical or doable but it's the most efficient, low cost and reliable method to get clean/fresh air into your room and cool in summer/heat in winter, hands down the best option if you can manage to tie into it. For inline fans (incoming and exhaust) I didn't buy anything special, a couple of inline Fans w/variable controllers off E-Bay from a Canadian supplier for about $100/each including shipping. One I've had for over a year now and it's just as efficient, no noise increases or performance drops. I highly recommend the variable speed controllers for Inline Fans. For the most part they can be used on their lowest setting and save a lot of power/draw. When needed, all you have to do is crank the variable controller as needed and use extra power only when you need it (e.g. summer months).

For humidity, there are basically 3 ways to manage it. Bring in drier air, exhaust as much as possible, or use a dehumidifier. I really don't have much to worry about as I'm pumping fresh and dry air in from my furnace/house so if I need to drop humidity more I can just crank up the Inline Fan bringing fresh air in and drop the humidity. For a backup or to deal with the summer months where humidity here shoots up into the 90's, I bought a single hose relatively high end portable air conditioner/dehumidifier combo with direct drain into my sump pump hole. Reason I bought this one was that it cost me $225 CAD at factorydirect.ca so was about the cost of a decent stand-alone dehumidifier. I don't use the air conditioner as I have no need for it, and the single hose portables are not very efficient at air conditioning. The unit is set to permanent dehumidifier mode, drained into my sump hole, but exhausted outside through the single pipe. This is why I bought this one, with a regular dehumidifier, if you need to have it on, it will bring your temps up as the air is expelled right back into the room. So if you think about it, at the time when humidity is at it's highest (summer) you're bringing your temps up further, not good. The model I have is a Haier CPRB08XCJ, it's efficient and works well for a dehumidifier, wouldn't recommend it for an air conditioner as single hose portables are not the most efficient out there, if you go portable for air conditioning, look at dual-hose units.

Environment Monitoring:
Monitoring your temps and humidity can be as simple as a $5 hydrometer/thermometer. However, this requires that you either place it and have a camera monitoring it, or checking during lights-on, and lights off to understand the fluctuations and factors affecting those fluctuations. To really monitor and understand what factors affect your temps/humidity though, I'd recommend some form of digital/electronic thermometer/hydrometer. If they can log data, even better. It's amazing the many factors that can affect your temps and humidity, like changing lights, outside conditions, a fan gone bad, watering your plants, etc., etc.

In my case I settled on the La Crosse monitoring sensors early on and I'm glad I did. I have 3 of them now monitoring 3 different tents/cabinets/rooms. They are priceless if you want to understand and make informed decisions on heat/humidity management tactics. I've monitored and reviewed data for so long now, I can tell if something's gone wrong by just checking my iPhone, iPad or computer and looking at the real-time display/data on these La Crosse monitors. Sometimes I don't even have to check, the monitors are cloud-based and send data to the servers every 15 minutes (adjustable to whatever increments you want). If your temps or humidity go out of a set range (e.g. above 85F, or above 65% humidity), in my case also I have a water monitor in the new room that can monitor if say the sump pump breaks and water seeps onto the floor, it can send you a text, email or both. Very nice feature to have and can save your grow, have had a couple of times when timers broke and I was able to tell immediately that lights hadn't come on by the temperature in the room. In addition to live monitoring/controls, I download .csv files weekly and import them into an Access database for history, handy when you're reviewing a grow later. Highly recommended.

Lastly, I use monitoring cameras in 3 rooms. This is just a nice to have but to does save me from going into the room and disrupting the plants unless necessary. I'm in technology so get to write-off anything remotely associated with technology. I settled on the Foscam line of IP wireless cameras as for the price/features they are some of the best out there for the money. They can pan/tilt, take snapshots (including automated snapshots to an SD card in the camera if you put one in), automated and on-demand video recording, infared for monitoring during lights out. They can be monitored/viewed/controlled through any smartphone, tablet, computer. If you're very technically inclined and understand the implications, you can even view/monitor remotely, but beware, hackers are constantly looking for these exposed devices and do so regularly. I have all kinds of security/firewalls and can turn the remote access on by schedules, I typically only turn on specific schedules when I'm travelling and turn it off when I return.

Cheers and happy growing :bigjoint:
 
Last edited:

GroErr

Well-Known Member
Odour Control
Forgot this one which some may find important ;) Nothing fancy again here, I exhaust outdoor and planted a bush where the vent is so it dissipates quite well. BUT, during the last 3-4 weeks of flowering the smell can be over the top and I don't want anyone knowing I grow. For the last 3-4 weeks of flowering, when it starts to smell (of course this will vary from strain to strain), I grabbed a 4" w/2.5" ID filter from the same place I bought the inline fans from, think it was around $50 and works well. I just attach it when needed as it affects airflow so the inline fan has to be cranked up a bit. Tried a HEPA air filter which is OK before they start to stink but once they get to 4 -5 weeks and begin smelling, it just didn't cut it.

That's it, hope this helps some folks with some ideas and options...
 

BobBitchen

Well-Known Member
Sub-Floor and Flooring:

Next the floor sub-floor was installed and flooring. The flooring is that heavy vinyl flooring used directly on cement, like garage floors, it's tough, should last a while and easy to clean. It took a bit more work to do the sub-floor and flooring because I wanted those removable panels in the floor. Plus the sump pump needed removable panels for maintenance. Worth the flexibility though later.

Pics of the flooring stages:
View attachment 3182079 View attachment 3182082 View attachment 3182083 View attachment 3182093

Flooring Finished and Initial Lower DuroFoam "Walls" Installed:

At this point I had some plants ready to go into flowering. I kept the cycle at 14/10 for about 8 days during daylight hours so I was able to finish the inside wall, seal it, put the ceiling racks in to hang the lights, and hung the door.
Left it at this stage until I finished that run a couple of weeks ago. Then finished the rest of the walls, sealed all cracks, cleaned it up and put the current set of plants coming up.

Semi-finished room for first run:
View attachment 3182103

Finished Room last weekend:
View attachment 3182112 View attachment 3182113 View attachment 3182115

Snapshot today from the Foscam monitoring camera with the next run coming up in two weeks or so with a new Sun System LEC 315w Light Ceramic MH Fixture 120v, will be adding some LED's for side and end lighting, running about 500W of combined 3100k CMH Philips Elite Agro and LED's. Should produce some nice bud :)
View attachment 3182116
:clap: sweet...
 

GroErr

Well-Known Member
Hey thanks for the kind words senile, I spent just shy of a year indoor using the original cabinet I built. Lots of learnings/issues, lots of reading (great ideas and resources here) then tackled the build with my wish list in hand, didn't leave much out other than power, wish I had run some 240v circuits. Will take a section of the left wall out (easy enough to remove those foam walls) and run a couple of 240v circuits at some point, things are humming right now so no hurry ;) Cheers...
 

GroErr

Well-Known Member
Very Sweet Build out M8. :clap:

"pulls up a seat"

Looking forward to the rest of the show.

Peace and Great Grows

Asmallvoice
Thanks and cheers, I'll post some updates from time to time like this pic below showing the room in full action now. Funny I posted this back in June once I had it going and got some time to put the pics/update together. Only a few visits and a couple of comments and had pretty well forgotten about it. Then this week I posted a comment/link in another thread and I've had more comments and visits than the last 5 months since posting it - lol

View from the door as of Sunday night with a 3x6' running and new lighting installed. Added the LED panel to 2x LEC 315w CMH fixtures recently. Just trying to see if with the additional reds (only running the 630/660nm LED's) and running it 10 minutes earlier than the CMH comes on, helps with speeding things up a bit and maybe some additional frostiness. I'm loving the CMH and it produces quality buds/frost, but the LED runs I've done have produced the frostiest buds, maybe the combo will produce Nirvana?
3x6-Day11-3x5Gal-Day0-1.jpg
 
Top