HerbalRemedy
Well-Known Member
I just got done with a soil grow. I pulled them a little early (dirt bag seed) but was anxious to get these White Widows in my hydro unit. This entire grow has been as cheap as possible. Its been a work in progress but my little cabinet is getting there little by little. I'll try my best to explain the entire setup for anyone that may be inspired to build your own.
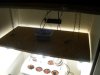
The cabinet was actually from an old floor model television that was going to be tossed. I grabbed it and painted the inside in flat white. I ended up with a grow area of 3Wx2Dx4'H. Plenty big for a personal stash
For simplicity and at the time finances I decided to use compact fluros for lighting. I have a total of ten "daylight"6500K and ten "warm" 2700K fluros. I use the daylights for veg and warm for flower obviously. I used a shelf from the cabinet as a reflector. I attached the bottom of it with mylar and mounted surge suppressors with "socket to bulb" adapters. Hung the entire setup by a couple of chains. The lighting has done excellent in my opinion. I plan on mounting a couple of 35-70 watt hps bulbs in the near future.
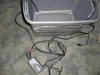
The top of the cab has a four inch hole bored into it and I have a "Stanley Blower" connected via dryer duct sucking hot air out. (The bottom of the cab came with vent holes from the factory i'm guessing) I have a couple of el-cheapo walmart fans in the bottom circulating air. I have to say the exhaust is working great at keeping the temps down.
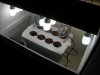
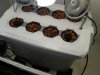
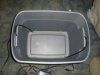
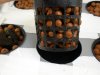
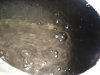
Now for the hydroponic unit. I am using a 10 gallon sterlite plastic tote as the reservoir. I have two "air curtains" from walmart mounted on each side at the bottom. I used 5 minute epoxy to glue the two suction cups that was in the packaging. I tried to use the suction cup by itself but it would not say in place. The tote already had a small hole drill on each side of the handle near the top. I just hollowed it out a bit more and pushed an amount of air tubing in each side and attached this to the air curtains. I connected the tubing to a cheap walmart air pump. I had some 2 inch net cups so I drilled a total of 8 sites in the lid. I needed to make the reservoir resistant to light penetration so instead of paint I wrapped the entire system in duct tape. I went back over the lid with white tape. Not sure if this is going to help but I feel like white is more reflective than gray so what the hell. After placing the cups in and checking depth I can fill the tote with about 6 gallons. I built another tote the exact same way but each lid has two sites for 5 inch cups. So basically I am planning on 4 plants and two systems in this cab at a time.
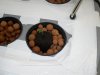
I am using Hydroton Grow rocks and starting my seeds in rapid rooters. Nutrients are GH flora 3 part series. I am using an EC wand to test ec or ppm. I'm using litmus paper with a bottle of GH ph up and down. Right now the ppm of the solution is about 350 and i'm misting the little ones with plain water twice a day until the roots penetrate the resevoir. Ph is about 5 6.0 and has been steady for the past two days.
The two seedlings in the system just sprouted and I have three more in the "gladware" on top of the reflector in the pic about to bust out. All are the WW strain courtesy of my man Dr. Chronic.
Its been a long time in the making and I've had a good time experimenting with this new hobby of mine. Comments and suggestions welcome!!
The cabinet was actually from an old floor model television that was going to be tossed. I grabbed it and painted the inside in flat white. I ended up with a grow area of 3Wx2Dx4'H. Plenty big for a personal stash
For simplicity and at the time finances I decided to use compact fluros for lighting. I have a total of ten "daylight"6500K and ten "warm" 2700K fluros. I use the daylights for veg and warm for flower obviously. I used a shelf from the cabinet as a reflector. I attached the bottom of it with mylar and mounted surge suppressors with "socket to bulb" adapters. Hung the entire setup by a couple of chains. The lighting has done excellent in my opinion. I plan on mounting a couple of 35-70 watt hps bulbs in the near future.
The top of the cab has a four inch hole bored into it and I have a "Stanley Blower" connected via dryer duct sucking hot air out. (The bottom of the cab came with vent holes from the factory i'm guessing) I have a couple of el-cheapo walmart fans in the bottom circulating air. I have to say the exhaust is working great at keeping the temps down.
Now for the hydroponic unit. I am using a 10 gallon sterlite plastic tote as the reservoir. I have two "air curtains" from walmart mounted on each side at the bottom. I used 5 minute epoxy to glue the two suction cups that was in the packaging. I tried to use the suction cup by itself but it would not say in place. The tote already had a small hole drill on each side of the handle near the top. I just hollowed it out a bit more and pushed an amount of air tubing in each side and attached this to the air curtains. I connected the tubing to a cheap walmart air pump. I had some 2 inch net cups so I drilled a total of 8 sites in the lid. I needed to make the reservoir resistant to light penetration so instead of paint I wrapped the entire system in duct tape. I went back over the lid with white tape. Not sure if this is going to help but I feel like white is more reflective than gray so what the hell. After placing the cups in and checking depth I can fill the tote with about 6 gallons. I built another tote the exact same way but each lid has two sites for 5 inch cups. So basically I am planning on 4 plants and two systems in this cab at a time.
I am using Hydroton Grow rocks and starting my seeds in rapid rooters. Nutrients are GH flora 3 part series. I am using an EC wand to test ec or ppm. I'm using litmus paper with a bottle of GH ph up and down. Right now the ppm of the solution is about 350 and i'm misting the little ones with plain water twice a day until the roots penetrate the resevoir. Ph is about 5 6.0 and has been steady for the past two days.
The two seedlings in the system just sprouted and I have three more in the "gladware" on top of the reflector in the pic about to bust out. All are the WW strain courtesy of my man Dr. Chronic.
Its been a long time in the making and I've had a good time experimenting with this new hobby of mine. Comments and suggestions welcome!!
Attachments
-
 36.2 KB Views: 353
 -
 40.7 KB Views: 291
 -
 46.3 KB Views: 201
 -
 52.5 KB Views: 295
 -
 44.7 KB Views: 328
 -
 88.6 KB Views: 260
 -
 44.7 KB Views: 261
 -
 32.8 KB Views: 284