GroErr
Well-Known Member
Have seen a lot of pics here with wiring/extension chords and just downright unsafe environments for CFL setups.
Thought I'd post this to show what you can do, easily, cheaply, safely if you're planning to grow with CFL's. It's not the best I've seen by far but it easy/cheap, effective and safe.
I use LED's for growing but I do use CFL's for my clone tent and plan to use these for additional side-lighting when vegging (6500k) and flowering (2700k).
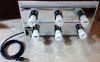
With Y adapters they can fit 12 CFL's per "panel" (I call it the GP-1000 - or Getto Panel 1000). It would be difficult if not impossible to put 12 CFL's of any size and draw even close to 15A so no worries on safety.
Total Cost per "panel", $30-$35, not burning your grow and house down priceless as they say...
Step by step assembly: (Disclaimer: if you can't follow this, buy something, don't zap yourself if you don't know what you're doing)
Voila, you've just built yourself a GP-1000")
Here's one with only 6 lights on, like I mentioned above, add 6 Y adapters and you can have up to 12 CFL's on it
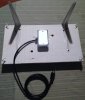
3 of these, one on top, 1 on each side, a couple of clamp-on's and you'll reduce your cabling/extension chord mess, and sleep better at night
Peace brothers and sisters, be safe
Thought I'd post this to show what you can do, easily, cheaply, safely if you're planning to grow with CFL's. It's not the best I've seen by far but it easy/cheap, effective and safe.
I use LED's for growing but I do use CFL's for my clone tent and plan to use these for additional side-lighting when vegging (6500k) and flowering (2700k).
With Y adapters they can fit 12 CFL's per "panel" (I call it the GP-1000 - or Getto Panel 1000). It would be difficult if not impossible to put 12 CFL's of any size and draw even close to 15A so no worries on safety.
- Find a piece of 1/2" plywood, my clone tent is 24"x24", so I made the wood panels 11"x19" to fit 2 in the tent and allow for air movement ($0) had it in the garage
- 2x bathroom light fixtures with 3 sockets each at Lowes, $12/each (they have 4 and I think 5 socket fixtures for a little more if you have the room)
- 1x flush mount electrical box w/cover (safety!) $1.50
- 1x computer power cable w/ground (I have about 10 of them, you can buy a similar chord at any hardware store for $2-$3)
- 2x L brackets $1.50 for both (I use these when I want/need to use them as side lighting)
- 6x Y adapters, ebay, $1.25/each (I bought 2x 10 packs for $24 delivered)
- 4x Hanging hooks w/screw on back-side $1.00 for 10 pcs at the dollar store
- 1x Wiring box clamp (I had some) $.50?
- 3x Plastic wiring screw connectors (I had some) $.50?
Total Cost per "panel", $30-$35, not burning your grow and house down priceless as they say...
Step by step assembly: (Disclaimer: if you can't follow this, buy something, don't zap yourself if you don't know what you're doing)
- Remove the front face from the bathroom fixtures to get at the cabling (pull up on socket covers, then remove one screw on side of each fixture, pull casing up)
- Drill a hole in the back of the wood panel to pass the cabling from the bathroom fixtures through to the back and allow the fixture to lay flat on the plywood. (drill the hole as close to the centre as possible as this will balance the panel)
- Mount the two bathroom fixtures flat on the plywood with 1/2" long wood-screws, passing the cables through the pre-drilled hole
- Mount the wiring box flush to back of panel, punch out one hole to feed fixture wiring through, one hole to feed the power cable through
- Connect the wiring from both fixtures together, cut the female end of the computer power cable to get at the wires and strip 1/2" off each wire
- Connect the joined fixture wiring/cables to the computer power cable, inside the electrical box (black-black, white-white, green-ground), clamp cabling in, screw box into plywood, place cover on the box.
- Screw your hanging hooks into the back side, one on each corner, you'll use these to hang them
- Flip it around, screw the front face plates back on to the fixtures, push the socket face plates back on
- Optional: Install L brackets as you see fit for your needs. I use them (they bend easily) to either mount as side lighting, or they can support the panel on the floor for side-lighting
Voila, you've just built yourself a GP-1000
Here's one with only 6 lights on, like I mentioned above, add 6 Y adapters and you can have up to 12 CFL's on it
3 of these, one on top, 1 on each side, a couple of clamp-on's and you'll reduce your cabling/extension chord mess, and sleep better at night
Peace brothers and sisters, be safe