SheepsBlood
Well-Known Member
Welcome All,
I have grown tired of my shotty plywood creations, grow tents, and anything else ghetto to get me by. I'm going all out on this build. I will be using pre-existing equipment that I have bought over time and incorporating it into this professional build but making sure I can upgrade later when better equipment warrants.
*** Sketch Up Design will be available FREE here once I complete all measurements and create a wood cut out diagram for ease of use for future readers wanting to build my design***
Pre-build Design Phase:
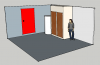
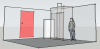
This is my design I created in SketchUp. SketchUp is a free design software which is fairly easy to use.
Ideas for this build:
- Internal will be lined with reflective material I will cut out from my Giant Grow Tent. (I will only cut where needed to prevent leakage of smells)
- Seal all cracks, gaps, crevices with mold resistant white silicone sealant
- Two door construction
- Internal electrical outlets in overhead storage and in ceiling of main grow space.
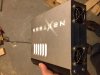
- Above storage for 400w digital ballast
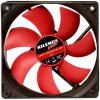
- 4-120 mm Fans for intake of air
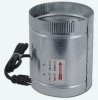
-6" Inline Exhaust Fan ducted through ceiling to attic fan opening (I am going to surround it in insulation to reduce noise until I get a better fan)
Day 1:
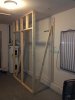
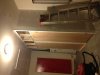
So far I have started the front framing for the doors. One side will hold my grow and the other side I am using for storage. With this design you would be able to use one side for grow and one for bloom while still having enough room for a clone area on top and room for mothers in the Veg side. *** Note: the side and back are not attached as of yet. Today is day one of my build.
As you can see from the picture I have a 4ft 8 tube T5 light for VEG. I also have a (not in the photo) 400 watt HPS with air cooled fixture.
Stay tuned. I will be updating this blog until I finish this build. Then I will be switching over to a Grow Blog for those interested.
I have grown tired of my shotty plywood creations, grow tents, and anything else ghetto to get me by. I'm going all out on this build. I will be using pre-existing equipment that I have bought over time and incorporating it into this professional build but making sure I can upgrade later when better equipment warrants.
*** Sketch Up Design will be available FREE here once I complete all measurements and create a wood cut out diagram for ease of use for future readers wanting to build my design***
Pre-build Design Phase:
This is my design I created in SketchUp. SketchUp is a free design software which is fairly easy to use.
Ideas for this build:
- Internal will be lined with reflective material I will cut out from my Giant Grow Tent. (I will only cut where needed to prevent leakage of smells)
- Seal all cracks, gaps, crevices with mold resistant white silicone sealant
- Two door construction
- Internal electrical outlets in overhead storage and in ceiling of main grow space.
- Above storage for 400w digital ballast
- 4-120 mm Fans for intake of air
-6" Inline Exhaust Fan ducted through ceiling to attic fan opening (I am going to surround it in insulation to reduce noise until I get a better fan)
Day 1:
So far I have started the front framing for the doors. One side will hold my grow and the other side I am using for storage. With this design you would be able to use one side for grow and one for bloom while still having enough room for a clone area on top and room for mothers in the Veg side. *** Note: the side and back are not attached as of yet. Today is day one of my build.
As you can see from the picture I have a 4ft 8 tube T5 light for VEG. I also have a (not in the photo) 400 watt HPS with air cooled fixture.
Stay tuned. I will be updating this blog until I finish this build. Then I will be switching over to a Grow Blog for those interested.