cob | sip | scrog

Humanrob

Well-Known Member
I'm still thinking about this... If I'm going to harvest this in two waves 10-14 days apart, and I want to run the SIP dry before cutting then I'm going to run it dry, cut, fill it a couple more times, and run it dry again. Anyone think that the first drying would damage the "water roots" in the res? I've never done hydro, so I don't know what how resilient the "water roots" are to drying out and recovering.
 

Evil-Mobo

Well-Known Member
I'm still thinking about this... If I'm going to harvest this in two waves 10-14 days apart, and I want to run the SIP dry before cutting then I'm going to run it dry, cut, fill it a couple more times, and run it dry again. Anyone think that the first drying would damage the "water roots" in the res? I've never done hydro, so I don't know what how resilient the "water roots" are to drying out and recovering.
I just watered again a few days ago after letting mine dry out, not because I was going to harvest just trying a method of growing in flower that involves drying the plant out in week 5 then blasting with a bump in feed after. She has responded well with no issues, lost a few tiny fan leaves from stuff that will be larf so no biggy. I say go for it. I think soon I will start back on water only for a sort of SIP flush and just let her ride until harvest. Just unsure because she's starting to fatten up and drinking A LOT. I am watering daily
 

Humanrob

Well-Known Member
that kind of Fox tailing that early on is usually due to the light being too close. Too many photons. Some cultivars are supposed to fox tail in the last week like gorilla glue.
Just as a quick follow up, my plant seems to confirm that you sir are correct. The buds that are less than 12" from the lights are wildly fox tailing, the ones that are 16" or more from the lights only have hints of it. Being that I can't raise the light anymore, I am glad that the tall ones are not burning or bleaching... so at least there's that. Probably another week and the top buds will come down, then I'll see if I want to cook the lower ones more.
 

Humanrob

Well-Known Member
I just watered again a few days ago after letting mine dry out, not because I was going to harvest just trying a method of growing in flower that involves drying the plant out in week 5 then blasting with a bump in feed after. She has responded well with no issues, lost a few tiny fan leaves from stuff that will be larf so no biggy. I say go for it. I think soon I will start back on water only for a sort of SIP flush and just let her ride until harvest. Just unsure because she's starting to fatten up and drinking A LOT. I am watering daily
Thanks for that info. I'm at a point where I don't think I can really hurt the plant or the harvest, so I'm going to try and experiment with drying it out and see what happens. My res level indicator tubes are about an inch off the bottom of the bins, and my wicks do actually touch the bottom, so it will be a guess as to when they are fully dry. I've heard the soil can stay moist for a while after the res dries up, but I don't know if I'll let it go long enough for the plant to show the first signs of drooping -- when I was working in a simple cloth pot with soil, that's what I would do before a harvest. It'll come down to my level of patience, and if I actually see amber, and a few other factors. I "experiment", but I'm way more gardener than scientist.
 

DankTankerous

Well-Known Member
Just curious as what does it do for the plant to deprive them of water and let the pots and soil dry? Is it increase resin making? Make it easier to dry clipped buds? Make the taste and cure better?
 

Humanrob

Well-Known Member
Just curious as what does it do for the plant to deprive them of water and let the pots and soil dry? Is it increase resin making? Make it easier to dry clipped buds? Make the taste and cure better?
I find that they dry more quickly and evenly, and are way less likely to get that funky hay smell if I let the plant dry out a bit before cutting it. I don't let them dry until they whither, just until they show the first signs of wilting.
 

ttystikk

Well-Known Member
Just as a quick follow up, my plant seems to confirm that you sir are correct. The buds that are less than 12" from the lights are wildly fox tailing, the ones that are 16" or more from the lights only have hints of it. Being that I can't raise the light anymore, I am glad that the tall ones are not burning or bleaching... so at least there's that. Probably another week and the top buds will come down, then I'll see if I want to cook the lower ones more.
Increase airflow past the top of the canopy to help keep temps down on the affected buds.
 

Humanrob

Well-Known Member
Day 72

I think it was on day 65 that I took down three top branches of the OG to get an early taste of that one. Jarred it this morning, it weighed in at a meager 20 grams. The buds are very frosty and smell sweet, but they are also not dense at all, smaller, and spaced far apart. Odd strain, that one. My patient is impatient, so the first smoke will probably be a 7-10 days from now. At that point we'll know ALL that really matters.

On day 69 I took down all of the top stems/buds from the OG that were above the top screen (they are too larfy and open to call "colas", I believe). I then took off the top screen and lowered the light. For simplicity sake, I removed the 5000k COBs that hang lower than the rest, so I'll be finishing up under 6 COBs @about 300w (2-4000k + 4-3000k). I've flowered that way before in my 2x4, and its fine. For what its worth I've still also got a pair of the lizard lights going for whatever UV they might add. It feels so much better now to have the ability to properly distance the light from the plants, and finally have an even canopy (since I cut everything above the second screen on the BB#3 over two weeks ago).

Some quick pics of what's left... I intend to let it go until they actually finish maturing. I've already passed the 70 day point, I've never taken a crop this long before. It could be another 2 or 3 weeks before I'm done. This is the first indoor I've ever done where I did not have plants "on deck" vegging, waiting for the flower space. So I have time.

06.30_afterfirstcut.jpg 06.30_side-canopy.jpg
 
Last edited:

Humanrob

Well-Known Member
Did I say 2 or 3 weeks? Yawn...
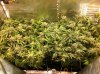
Ah fuck it, I'm done. I chopped them down and pulled the whole thing apart.

My rubbermaid bins filled with wet soil were heavy as hell. There was no way to hold it up and take a picture at the same time, so I couldn't snap one until I had dragged the beast into the back yard and dumped the soil out of it. That action ripped all the water roots out... leaving not much to be photographed. I did get a glimpse of how they formed, and I had other clues... like the fact that when I pulled the air stones out they were wrapped in roots. It turns out I had almost no roots growing through my wick, which is where I had expected to find them. The clump that existed found their way around the water fill tube -- which is where the line to the air stones ran in -- and appear to have grown entirely in the channel of air coming off the stone. I learned a lot from this, next time -- like @SomeGuy -- I'll definitely increase the amount of air I'm putting in.

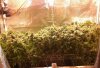
It's all hanging up to dry. This run was nothing to write home about in terms of quantity or quality for that matter. It'll do, there will be enough good medicine to carry us, but as a grower I'm not impressed with any aspect of it. I don't blame the SIPs, they were experimental and worked as well as I made them. I'll try some different genetics next time, something I'm more familiar with. I'll add larger and more air stones. I'll put the plants into the SIPs much younger. And on a different note, I'll trim them much better, I had too many thin branches with small buds, especially on the BB#3. I got off to a bad start vegging them too long and moving them into the SIPs when they were too big, and it threw off my game.

Another run come and gone.
 

Humanrob

Well-Known Member
This is why I'm gonna make a bit more air gap. It will allow the roots to grow out the wick more I had similar root observations as you in some plants. It's also why I don't think more airstones are bad. The roots love them ... lol
I've been thinking about this more. If I cluster some air stones right around the wick, that would encourage growth there, and the larger air gap would discourage roots from dropping from other locations. That would certainly neaten things up down there, and keep the roots safer. As soon as I lifted my bins the water feed tube started slipping out and the roots started ripping -- had I needed to do that during the grow, it would have caused a lot of damage. Of course, I won't run feed tubes through the dirt again in future designs.
 

ttystikk

Well-Known Member
Just moved a batch of ladies in 5 gallon buckets. We modified these with holes drilled all around the sides at the bottom, so roots could find their way out and into the shallow water in the tub they sit in.

Even before day one of bloom, all the buckets had roots coming out. I'm all kinds of impressed!
 

SomeGuy

Well-Known Member
I've been thinking about this more. If I cluster some air stones right around the wick, that would encourage growth there, and the larger air gap would discourage roots from dropping from other locations. That would certainly neaten things up down there, and keep the roots safer. As soon as I lifted my bins the water feed tube started slipping out and the roots started ripping -- had I needed to do that during the grow, it would have caused a lot of damage. Of course, I won't run feed tubes through the dirt again in future designs.

Im using two flexible airstones around the edge of the bottom of my rez. (part of my "upgrade"). I will also have one right by the wick. I am hoping for greater things.. LOL
 

Humanrob

Well-Known Member
Im using two flexible airstones around the edge of the bottom of my rez. (part of my "upgrade"). I will also have one right by the wick. I am hoping for greater things.. LOL
Do you have any techniques you are using to keep the stones where you want them? I'm trying to figure out how to hold them down in one place.
 

Thorhax

Well-Known Member
Yo, is there a mesh liner that would work for our wicks? The bubbles threw chunks out of 2 of my wicks. I think like silk screen type of material would be cool.

I used Velcro to keep my air stone in place
 

Humanrob

Well-Known Member
Yo, is there a mesh liner that would work for our wicks? The bubbles threw chunks out of 2 of my wicks. I think like silk screen type of material would be cool.

I used Velcro to keep my air stone in place
If you just want your wick to be an auto watering device, then I think you can use something like landscaping weed block fabric, it should allow water through it but not much else.
 

Thorhax

Well-Known Member
If you just want your wick to be an auto watering device, then I think you can use something like landscaping weed block fabric, it should allow water through it but not much else.
My roots have filled my res.. I like it:) think that fabric would stop roots? I was thinking a mesh would allow roots to grow through
 

ttystikk

Well-Known Member
If you just want your wick to be an auto watering device, then I think you can use something like landscaping weed block fabric, it should allow water through it but not much else.
I'm excited to see roots grow through the holes.

My roots have filled my res.. I like it:) think that fabric would stop roots? I was thinking a mesh would allow roots to grow through
I'm with you; why not encourage roots to run throughout the tub?
 

Humanrob

Well-Known Member
My roots have filled my res.. I like it:) think that fabric would stop roots? I was thinking a mesh would allow roots to grow through
My bad, I misunderstood, I thought you were trying to keep things separate. Are you using air stones?

EDIT: Duh, never mind, just reread things and you talked about the bubbles...
 

SomeGuy

Well-Known Member
Do you have any techniques you are using to keep the stones where you want them? I'm trying to figure out how to hold them down in one place.

Not yet but I may use some jb weld and plastic clips so I can change out the stones. Cable clamps would work well I think stuck to the bottom. Then just slip the tubing or flexible tube airstone through clip.

Yup. Thought it out while typing this, that's what I'll do.. lol
 
Top