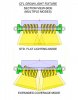
The following are the plans, photos, and some tips for building a simple 240-288 watt CFL light fixture. This fixture is relatively inexpensive and is extremely easy to put together. Its well suited for an LST, Scrog or SOG-style grow cabinet, since the light will be spread evenly over all your acreage. But its probably not the best option if you plan to skip training your plants and go for that one massive cola.
This design is sized for my 30-inch Closetmaid wardrobe cabinet (30 X 20 X 72 Tall). But the design is scalable and can be adapted to fit just about sized cabinet.
Parts list:
Tips:
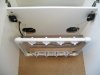
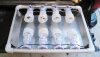
The following photos should make it all clear.
Hope someone can benefit from this post and I look forward to your comments and questions.
Never stop growin'!!!
This design is sized for my 30-inch Closetmaid wardrobe cabinet (30 X 20 X 72 Tall). But the design is scalable and can be adapted to fit just about sized cabinet.
Parts list:
- ¾ -inch, Schedule-40 PVC pipe, 8 feet
- ¾ -inch PVC slip elbow, 4 each
- Plastic light sockets, 8 each- Note, there are many types. These came from Lowes and cost about $2 each. But you can get similar ones online
- 12 X 24 aluminum leather grain Sheet from Home Depot for about $12 (They dont show this size online but do have the 3 X 3 for $23)
- 12 heavy duty extension cord (or buy the 3-wire cable and a plug).
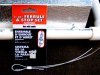
- 1/16 inch wire rope, 6 feet
- Ferrules for 1/16 wire, 6 each
- Light yo-yos, 2 each
- Carabiners (key chain-style), 2 each
- #8 screws (1 long), about 24
- Eye screws, 4 each
- Hook screws, 4 each
- Zip ties, one or two each
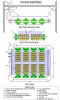
- CFLs, 8 each- Note that my fixture has inside dimensions of 19 X 15 and will accept four, 30-watt lights and four, 42-watt lights. Simply extend or shorten the PVC to meet your needs.
- Saw- I bought a cheap (less than $20) miter saw from Home Depot and have used it over and over again while making my grow system. A great deal.
- Electric drill with drill and screw driver bits
- Spring clamps are always useful
- Wire stripper- Dont even consider a cheap one from Harbor Freight. Go Craftsman or some reputable brand.
- Tape measure or yard stick.
Tips:
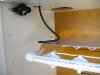
- If vertical space in't an issue, eliminate one set of hook screws and mount the yoyo directly to the cabinet ceiling.
- If vertical space is limited, exchange the carabiner for a small key ring. This will yield an additional inch or two.
- The PVC will fit snug enough without glue. Dont use any.
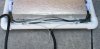
- Drill holes in the leathergrain aluminum before you bend it.
- The leathergrain aluminum bends very easily. Just clamp it to the sharp edge of a table. Put a board or other straight edge on top, and bend by hand.
- Wire the assembly using a single, stripped extension cord, rather than cutting a bunch of short pieces to go between lights. There are two tricky parts to this operation.
- First, experiment with ways to remove the cover from a center section of wire. There are several methods and Im sure theres a better way than the one I used. Just figure it out, and practice on a spare piece of wire before cutting into the actual extension cord.
- The second crux is calculating where to strip the wire. Make sure to leave at least six feet of cord between the plug and the light fixture. Start with a 12-foot cord. Account for the inch (approx.) of wire required to wrap around each contact screw. Check your calculations twice before grabbing the wire stripper. Start working from the light closest to the plug, moving outward, toward the end. Use at least 14-gauge wire.
The following photos should make it all clear.
Hope someone can benefit from this post and I look forward to your comments and questions.
Never stop growin'!!!