Cabinet LED Grow (Area 51 XGS-190 and Barney's Farm Blue Cheese)

Dragon311

Well-Known Member
Time for the next grow!

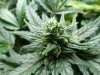
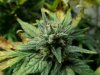
I've been trying to alternate my grows so far. Satviva dom, indica dom, sativa dom, etc... I've really enjoyed the sativa dominant strains I've grown so far. Super Lemon Haze and Silver Kush being my favorites. I haven't really liked the indica doms I've tried so far, but then again I haven't had the best of luck with them either. So far for indica doms I've tried: Blue Mystic, Carmel Ice, and Northern Lights Blue.

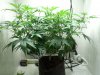
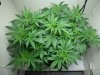
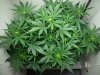
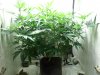
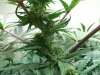
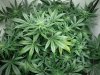
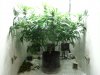
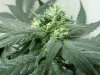
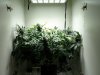
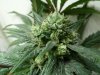
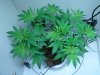
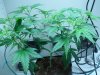
I decided to try and follow Nugbucket's guide for mainlining a plant this time around. It seems perfectly suited for my style of grow with a cabinet and the XGS-190. I opted to go for 8 tops on this plant since it's my first time trying it this way.

The first time I topped her and stripped away all the early fan leaves I was hesitant, but she bounced back just fine from such a massive trimming. I let her grow out a bit, and trained the plant for it's first main split at the trunk. I made the 2nd cut on her, and was attempting to train her into a new shape when I took it too far, and she snapped in half at the main split!

I have done LST on many plants in the past and had never broken a branch or snapped anything off before, but I can not say that anymore. I tried to tape the branch back up and see if she'd heal herself, but by morning the branch had withered away.

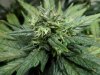
I thought I was going to have to start over again. The more I thought about it though, I could just resume the topping and training for mainlining again, just set back a couple nodes. So I got some more coco and added more to the pot to bury the stalk a bit deeper, and went back to training her again.

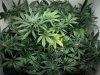
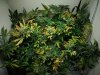
She just got back up to 8 tops a few weeks ago. I had some problems trying to shape her. All fabric pots aren't the easiest thing to work with when trying to anchor and tie something down. I was able to get the main split shaped pretty well, but its the resulting splits that didn't get held down as evenly.


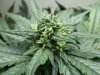
I have installed a modified plant support ring, and am in the process of tieing her to the ring for added control over growth profile and support. I just flipped her lights over to flowering the other day, so the countdown can begin!
 

Attachments

Last edited:

Dragon311

Well-Known Member
Have a slight problem, but nothing major. You can kinda see the early signs in my original pics. I believe it to be a Cal/Mag deficiency. Hopefully I can hit it hard now and take care of it. Guess we'll see as things go.

This is the "fun" part of the main-line technique. Just sit back and let it grow from this shape. So far it is keeping a nice fairly consistent canopy.
 

n0tmycupoftea

Well-Known Member
Great job so far man!! And I would have to agree with you that those smart pots can be difficult to work with in terms of training and tying down. What I have found to work for me are paperclips. I puncture the paperclip through the fabric and bend them to secure them and then just use the loops on the paperclips to hoop around the stem and that keeps them down. And for harder situations up top towards the canopy, I do the same exact thing, just linking the paperclips together until they're long enough to link up with the base.

I'll be updating my thread when the lights come on later today, if all that was difficult to understand lol
 

Dragon311

Well-Known Member
Flower Day 12

She has responded quite well to her mainline training. The only reason for a slightly uneven canopy is some poor training on my part. Even then, I'm quite happy with the general shape of the canopy as is. It's maximizing the space in the cabinet with the XGS-190 setup.

It appears that I was able to diagnose and treat the deficency correctly. The brown spots don't seem to have progressed into the new growth at all. Hopefully it stays that way!

I'll be interested to see how much stretching she does over the next couple of weeks...
 

Attachments

Dragon311

Well-Known Member
@n0tmycupoftea Thanks man! I ended up using some training wire that I could tie thru holes I made in the fabric. I'll have to try the paperclips or something else for the next one that's for sure. I got a couple weeks till the next seedling will be ready :)
 

Abiqua

Well-Known Member
Really nice Dragon, glad to see more people take the LED plunge! Stacked nicely.

Been looking at 2x of the RW150's, but a bit out of my price range, maybe just a RW75 at a time :peace:
 

Dragon311

Well-Known Member
Flower Day 29

She's just barely past half-way into flowering now. The buds are becoming discernible and a light covering of trichromes has started. Her height has not been an issue for this grow. I shouldn't have to get rid of the rope ratchets this time to save vertical space at all. I think next time I do an indica dominant strain I will use a larger pot, maybe 3 gallon or 5 gallon.

I also picked up some of H&G's Top Shooter. It's their only product they didn't send me a sample of, and since I've liked everything else they sent, I figured I'd give it a shot. We'll see how it does soon, since it's supposed to be added the last three weeks of flower.
 

Attachments

Dragon311

Well-Known Member
Looking good, how big is your space?
It's a 6ft cabinet thats 30" wide and about 20" deep i think. There is a fixed shelf at the top that's about a foot tall. That's where the extraction fan and carbon filter are situated. So that leaves about 5ft for a flowering chamber.

I use a separate smaller cabinet for veg.
 

Dragon311

Well-Known Member
Flower day 42

Whew...it's getting close. Definitely in the home stretch now. Two weeks to go! This is also the first time I'm using H&G's Top Shooter, so I'll be curious if there's any noticable difference or not.

I definitely have something going on...not sure if it's a deficency, or too much fertilizer (I have been feeding aggressively)...or just natural yellowing, but the older fan leaves are starting to crisp up and fall off. Seeing as how there's only 2 weeks left, I'm hoping it's just natural yellowing as there's not much time to correct anything else...


I love the skunky smell she gives off with hints of blueberry...I'm looking forward to when it's time to trim her all up and I'll have the smell EVERYWHERE :D

Onto the bud pr0n!
 

Attachments

uzerneims

Well-Known Member
All i wanted for birthday is a big trichomes!

I'm just looking for some other grows, checking for their trichs...
Thinking how to improve trich production..
Could it be uvb reptile light for few hours?
 

Dragon311

Well-Known Member
Flower day 49

*drool*

You'll have to excuse me if I get distracted by the shiny trichro....

There's been considerable loss of fan leaves as you can tell from the canopy picture. I guess I got too aggressive with feeding her. Since she's on her last days, I'm just going to use plain water here on out. I had to run a couple strings to support some of the colas, they were falling over.

80-90% of hairs have turned...

calyxes are starting to swell...

waiting for more of the pistils to get sucked back into the calyxes...

sooo close...
 

Attachments

Dragon311

Well-Known Member
Welp she made it to day 55 of flower. I forgot to take some final pics before I chopped her down... I'll post something once things dry out and I get them on a scale.

I'm digging the "mainline" method outlined by Nugbuckets. I only had to clip and hang 8 healthy branches. So that made that part pretty painless. I let them hang and dry a bit for 3 days. I was going to let them go a day or so longer before trimming them, but something caught me by surprise. I was checking them this morning and to my disbelief there was the very beginning of spider mites starting to spin a web along the top by the cut and the stem where it was hanging.

So I immediately inspected all the remaining branches, and the rest were clean. I have no idea how they got in there, but thankfully they didn't attack until after they had been cut and hung. I took the day off, and spent it trimming the entire harvest to make sure the mites had not progressed far enough to make it to the buds yet.

She's definitely not as dense as the Silver Kush was, that stuff was super dense. I dunno if I'll make 4 zips on this one or not, but we'll find out in a couple days :) Her smell is intoxicating...heavy dose of blueberry and that skunky cheese funk...the finger hash was pretty damn good :D

So everything has been manicured, and are now in some paper bags to finish drying up. I'll give them 3-5 more days then jar them up with some Boveda 62s.
 

Hanky92

Well-Known Member
Welp she made it to day 55 of flower. I forgot to take some final pics before I chopped her down... I'll post something once things dry out and I get them on a scale.

I'm digging the "mainline" method outlined by Nugbuckets. I only had to clip and hang 8 healthy branches. So that made that part pretty painless. I let them hang and dry a bit for 3 days. I was going to let them go a day or so longer before trimming them, but something caught me by surprise. I was checking them this morning and to my disbelief there was the very beginning of spider mites starting to spin a web along the top by the cut and the stem where it was hanging.

So I immediately inspected all the remaining branches, and the rest were clean. I have no idea how they got in there, but thankfully they didn't attack until after they had been cut and hung. I took the day off, and spent it trimming the entire harvest to make sure the mites had not progressed far enough to make it to the buds yet.

She's definitely not as dense as the Silver Kush was, that stuff was super dense. I dunno if I'll make 4 zips on this one or not, but we'll find out in a couple days :) Her smell is intoxicating...heavy dose of blueberry and that skunky cheese funk...the finger hash was pretty damn good :D

So everything has been manicured, and are now in some paper bags to finish drying up. I'll give them 3-5 more days then jar them up with some Boveda 62s.
Gorgeous grow man just read through it all, you've inspired me too use the mainline technique on my next grow!

Sent from my HTC One SV using Rollitup mobile app
 
Top