Bubbleponics Hydro 400W MH/HPS Dual Light with SCROG from Seed (Bubblelicious)

THCDigest

Member
Hey fellow THC cultivators! I’m the Gimp from THC Digest, and I want to start my own growing journal to show to grow weed indoors with a hydroponic system using the techniques and tools that I use.

I have posted a guide on the RIU forums to give a basic idea of the process I'll be using throughout my grow, or you can also follow my journal directly without all the discussion.

journal-main.jpg

With that out of the way, here are my system specs –

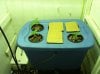
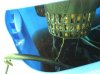
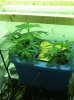
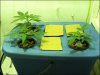
Hydroponic System: Bubbleponics by Stealth Hydroponics ($100)
Grow Lighting: 400W MH/HPS Dual Lighting System ($150)
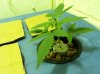
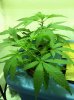
Seeds: Feminized Bubblelicious from Buy Dutch Seeds ($60)
Nutrients: General Hydroponics Flora Series ($40)
Root Treatment: Cannazym from Canna ($30)

Total Cost: $380

Other Notes:

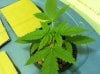
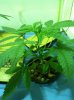
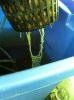
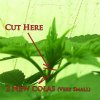
  • SCROG setup (my first time)
  • Expected yield: 6 – 12 oz (my previous grow was ~9 oz with no SCROG)

This is meant to help anyone who is looking for ideas or might not even be sure where to start. That means if you have a question, comment, or suggestion… please share it. Not only will this help me improve this journal and make it more valuable to people who look at it, but if you have something to say about it, there’s likely a lot of other people who feel the same as you do. Sharing is knowledge and knowledge is power.

Grow Smart, Grow Big!
 

Original Kush

Active Member
When you started the first week of veg, how did you feed your plants? Was the water pump on 24hrs for feeding?
I'm having some problems with mine and I have no idea what's going on with it.
 

THCDigest

Member
I actually don't feed my plants at all for a couple weeks, just fresh water with a constant flow of water on the roots. I'm not sure if this is the best way to do it, I just know that in the past I have ended up overfeeding pretty easily if I feed them early, and the way I do it now has always seemed to work.

I usually don't introduce nutes until my 2nd week in or when I notice my plants starting to lose a little bit of their green. The discoloration is very slight, but noticeable once you go through it a few times.
 

THCDigest

Member
Week 1

Week 1 - Plant closeup.jpgWeek 1 - Plant Height.jpgWeek 1 - Plant Root.jpgWeek 1 - Plants.jpg

Germinating the Seeds

First thing’s first, I started with feminized Bubblelicious seeds and another strain I’m not sure of and began germinating them in the beginning of July, 2012.

The process is really very simple. I fill a mug (for insulation) about ½ - ¾ full with room temperature water, add the seeds, and cover with aluminum foil (for cover and insulation).

Ideally you should put the mug in a place where it’s dark and the temperatures will stay in 70 – 80 F; you don’t want to expose your seeds to a lot of variation and stress.

I let my seeds sit in the water for roughly 48 hours at which point germination should be pretty much complete. You’ll know because you’ll see the taproot showing. I like to wait until the taproots are at least ½” or so long before planting.

Seed Germination Video

Planting the Seeds

After the seeds have germinated, I will put them in their new permanent housing: a Rockwool cylinder (or cube). Damp the Rockwool first to make sure your seeds stay plenty hydrated.

I then put the Rockwool with seed in a net pot and fill the rest of the space with Hydroton pellets. This holds the plant in place without polluting your water drain off.

It is also very important to make sure that your seeds always have a source of water here. Drying out mean sure death especially this early in the grow.

Seed Planting Video

Some Seed Deaths

I planted 6 seeds, 3 Bubble & 3 mystery seed, at the beginning and all appeared to germinate successfully. Roots on Bubblelicious were ½ – ¾” bigger than the unknown seed.

After about 3 days, my first Bubblelicious seed broke through the surface of the Rockwool and I turned the light on at this time - 24 hour on cycle. I waited another couple days and 1 other Bubble seed was breaking through, but I couldn’t see the progress of the other 4 as yet.

I decided to pull the Rockwool out individually and open them up to check on the seeds. The Bubblelicious was developing a pretty good root which had almost made its way out of the bottom of the net pot, so it looked good. The other 3 (all mystery seed) hadn’t made any progress since the day I planted them, so I tossed them.

I don’t think this will be a big deal as far as my end yield because I have gotten great yield with just 1 plant, and I’m using the SCRoG, so I have yet to see how that will have an impact.

Next Update

I will be adding nutes for the first time and show exactly what I use. I also will talk a little bit more specifically about my setup and some of the modifications I’ve made this grow compared to my last.

Full Journal Post with Video on THC Digest
 

THCDigest

Member
Week 2

Week 2 - Back Left.jpgWeek 2 - Front Left.jpgWeek 2 - Front Right.jpgWeek 2 - Full View.jpgWeek 2 - Left Side.jpg

Introducing Nutrients

It’s week 2 and this is the time I usually start my nutrient feeding schedule. The reason I don’t start it earlier is because it’s really easy to overfeed your plants in the early stages, so I just avoid it all together until I know the nutrients from the seed are pretty much spent. This happens usually 7-14 days after the plants have broken the surface.

First off, the nutrient formula I use is General Hydroponics Flora Series. Previously I used a powder form of nutrients that came with my hydro system, but I found that it wasn’t easy to determine how much to use and often put my pH way out of whack, so I knew I needed a better solution.

The GH Flora Series comes in 3 different types: micro, grow, and bloom. They also provide a feeding schedule, which is very easy to follow and makes knowing what to do next very clear. Since I started using these nutrients, I have always had a successful grow and have gone from 3.5 oz with my first success up to 9 oz my last grow. In other words, it’s very effective.

I’m thinking about trying a different nutrient lineup for my next grow to see if there’s anything that might be better, but up until now my attitude has been “If it ain’t broke, don’t fix it.”

Feeding my plants is really a very simple process. Once I figure out what I need for the week with the feeding schedule, I just put a little water in a measuring cup and pour the appropriate amounts of each nutrient formula in with it (GH suggest not mixing the nutrients just by themselves which is why I put water in first.)

Then, it’s as simple as just dumping the solution into the tank and voile, plants fed for the week. I didn’t show it in the video, but it would be wise to test pH after introducing nutrients regularly to make sure you don’t go outside the optimal range of 5.5 – 6.5 and hit nutrient lockout.

Read More at THC Digest about Nutrients and pH

Modifications to This Grow

I should have probably gone over this a little earlier, but I wanted to go over the changes I’ve made for this grow.

The first and biggest change is I’ve added a SCRoG (Screen of Green) to my setup. On my last grow I had a lot of popcorn buds (got very little light and are basically unusable), so after doing some research it seemed that the SCRoG is an ideal solution.

The whole purpose of this is to organize the bud-producing portions of your weed plant in such a way that they get the most light possible. Without a SCRoG, your plants will be more chaotic and won’t be able to capture the full power of your light. If you’re using an HID, I think this becomes even more important.

Most of my other modifications came as a result of putting the SCRoG in the closet. For instance, in previous grows when I needed to clean the system out, I would lift the lid off with the plants in it and go put them somewhere else where their roots could sit in water while I cleaned the components.

However, the SCRoG makes it pretty much impossible to lift the lid out, so instead I elevated my nutrient tank and when I need to clean it out, I’ll let it drop down and pull it out of the closet, leaving the lid and plants intertwined with the SCRoG.

I mostly just want to illustrate here that I believe one of the most important (if not the most important) trait a grower can have is a willingness to solve challenges. Think about complications you’re facing, determine what your goal is, and brainstorm ways you can overcome the challenge. If this seems too difficult, growing weed is going to be a real hair-pulling experience for you IMO.

Next Week’s Update

In the next post, I’ll be focusing on root maintenance since my plants’ roots are getting pretty close to touching the water. The last thing you want in your system is a case of the ol’ root rot unless you like wasting time, money, and effort. I don’t.

Full Journal Post with Video on THC Digest
 

THCDigest

Member
Week 3

Week 3 - Back Left.jpgWeek 3 - Back Left 2.jpgWeek 3 - Front Left.jpgWeek 3 - Front Left - Top View.jpgWeek 3 - Front Left Roots.jpgWeek 3 - Front Right.jpgWeek 3 - Front Right - Top View.jpgWeek 3 - Front Right Roots.jpgWeek 3 - Full View.jpg

Rapid Growth Incoming

After feeding my plants some nutrients last week, I saw a lot more growth than the previous weeks. The 2 reasons for this are straightforward:


  • They actually have food now
  • Their roots are now touching the water

I made sure not to overfeed earlier and now that the plants have access to nourishment, they’re responding very well. This rapid vegetative growth above the surface has to be supplemented by root growth below. This caused the roots of all 3 plants to make their way down into the nutrient tank onto the water’s surface.

This is good news because this will spur even more growth out of the plants as long as they aren’t overfed and no unforeseen problems creep in.

Keep an Eye on Root Rot

However, because the roots are now in contact with the water source, they are also in danger of acquiring root rot. Root rot is the last thing you want in a hydroponic grow and is capable of wiping out fully grown plants with almost no chance of saving them (it’s happened to me and it hurts).

Luckily, root rot is relatively easy to keep at bay by keeping your tank highly oxygenated and/or adding enzymes that combat the infectious nature of root rot.

Oxygenating the tank requires only an air pump and an air stone. This step alone will probably take care of majority of the threat of root rot unless there is an abundance of roots and oxygen has a hard time reaching certain places.

I also use Cannazym as a preventive measure to take care of anything the oxygen might not be able to on its own. Such a measure becomes more important as a grow gets further down the line because root death is a natural, unavoidable occurrence and takes place a lot more as a grow progresses.

Next Week’s Update

The hydro system is starting to get a little dirty, which means it’s time to give it a nice scrub down. I’ll talk about the steps to do that.
Also, I will be talking a little about topping and giving it a shot. It’s something new I’m trying this grow, and I’ll be sure to show you what I’m doing and how I’m doing it as well as the results of my experiment.

Full Journal Post with Video on THC Digest
 

Rhalley

Member
Awesome thread so far. I'm new here and new to growing for the most part. I ordered the same system and should have it this week, and am hoping to have my seeds sometime next week. Do you think I'd be ok using the provided nutes, or should I buy more seeing as I have time? Looking forward to your next update.
 

THCDigest

Member
I used the provided nutes on my first and 2nd grow. I didn't like them for 2 reasons:

- Easy to overfeed. My 2nd grow my leaves curled up and got super green when I switched to flower because I was giving them too much Nitrogen.. had no idea.
- Makes the pH go crazy. After I put the nutes in, pH would shoot one way or another and I'd have to immediately add oH up or down just to balance it.. clogging the system even more.

After 2 grows I switched to GH Flora Series and have used it ever since. I still want to try other nutrient formulas in the future, but for now I'm sticking with I know what works effectively.
 

THCDigest

Member
Oh, I forgot to add it's awesome that you're going for it... it takes some guts and confidence to take the plunge. I suspect there are many who will read and read without ever taking action, but you're giving it a shot. As long as you refuse to let problems stop you from learning and pressing on, you'll succeed.
 

Rhalley

Member
Thanks man. I can't wait. I ended up ordering the flora series just so I don't have any regrets or what ifs. If everything goes well with getting my seeds I should be growing in the next couple of weeks. I'll look into a journal when I get home tonight and have a computer. Maybe we can compare grows. I ordered 5 Buddha Seeds Purple Kush Auto and got 1 free G13 Labs Raw Diesel, and 1 Delicious Seeds Critical Sensi Star. I'm on a diesel forum and have learned a ton for my truck, and hopin this forum will be the same!
 

Rhalley

Member
And I don't mean to hijack your thread, but how were your yields with the first couple of your grows. I'm pretty much expecting to have some issues. I'm hoping the autoflowering will be a little faster and easier, leaving me less room for error.
 

THCDigest

Member
Week 4

Week 4 - Back Left.jpgWeek 4 - Back Left - Top View.jpgWeek 4 - Front Left.jpgWeek 4 - Front Left - Top View.jpgWeek 4 - Front Right.jpgWeek 4 - Front Right Roots.jpgWeek 4 - Full View.jpgWeek 4 - Left Side.jpg

Fix Problems Before They Start

This week there were a couple things that caught my attention regarding my grow. The first is that my leaves were starting to droop a little bit, which is an indication of a problem. The other potential hazard I see is the abundance of insects in my grow room, which is the first time for me.

To fix the bug problem, I located what I believed to be the source of where they were getting in. The summer always brings out the bugs, but this year we had a new air conditioner which left our window open and gave perfect entry for many more insects.

I cleaned thoroughly around my grow room with bleach as well as around the window. Bleach seems to work pretty well as an insect deterrent. Additionally, I did the best job I could in making a better seal around the A/C unit so even fewer insects could get in. I’ll keep an eye on it to see if the insect population changes.

As far as the drooping leaves, I suspect it has a lot to do with the solution getting a little too gunked up with nutrients, bacteria, etc. and just needs a fresh cleaning. If ever there looks like a problem, the first place I think a hydro grower for many problems is just a system clean out and a new tank of fresh water.

That’s what I’m doing this time to see if it fixes the leaf problem. I am fairly certain it will, but if it doesn’t I’ll start trying to figure out the cause.

Cleaning the Hydro System

The cleaning process in a hydro grow is probably the most work-intensive portion of a grow but it still isn’t really all that difficult and takes only about 15-20 minutes.

Different hydroponic systems will have slightly different cleaning processes but the basic idea is the same. Flush the system, get a fresh source of water, and maintain component cleanliness.

I typically clean my system every other week in the beginning stages of the grow but switch to weekly cleaning as the plant starts reaching its full height and the root structure gets quite massive. There’s a lot of places for harmful pests and parasites to build up in a mature system so cleaning it routinely is of utmost importance.

My First Try at Topping

Topping Edit.jpgAfter Top Edit.jpgTopping 3 Days Later Edit.jpg

Because I introduced a SCRoG for the first time this grow, I thought I also needed to learn some ways to help fill it up. I’m trying out topping for the first time because it sounds like a good way to do that.

I actually think this process is somewhat difficult to describe with words, so I’ve added photos to show where I’ve cut as well as another photo showing the progress just a few days later. Really quite encouraging for my first time!

Full Journal Post with Video on THC Digest
 

Attachments

Top