-boring 'ol 230w 154lm/w led strip build
- Thread starter iHearAll
- Start date
Lucky Luke
Well-Known Member
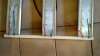
Its a small veg tent (500mm x 500mm x I think a meter from memory). The strips will replace a 130w CFL. In summer anyway, I may have to use the CFL in winter for the heat it generates.Nice! Looks like a pretty sturdy construction, what size space are you going to be lighting with it?
Thanks, I thought it may be better to over engineer the frame and have it so everything can be easily taken apart (and its easier to build lol). I would of preferred aluminium for the sinks but galvanized steel was easier to source and at 50mm wide a good size.Question, where is the fifth strip? Also, looking goooood
I shall use the remaining strip in a cloning cupboard.
Last edited:
SonsOfAvery
Well-Known Member
Looks professional, good to take the extra time and get solid end product. I'll be making slight adjustments to mine after this grow.You guys are way ahead of me, time to kick it into 2nd gear!
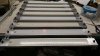
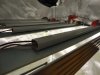
Here's the start of my first panel (of 3 total) ... hit the heat sinks with some 240 grit, followed by some 600 grit. Probably going to use tape anyhow, so doesn't really matter.
Going to mount the strips and wire this up and do some PAR measurements to see if the 8 strips are going to do the job... then neaten up the wiring. The sinks are mounted to some 24" long 8020 extruded AL strips I had laying around. I can squeeze two, maybe 3 more strips on there if have to.
View attachment 4098352 View attachment 4098351
@Lucky Luke
You'll be hitting easy 35w/ft² with that setup in that space.
my frame with x12 strips does create quite a bit of heat in my tent, but its -5°c here at the moment so it's welcome.
Hairiest_Stamen
Well-Known Member
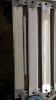
Alternating 3k and 4k. Time to hack together some wiring.
Lucky Luke
Well-Known Member
Fired all 4 up and all working (thank fk!).
The gasket silicon seemed to have worked well. No pics as the wife came home with the hazard lights on and I had to quickly become a mechanic and replace a fuel pump (never done that before). Whilst I was at it I took off the AC unit and will replace a leaking coolant hose that is in a fkn prick of a position tomorrow.
The gasket silicon seemed to have worked well. No pics as the wife came home with the hazard lights on and I had to quickly become a mechanic and replace a fuel pump (never done that before). Whilst I was at it I took off the AC unit and will replace a leaking coolant hose that is in a fkn prick of a position tomorrow.
Lucky Luke
Well-Known Member
That looks really pro!Alternating 3k and 4k. Time to hack together some wiring.
View attachment 4098607
Hairiest_Stamen
Well-Known Member
Thanks. Got a lot of 8020 extrusion, might as well put it to use.That looks really pro!
Tacked the driver to the side of one of the heatsinks with some thermal tape. Looks real clean, debating whether in should do the rest like this. More heat getting pumped into the heatsink probably reducing it's effectiveness but not sure it'll make a real difference. Original plan was to mount the sinks to a AL plate on the other side of the fixture.
Lucky Luke
Well-Known Member
all done and up.
Hairiest_Stamen
Well-Known Member
Looks great. Solid, simple design.
Hoping to fire mine up tonight.
Lucky Luke
Well-Known Member
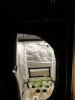
Question and stealing this pic to help explain.the skinny drivers are fine and are actually pretty comparable in efficiency to your typical meanwell. they sit at or above 85% and you can select 4 current options. .335a (45.5v), .39a (46v), .45a (46.5v), and .5 a (47v) options. take your pick how you choose to build if you go for a meanwell driver.View attachment 3972927
The switches in the pic labelled 1 and 2. In this pic is this at the lowest voltage? (both switches to outside position).
Hairiest_Stamen
Well-Known Member
yes, lowest setting. should be visibly the dimmest of all 4 settings.Question and stealing this pic to help explain.
The switches in the pic labelled 1 and 2. In this pic is this at the lowest voltage? (both switches to outside position).
Hairiest_Stamen
Well-Known Member
Took some crude PPFD measurements tonight... using an Apogee SQ-120 and voltmeter.
Highest current setting (@ 200W total), Eight 3k/4k alternating strips in a 16"x24".
Unimpressed with the #'s so far, not sure of the correction factor for the SQ-120, but assuming x 1.0
Roughly center of fixture
Distance | mV | PPFD
20" 96 480
16" 114 570
12" 141 705
6" 226 1130
Numbers on the sides varied ... 15%-30% drops. which is understandable because not much from the edge strips is reflecting off the walls and hitting the sensors.
One factor is definitely the fact that the front of the 2.5' x 4' grow enclosure was open (no reflection), and a large distance to the reflective walls.
I'm going to build a fake 3'x2' tent with some foam board and see what the numbers are, may need to add a bunch more strips.
Hairiest_Stamen
Well-Known Member
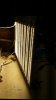
She's pretty bright.
ANC
Well-Known Member
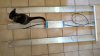
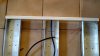
I am just posting this again to show the simple cable management one can do.
One cable runs from driver to the plastic conduit with clip-on lid.
Inside the conduit, the wires are split using a simple large crimped female bullet connector.
Holes are drilled in the conduit close to the connection points for the wires to reach their destinations.
Hairiest_Stamen
Well-Known Member
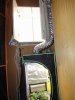
Ill post this as a study in what not to do... I've done much better in the past. Haha

Lucky Luke
Well-Known Member
lol still tidier than mine..can tell I'm not very anal...Ill post this as a study in what not to do... I've done much better in the past. Haha
View attachment 4099795
nfhiggs
Well-Known Member
Not sure why you are not happy with those numbers - 500-1000 is considered the sweet spot.Unimpressed with the #'s so far, not sure of the correction factor for the SQ-120, but assuming x 1.0
Roughly center of fixture
Distance | mV | PPFD
20" 96 480
16" 114 570
12" 141 705
6" 226 1130
Hairiest_Stamen
Well-Known Member
Looking for 800+. Bet the numbers go up a bit once I get another 2 fixtures in there.Not sure why you are not happy with those numbers - 500-1000 is considered the sweet spot.
Want to set up a dummy 2x2 and see what the result is with reflective walls.
Hairiest_Stamen
Well-Known Member
Set up a dummy 30x24 box with some rigid foam shiny side in. Numbers look a better.
second column is ppfd with open front... third with closed.
Distance | PPFD | PPFD no front | ppfd
30" 625
20" 480 605 800
16" 570 700 900
12" 705 800 1000
6" 1130 1150 1200
second column is ppfd with open front... third with closed.
Distance | PPFD | PPFD no front | ppfd
30" 625
20" 480 605 800
16" 570 700 900
12" 705 800 1000
6" 1130 1150 1200
Last edited:
Lucky Luke
Well-Known Member
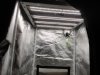
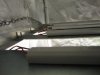
Little veg tent at the bottom. 2 of 4 strips turned on (low). Cloning cupboard on top. 1 strip on high (I may go back a setting).
What great value these strips/drivers are.
The ducting has since been tidied up and so have the power cords.
What great value these strips/drivers are.
The ducting has since been tidied up and so have the power cords.