Bonsai Mothers, Going the Distance

How long has your mothers survived?

  • 3 Months

    Votes: 5 18.5%
  • 6 Months

    Votes: 1 3.7%
  • 1 Year

    Votes: 3 11.1%
  • 2 Years

    Votes: 2 7.4%
  • 3 Years or More

    Votes: 6 22.2%
  • You can keep a mother? I'm still growing from bag seed!

    Votes: 10 37.0%

  • Total voters
    27
  • Poll closed .

Kerberos

Active Member
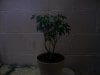
This is both a small recount of my bonsai mothers, and a question on who else out there is doing them, by what methods, etc.

I just put to rest a bonsai mum who was around for nearly 2 1/2 years and am starting again. Share and learn, share and learn. :joint:

My bonsai mum ideas all came from the old Overgrow and their articles. I followed a lot of what the old 'caring for bonsai mothers' article as well as a good debate on lighting cycles for stasis or slight-stressed delayed growth. (re: lighting, If anyone has a link to that btw it was offsite but I've lost it to time)

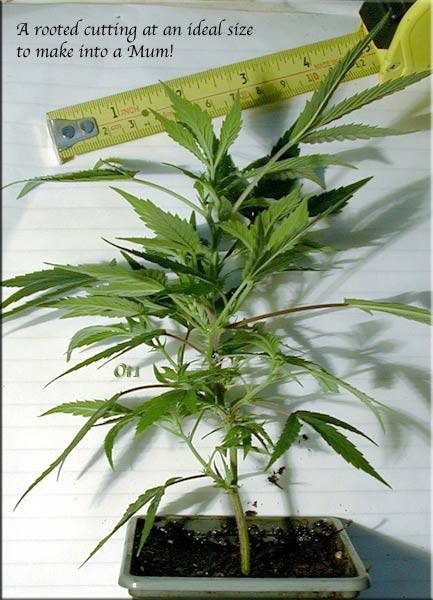
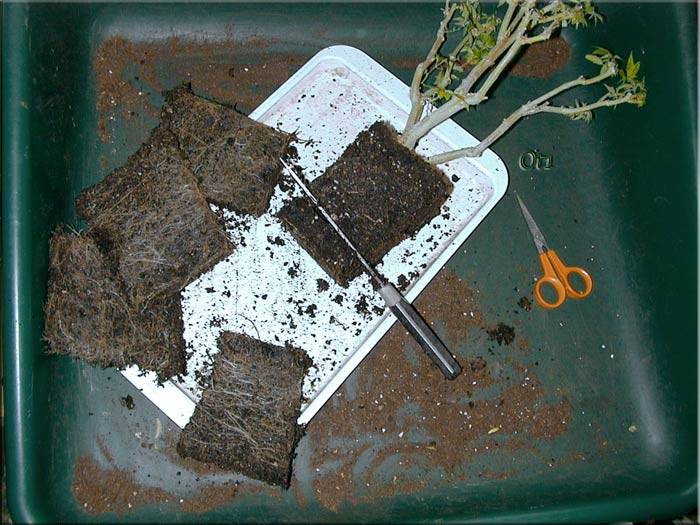
My mums started as clones, went into little square pots, cutting the roots back every 30d, each time guaging if it needed to move up a little.

Growing the pots until finally they would rest at something near a quart capacity. I'm going to shoot for a smaller pot this time but a larger pot can retain moisture for longer letting you ignore them longer (which has pros/cons).

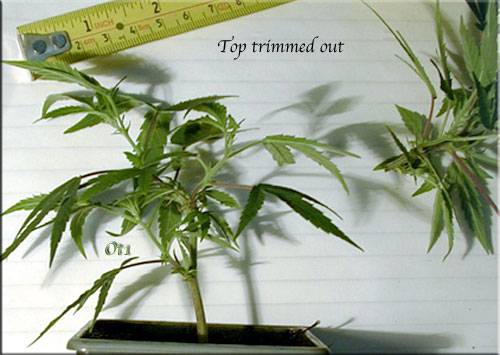
Give them nutes only when you could see a deficiency or other indicator, the idea being you want these ladies to last and stay small. I want them healthy enough but not enough to go crazy.

Their light cycle was the most screwy, a couple hours on, an hour off, four more on, three off, etc, etc. Keeping them somewhere in limbo, enough light, and enough dark, but nothing that would fully commit it to a flowering or vege state.

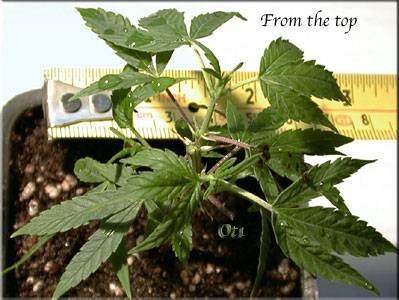
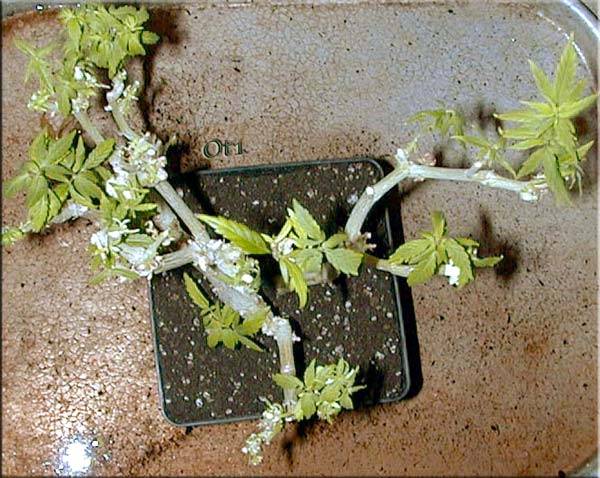
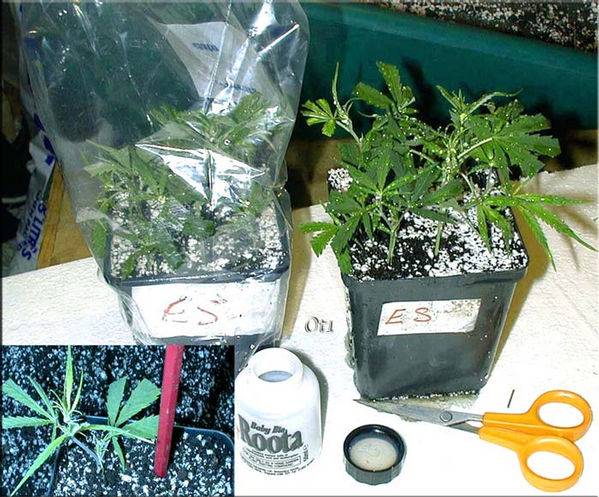
2-3 weeks before needing clones I'd pull them from their pots, soak them in a little bath with a real real light growth-gh solution, repot them and give them 22hrs of light. They'd spring forth life, I'd take the new clone offshoots, and then bury them in their psychotic routine again.

This works pretty well but they stem up after a while and even with generous pruning you start slowly getting higher and higher until you're no longer optimal with lighting. I've seen how the plan can reflower lower down an old stock/trunk but don't know how to trigger it beyond very small flowers. There's something in that thought but I don't have the time to really process it. If I could get them to regrow the trunk it'd help.

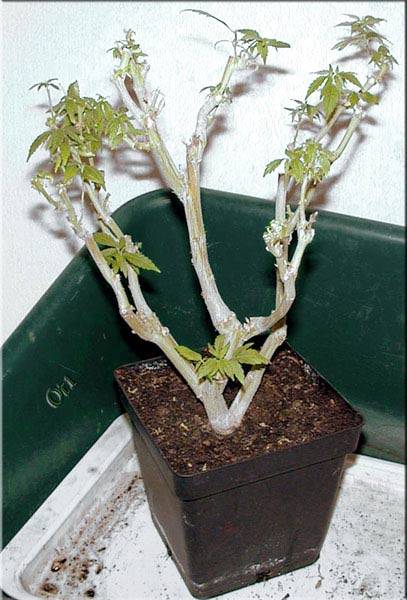
The longer you keep your plants in a stasis sort of state the longer it takes them to recover and the more I've noticed the production facilities seem to be damaged.

I kept a mum suspended for 1 year. Even after a month of normal light and nutes it was no longer a producing quickly, nor of high quality. I took one of my (out of 2) year suspended mothers and put her under an hps and that much energy really confused it hehe.

I'm thinking you can't keep screwing with life forever, and I'm happy to be able to get a good year or two out with only monthly maintenance and weekly (or bi-monthly) waterings.

I'm just curious where it's gone. Is there new techniques that you all have found that I've missed since the loss of OG, or are we all still about the same place?

-K-
 

potroast

Uses the Rollitup profile
I've only used a stasis lighting schedule for small, newly rooted cuttings that I left under the flourescents for a while. The stasis that I use is ON for 10 hours, and then during the 14 hours of darkness turn ON for 20 minutes every 4 hours.

But I keep my mothers in the veg room on 18 hours of light. I grow them hydro, in 4 inch or 6 inch rockwool cubes. I keep each for 6-10 months before replacing with a new cutting. With continuous cutting and pruning, the old growth becomes woody, and any new growth will be outward of that. As that pattern continues, the plant gets too big and unproductive for good cuttings.

HTH :mrgreen:
 

HighPhi

Well-Known Member
i am growing some bonsai mother right now actually.
it was an experment to see what a winter outdoor grow in oz would do to te plants and so far they are exactly like normal big one but tiny about 33cm high and ones starting to get some buds.
checkout in the outdoor grow section my winter outdoor oz grow thread for pics.
 

GoodFriend

Lumberjack
... i haven't seen this posted here on rollitup, so i didn't really know what you guys were talking about... so for all those reading this like me... here is the OG article on bonsai moms...

Part 1
MAKING, MAINTAINING, AND RENOVATING BONSAI MOMS


This Article was originally published at overgrow.com 27/6/2000. Revised and archived 20/10/03 by Oldtimer1.
Now we will deal with every aspect of the care and maintenance of Mums including root and branch pruning as well as the renovation on an old mother well past her sell by date.

"Tired of huge unwieldy mothers that take up too much space? As I've shown before, a fully established bonsai mum only takes 8 inches x 8 inches."

This bonsai mother, if well fed, produce 10 to 30 good cuttings every 14 days under an HID or every 20 days under fluorescent shop light. This means a 4 ft x 2 ft shoplight with 18 Mums, could produce an output of over 9500 cuttings a year.


Typical Bonsai Mum


We are not talking about intensive production here but it shows just how flexible and efficient the system can be. What it does for the connoisseur is allow them to keep a good selection of varieties in a relatively small space. If you don't fancy growing one for 6 months or a year it doesn't matter. All she will need is regular maintenance.

Lets start with Mumming up a plant from a rooted cutting, once again this is simple. You will find that with every batch of cuttings a few will stand out, being sturdier and generally looking better all round, pick one or two of these to make your Mums, not some wimpy left over reject. Remember this mum will provide you with cuttings 4 to 18 times a year for the next 3 to 15 years, so only the best will do. Pick a fully rooted through cutting from the plug tray and pot on into a 2.5 inch square pot. I find square pots much easier to deal with when it comes to root pruning, as you will see later.

Grow it on for a few days so it can start rooting through then trim its top back to leave 3 or 4 side shoots.


These little branches to be will make the main framework of your Mum. Ideally as they grow they should form an open cup shape. The top 2 will grow the fastest and when they get to about 5 inches pinch or snip out their growing tips to just above a leaf node. This will allow the second pair to catch up in a day or so, then pinch them out as well. This will encourage side shoots to form, any that grow into the central cup shaped space pinch out.

You will now have 6 to 8 leading shoots coming up. When they reach 4 to 6 inches they can be taken as your first set of cuttings. You cut them back to just above the first leaf node of the new growth. So after the cuttings have been taken the mum is only a tiny bit larger than the last time she was cut back but the main branches will be starting to get thicker.

Now is the time to move up to the next pot size and a 3 inch sq is ideal. The next set of leading shoots will tend to be 12 to 16, plus there will be others coming up from lower nodes so in total there may be 30 or more. Any really thin ones or any growing into the centre either cut back to one node or remove altogether.


In the picture above from the left:- [one], is the trimmed cutting from above. [two], Has had 2 sets of cuttings taken off and is more than ready to move to a 3 inch pot. As you can see it is a little short of N showing its better to move after only taking one set of cuttings. [three] in a 3 inch pot 12 cuttings have been taken with 2 left on to show where to cut back to. [four] is a five year old Mum that has just had 32 cuttings taken off and could do with some more small twiggy bits removed. She is in a 1 litre pot and has been since she was 3 months old.


Note how all have an open centre, this allows light to both the centre and the outside. It will fill in between taking cuttings but if pruned back to this form, makes better and more even growth giving more good cuttings each time. Water only is used while forming the Mums and no fertiliser. It is not until they are in their final 1 litre pots and a set or two of cuttings have been taken that feeding starts.


The general care and maintenance for fully formed mother plants.

The Mums need just enough fertiliser to keep them healthy. Feed of half strength fertiliser twice a month, using say a 6-2-4 fish mix as about right [its not critical]! This keeps them in good general health but doesn't over feed them. If you want faster production at any point change to a full strength feed once or twice. Every 2 to 4 weeks a new batch of cuttings are taken even if they are not needed and just put in the worm bin. You can think of it as being like having to mow the lawn and keeps the mum the same size and form for years. Because so much is taken away they can get short of macro nutrients so every month or so give them a foliar spray using maxicrop. Judge this by how the plants are looking not by a time table.

One of the main things that all growers need to learn is regular close observation. To know when they are healthy and need nothing to the first signs of deficiencies appearing. The one thing they may run short of is magnesium even if dolomite lime is used in the compost, this is easily dealt with by one watering plus a foliar spray, using 1 ounce of Epsom salts dissolved in a gallon of water.

They will need root pruning once or twice a year. This depends on how intensively they are fed and how good your water quality is. Despite what is normally quoted it is virtually impossible to flush out salt build up from a root ball. A temporary over fertilisation yes but the gradual crystallisation of salts and carbonate deposits no! If your water supply is heavily contaminated with minerals I recommend a small Reverse-Osmosis filter to clean your water for both your Mums and your production plants.

~~~~~~~~~~~~~~~

"Now root pruning and Mum renovation. "

The method of root pruning is the same for routine maintenance or renovation.

Here we are dealing with a 7 year-old mum that hasn't been root trimmed for nearly a year. I have deliberately neglected her for the last 10 weeks for purposes of showing you the recovery. She has been on a diet of R/O water only, no other feed of any sort. This is to show you how tough Cannabis is and how far you can let things slide and still get a mum back into productivity. Its not a recommended practice and continual abuse like this will eventually kill a mum.


As you can see there is little residual fertiliser left in the compost. It is what we call spent (worn out). The first thing we do is trim back nearly all the top growth back to the main framework branches. Leaving one or two tiny shoots at the tip of each branch to draw sap and keep the branch alive. If all the shoots and buds are removed, 99 times out of a 100 die back sets in-- and once that starts the whole plant usually dies within a month or two. It doesn't matter if the small shoots are yellow from lacking N, they will soon start to grow and green up as the new roots start forming!

Next the rootball should have 3/4 of an inch cut off each side and an inch off the bottom. This reduces the 4.5 x 4.5 x 4.5 inch rootball to 3 x 3 x 3.5 inches high after the loose compost is scraped from the top. This means that two-thirds of the soil is being replaced. A good full strength organic compost is used when repotting and it only takes a day or two for the roots to really start growing into the new compost.


Set the bottom of the rootball on about 3/4 of an inch of compost then pack out the sides and finally cover the top with a 1/4 to 3/8 of an inch. This means the mum is planted round a 1/4 inch deeper every time root pruning is done about 1/2 an inch a year. In a couple of years from now I will cut down vertically and split the plant in two as the side branch will have a root system of its own. Using this method the roots are constantly being replaced and as well the main trunk replaced slowly. This seems to keep the Mums healthy for many years.


The second mother of our selected "ES" line lasted for just over 15 years using this method. Interestingly if you want to hold a plant long term in a small pot say a 2.5 inch sq this can be root pruned the same as the 1 litre plant but only taking off about 1/4 of an inch all round. I keep Dads in this pot size and some are over 5 years old.


NOTE: it is very important to make sure there are no voids or air gaps left when packing the sides, use a pencil or small dibber, fill slowly and firm lightly.

The last picture is 12 days after the root and top pruning- It tells it's own story! Already there are enough nice leaders to make 10 good cuttings. I have to admit to putting her under an sodium light to speed up her development and make this Issues deadline. Even so, the recovery wouldn't have taken much longer in the mum box.

Thats it you should have all the info you need to make and root cuttings in compost the make and maintain bonsai mother plants, its easy, give it a go! .
 

GoodFriend

Lumberjack
TAKING CLONES FROM BONSAI MOMS

"A lot of interest has been shown in the methods we use to keep mother plants, how we make them, manage them and how we do our cuttings production." - Oldtimer1 1999.
Article originally published at overgrow.com April 30 2000 this article is revised and archived 5/8/03


This issue we will we will cover our soft tip cuttings system in detail and a brief outline about our mother plants! Every grower can get the same results by imitating our easy organic system.


As an outline our mother plants are kept root restricted, i.e. using some standard bonsai methodology and techniques. It is an excellent method for keeping mother plants long term and has proved a very reliable system since we developed this method some 24 years ago. The longest a mother has lived like this without having to be replaced is just over 15 years. On average pure indicas need replacing every 3 years, hybrids every 4 to 5 years and pure sativas every 6 to 7 years! Of course it depends on the care they are given! Male plants can be kept in the same way and in fact will stand more abuse than mother plants.


Clone, Mum and Dad box.
Its a double deck with 2 times 4ft x 2 ft lights each with 4 x 40w coolwhite fl lights Close up of tray top left
270 rooted cuttings, in plugs ready to go into pots. Close up of top tray right
100 cuttings at the start of rooting.


One of the big advantages using bonsai mother plants, is that each only needs a maximum of 8 x 8 inches. So a 2 ft x 2 ft x 2 ft high box with a 4 tube fluorescent shoplight can hold 9 mothers. We call the plants we keep Mums and Dads! Not to be confused with chrysanthemums (that bit is for you Cha Cal).


Some of the quotes I have read in High Times saying that you get genetic degeneration by keeping mother plants long term, this is total rubbish!


Degeneration can certainly occur if a mother plant gets infected with a reversion virus. I will cover this later! The grass produced today from our mother plants is just as potent and smells just as good as when it was first grown out from seed many years ago. In fact it is better now, we have better lighting and superior growing techniques, allowing the clones to express their potential more fully.


I am going to start by showing you our largest mum, this time from above. She is in a 1-litre pot (the largest size used). With all the top growth pictured she is about 13 inches tall and ready to take cuttings. Inset is a cutting being clipped out see below.


The type we take are small soft tip cuttings, 2.5 to 3.5 inches long. It is important that there is no lignification at all. When I first discussed this with friends on the net some 3 years ago was with some disbelief, and a lot of amusement at the idea of toothpick sized cuttings. How on earth was I going to get a decent crop of buds? Well, soft tip cuttings have an unrestricted growth potential and grow much faster than semi hard or fully lignified hard wood cuttings. At the end of the day we get a much higher crop weight using the soft tip cuttings.

I use fine point scissors for trimming the plants, they are fast and easy to use. Quick enough to do 2 to 3 cuttings a minute. Forget the stories that they bruise the stem and cause rot, it's rubbish! They do need to be sharp, so buy a new pair and keep them just for this task. As far as hygiene is concerned, providing all you Mums are free of virus, simply put them through the dishwasher after every session to get rid of the sap build up. This keeps them free and easy to use.


How to prepare the cuttings

Inserting cuttings and covering with bag


To Summarize

Preparing the cutting:-


[one] - typical tip cutting ready to prepare.


[two] - snip off the side shoot and leaf the node you want to root.


[three] - cut just below the node you want to root.


[four] - dip the trimmed node in rooting hormone.

Inserting the cuttings:-

-3.5 inch square pots are used to root in


-Filled with half perlite and half universal compost or allmix


-The mix is pre-soaked with water dosed with 1 ml of 35% or 2ml per litre of 17.5% H2O2 and 5 ml of maxicrop


-Then the cuttings are dibbed in to the compost, 9 to 12 per pot


-The dibbed cuttings are then watered in using a fine rose same mix as above to settle them in.

-Cover with a plastic bag and put under constant 24-hour lighting


-Preferably cool-white fluorescent lighting at 20 w per sq foot and a temperature of 75 degrees fahrenheit.

~~~~~~~~~~~~~~~~~~


"There are a number of reasons for not rooting directly into plug trays."
Lets look at what we need from a rooted cutting... We want one that is suited to growing in a confined space i.e. a pot. They are as closely matched as possible. To get good yields from a grow, uniformity is the rule. It is no good having one plant that produces 50 grams when its 2 neighbours only produce 15 grams each. They are identical stock but this is what is often seen in grow after grow. It is much better to try and get all the plants averaging 35 grams well within the capacity of the stock line of a plant that can make 50 grams.

Remember we are talking about growing in soil based or soilless compost mixes. The root type that the cutting produces is very important, lots of fine feeder roots are the ideal, anchor and tap roots are totally unwanted when growing in a pot. Remember the amount feeder root mass directly effects the potential crop weight

The 3.5-inch pots are 4 inches high; the rooting mix is very open with low nutrient content. This encourages early taproot development. Not all the cuttings will have rooted at the same time, so when they are transferred to the plug trays the root balls are trimmed to the same size and the tap root is removed, this goes a long way towards equalising the clones. Once they are transferred as below they tend to stay pretty even and grow on rapidly. To show what we are looking for some equalised clones grown on and just put into flower. There are several varieties in this grow and there is not more than an inch or so between plants in each variety. They are placed by variety to make a stadium effect and make maximum use of light.


Around ten days later the cuttings will have rooted through. The rootball is gently broken up, each cutting has its roots trimmed back to equalise the cuttings and make them fit the plug tray! Full strength peat or coir compost using organic base fertilisers, are used for this.

Then they are put back in the Clone/Mother box for about 5/6 more days until thoroughly rooted through, this is very important at all stages of repotting! Fully rooted plants just jump ahead when moved on-- we have found that plants moved into bigger pots too early typically produce 25% to 30% less final crop weight!


Moving the rooted cuttings to plug trays.
Cuttings in plug trays a few days later ready to move on to their first pots.
Showing a cutting out of the plug tray, fully rooted out and ready to go.


Cutting like this can be taken from any plants in veg. That's it you are ready to grow!
 

Pool

Well-Known Member
I love my bonsai mums.... only have one right now, but she's still pretty young(almost 8 months)... last one was offed due to moving...

Here's a few shots taken a few days ago, one before cuttings and trimming, on after(shitty pic, but it was dark and my flash don't work).

She's a bit bigger than my recent, but she's just under 11 inches now(was just under 17 in the first pic). I did leave a few big shoots I would normally cut off, but I need some more clones soon.

P.S.- I too learned bonsai from research at OG, and various other sites. I didn't really have it down though till I read a thread over at HG420 about them, with detailed pics on a start to finish mum, and all the work it needs.
 

Attachments

GoodFriend

Lumberjack
damn... the picks were deleted...

sorry folks... if anyone else has this little guide saved somewhere with the pics... pm me so we can put this guide back together...

i'm planning on using this technique!!!
so, maybe someone else can make another bonsai guide, specific for rollitup? huh? hUH?
 

Pool

Well-Known Member
Well, I know that thread is posted over on another forum, maybe a google search of "overgrow bonsai" might land you somewhere.

Honestly though, it's pretty simple.

Step 1: Take a cutting and root it of whatever strain you're new mum's gunna be.

Step 2: LST and pinch your girl early on, once she's about 5 inches. Simple bend-over fer a few days here n' there.

Step 3: Once she has 5-6 internodes, top her leaving 3-4 of them.

Step 4: LST and pinch the crap ot of her, forming her however you want, the possibilities are endless.

Step 5: You need to figure out which branches you want to be the initial trunk. I like to leave 2-3. Cut off any side branch that's not in your vision.

Step 6: Be sure to top and trim her back, roughly with every 3-5 inches of growth.

After she's had month or two old of that, she should be big enough for clones.

Also, whenever you notice her going rootbound to the point of hard, purple un-bendable stems(unclonable), trim them roots back. Just trim a 2 inch square around the stalk(so roughly left with 4-5 inch square), and as close to the root ball on bottom as possible. Repot in same pot.
 

PceNluV

Well-Known Member
ALL ABOUT BONSAI MOMS
This article was originally written by OG member Oldtimer1,
Part 1
MAKING, MAINTAINING, AND RENOVATING BONSAI MOMS


This Article was originally published at overgrow.com 27/6/2000. Revised and archived 20/10/03 by Oldtimer1.
Now we will deal with every aspect of the care and maintenance of Mums including root and branch pruning as well as the renovation on an old mother well past her sell by date.

"Tired of huge unwieldy mothers that take up too much space? As I've shown before, a fully established bonsai mum only takes 8 inches x 8 inches."

This bonsai mother, if well fed, produce 10 to 30 good cuttings every 14 days under an HID or every 20 days under fluorescent shop light. This means a 4 ft x 2 ft shoplight with 18 Mums, could produce an output of over 9500 cuttings a year.


Typical Bonsai Mum


We are not talking about intensive production here but it shows just how flexible and efficient the system can be. What it does for the connoisseur is allow them to keep a good selection of varieties in a relatively small space. If you don't fancy growing one for 6 months or a year it doesn't matter. All she will need is regular maintenance.

Lets start with Mumming up a plant from a rooted cutting, once again this is simple. You will find that with every batch of cuttings a few will stand out, being sturdier and generally looking better all round, pick one or two of these to make your Mums, not some wimpy left over reject. Remember this mum will provide you with cuttings 4 to 18 times a year for the next 3 to 15 years, so only the best will do. Pick a fully rooted through cutting from the plug tray and pot on into a 2.5 inch square pot. I find square pots much easier to deal with when it comes to root pruning, as you will see later.

Grow it on for a few days so it can start rooting through then trim its top back to leave 3 or 4 side shoots.


These little branches to be will make the main framework of your Mum. Ideally as they grow they should form an open cup shape. The top 2 will grow the fastest and when they get to about 5 inches pinch or snip out their growing tips to just above a leaf node. This will allow the second pair to catch up in a day or so, then pinch them out as well. This will encourage side shoots to form, any that grow into the central cup shaped space pinch out.

You will now have 6 to 8 leading shoots coming up. When they reach 4 to 6 inches they can be taken as your first set of cuttings. You cut them back to just above the first leaf node of the new growth. So after the cuttings have been taken the mum is only a tiny bit larger than the last time she was cut back but the main branches will be starting to get thicker.

Now is the time to move up to the next pot size and a 3 inch sq is ideal. The next set of leading shoots will tend to be 12 to 16, plus there will be others coming up from lower nodes so in total there may be 30 or more. Any really thin ones or any growing into the centre either cut back to one node or remove altogether.


In the picture above from the left:- [one], is the trimmed cutting from above. [two], Has had 2 sets of cuttings taken off and is more than ready to move to a 3 inch pot. As you can see it is a little short of N showing its better to move after only taking one set of cuttings. [three] in a 3 inch pot 12 cuttings have been taken with 2 left on to show where to cut back to. [four] is a five year old Mum that has just had 32 cuttings taken off and could do with some more small twiggy bits removed. She is in a 1 litre pot and has been since she was 3 months old.


Note how all have an open centre, this allows light to both the centre and the outside. It will fill in between taking cuttings but if pruned back to this form, makes better and more even growth giving more good cuttings each time. Water only is used while forming the Mums and no fertiliser. It is not until they are in their final 1 litre pots and a set or two of cuttings have been taken that feeding starts.


The general care and maintenance for fully formed mother plants.

The Mums need just enough fertiliser to keep them healthy. Feed of half strength fertiliser twice a month, using say a 6-2-4 fish mix as about right [its not critical]! This keeps them in good general health but doesn't over feed them. If you want faster production at any point change to a full strength feed once or twice. Every 2 to 4 weeks a new batch of cuttings are taken even if they are not needed and just put in the worm bin. You can think of it as being like having to mow the lawn and keeps the mum the same size and form for years. Because so much is taken away they can get short of macro nutrients so every month or so give them a foliar spray using maxicrop. Judge this by how the plants are looking not by a time table.

One of the main things that all growers need to learn is regular close observation. To know when they are healthy and need nothing to the first signs of deficiencies appearing. The one thing they may run short of is magnesium even if dolomite lime is used in the compost, this is easily dealt with by one watering plus a foliar spray, using 1 ounce of Epsom salts dissolved in a gallon of water.

They will need root pruning once or twice a year. This depends on how intensively they are fed and how good your water quality is. Despite what is normally quoted it is virtually impossible to flush out salt build up from a root ball. A temporary over fertilisation yes but the gradual crystallisation of salts and carbonate deposits no! If your water supply is heavily contaminated with minerals I recommend a small Reverse-Osmosis filter to clean your water for both your Mums and your production plants.

~~~~~~~~~~~~~~~

"Now root pruning and Mum renovation. "

The method of root pruning is the same for routine maintenance or renovation.

Here we are dealing with a 7 year-old mum that hasn't been root trimmed for nearly a year. I have deliberately neglected her for the last 10 weeks for purposes of showing you the recovery. She has been on a diet of R/O water only, no other feed of any sort. This is to show you how tough Cannabis is and how far you can let things slide and still get a mum back into productivity. Its not a recommended practice and continual abuse like this will eventually kill a mum.


As you can see there is little residual fertiliser left in the compost. It is what we call spent (worn out). The first thing we do is trim back nearly all the top growth back to the main framework branches. Leaving one or two tiny shoots at the tip of each branch to draw sap and keep the branch alive. If all the shoots and buds are removed, 99 times out of a 100 die back sets in-- and once that starts the whole plant usually dies within a month or two. It doesn't matter if the small shoots are yellow from lacking N, they will soon start to grow and green up as the new roots start forming!

Next the rootball should have 3/4 of an inch cut off each side and an inch off the bottom. This reduces the 4.5 x 4.5 x 4.5 inch rootball to 3 x 3 x 3.5 inches high after the loose compost is scraped from the top. This means that two-thirds of the soil is being replaced. A good full strength organic compost is used when repotting and it only takes a day or two for the roots to really start growing into the new compost.


Set the bottom of the rootball on about 3/4 of an inch of compost then pack out the sides and finally cover the top with a 1/4 to 3/8 of an inch. This means the mum is planted round a 1/4 inch deeper every time root pruning is done about 1/2 an inch a year. In a couple of years from now I will cut down vertically and split the plant in two as the side branch will have a root system of its own. Using this method the roots are constantly being replaced and as well the main trunk replaced slowly. This seems to keep the Mums healthy for many years.


The second mother of our selected "ES" line lasted for just over 15 years using this method. Interestingly if you want to hold a plant long term in a small pot say a 2.5 inch sq this can be root pruned the same as the 1 litre plant but only taking off about 1/4 of an inch all round. I keep Dads in this pot size and some are over 5 years old.


NOTE: it is very important to make sure there are no voids or air gaps left when packing the sides, use a pencil or small dibber, fill slowly and firm lightly.

The last picture is 12 days after the root and top pruning- It tells it's own story! Already there are enough nice leaders to make 10 good cuttings. I have to admit to putting her under an sodium light to speed up her development and make this Issues deadline. Even so, the recovery wouldn't have taken much longer in the mum box.

Thats it you should have all the info you need to make and root cuttings in compost the make and maintain bonsai mother plants, its easy, give it a go!
 

Kerberos

Active Member
Raise this thread from the dead.. I lost all my mothers and then I left the stragglers on my last harvest active, returned the light over two weeks to 22/2 and after 4 weeks new growth started. Harvested those shoots into a cloner and kept on trucking. In the end I think I've had one generation or another of this same Cindy 99 since I first planted it back in.. 1998 hahah.. How can you not love doing this? Damn, common NORML.
 
Top