...All Things Vero...

Would you consider buying a VERO after reading through some of the posts?


  • Total voters
    357

Abiqua

Well-Known Member
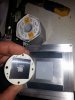
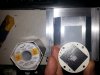
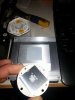
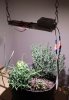
Just picked up a couple of these carclo reflectors, steep angle, but enough for now to mess around with....but meant for Cree CXA cobs up to 18xx series only....but a wide range of other manf. small low powered cobs.....and I don't really see anybody messing around with V10/13 with lenses, so....it begins a project for adapting these to Vero 10's for side lighting.....:peace:
http://www.ledsupply.com/led-optics/carclo-newton-wide-spot-mirror-reflector


MFG LED Eff. FWHM Cd/lm
CREE Cree XLamp CXA 1507 White 81 41 1.90
CREE Cree XLamp CXA 1816 White 82 44 2.0
CREE Cree XLamp CXA 1820 White 80 45 1.8
CREE Cree XLamp CXA 1830 White 74 48 1.55
LG LG COB 10W White 74 46 2.3
LUXEON Lumileds Luxeon COB 1203 77 35 2.50
LUXEON Lumileds Luxeon COB 1205 74 43 2.0
LUXEON Lumileds Luxeon COB 1208 73 45 1.9
LUXEON Lumileds Luxeon K12 UP Whi 78 47 2.4
LUXEON Lumileds Luxeon K16 UP Whit 75 48 2.2
NICHIA Nichia COB NSBWL 121A White 80 45 1.93
NICHIA Nichia COB NSCNJ 216A White 78 48 1.70
OSRAM Osram Soleriq S13 White 81 43 2.3
OSRAM Osram Soleriq S19 White 76 47 1.77
SAMSUNG Samsung COB LC040B Whit 80 48 1.65
SHARP Sharp Mega Zenigata 25W White 77 47 2.10
 

DonPetro

Well-Known Member
Same here with a pair of Vero 10s on a cheap <$3 300mA driver. I havent got my Veros all on the HLG driver yet still waiting for friggin fasttech (slowtech) cheap driver for single V10 driving to test vF and "bin" them that way to match sets of 5 up.

I had probed pos and neg and with the plug out of the socket the voltage was at 18.x volts and would slowly drop .1 at a time, maybe an odd capacitor issue with these cheap drivers not sure. Hoping and thinking they wont glow when hooked up to the HLG driver and will let you know when I find out.
Yea that sounds exactly like whats happening with mine. Not sure whether to use it or not.
 

avnewb

Well-Known Member
Anyone done vero 10s vertical? I thought I might use some of my last ten 5k V10s vertical on the edge of the room.
I could hang each at an angle close to canopy but it would be easier to mount them a few inches off the wall where I dont have to worry about adjusting them as much.
 

DonPetro

Well-Known Member
Anyone done vero 10s vertical? I thought I might use some of my last ten 5k V10s vertical on the edge of the room.
I could hang each at an angle close to canopy but it would be easier to mount them a few inches off the wall where I dont have to worry about adjusting them as much.
I thought about that when i was hanging my little 8w unit. I had it hanging by one cable as i was adjusting the other and thought hey, these would be great for side lighting.
 

avnewb

Well-Known Member
You are right the LEDs plastic will stick out just a bit over the edge of the raised part on the heat sink. But if you turn it correctly you can still attach it with the four screws. Yes, two corners of the LEDs flat base will hang off about 1/8th, but it is a square base under a round array of LEDs, so those corners are not key in terms of the over all heat transfer. Or at least this is my reasoning, and I have not had any problems with it.
What about the pre applied thermal compond? If use all 4 holes the square pad on back of vero29 won't like up with the orientation of the preapplied thermal compound. Or will the thermal compound spread ince hot then I tighten down screws a bit more?

Or should u remove the arctic MX-4 that comes on it and use PK-3 or something (which I would prob have to order).
 
Last edited:

Bueno Time

Well-Known Member
Well I got tired of waiting for cheap 300ma driver for single Vero 10 to test vF and realized through a stoned epiphany that I can use my HLG-60H-42B (dimmed with pot.) to test single Vero 10s.

So I tested 35 of my Vero 10 4000K and all were within 24.8-25.1v at 5.3w draw on kill a watt (vF did change as current went up/down) as test current was closer to the actual mA I will be running my Vero 10s (200-215mA MAX each) than if I tested them at 300mA, I think I got a little more accurate number for what each COBs vF is at/near the actual mA I will be running. Pretty cool that I could use my dimmable veg driver to test them, only wish I would have thought about it sooner. I am going to play with dimming spare Vero 10s to see how bright one of them can get just for fun.

Also @DonPetro, they did not glow when the driver was unplugged on the HLG driver like they do with the cheap 300mA drivers I have.
 

avnewb

Well-Known Member
So when you angle the vero 29 on the arctic 11 so that the 4 mounting holes line up with the flat part of the wedge, two of the corners of the metal pad on the bottom of the Vero 29 overhand the wedge on the heatsink so will not have any active cooling. Ya, not a big deal probably, but I think I will just do 2 screws each with the square pad oriented with the square thermal compound pad. Seams like having the metal pad centered on the MX-4 thermal compound is best IMO if if only held by 2 screws. Rather than it being like a diamond on a square where the other two corners are also not touching anything due the height of the thermal compound as I have no more to add...sorry if I did not explain this clearly...
 

Attachments

Bueno Time

Well-Known Member
So when you angle the vero 29 on the arctic 11 so that the 4 mounting holes line up with the flat part of the wedge, two of the corners of the metal pad on the bottom of the Vero 29 overhand the wedge on the heatsink so will not have any active cooling. Ya, not a big deal probably, but I think I will just do 2 screws each with the square pad oriented with the square thermal compound pad. Seams like having the metal pad centered on the MX-4 thermal compound is best IMO if if only held by 2 screws. Rather than it being like a diamond on a square where the other two corners are also not touching anything due the height of the thermal compound as I have no more to add...sorry if I did not explain this clearly...
Your going to want the whole surface coated with thin layer of thermal compound I wouldnt just put them centered over what is there now if it wont cover the entire thermal inferface. I would get a small tube of thermal compound of your choice its cheap enough and should be able to get it within a few days or a week off ebay or similar.
 

avnewb

Well-Known Member
FYI,
I didnt want to overpay at lowes for 3mm screws so I went with #4-40 and they also have a 4-40 tap with the right size drill bit for $5. I didnt have a 3mm-0.5 tap either and would have had to buy a set for more money ($15 at HF or $25 at lowes).
#6-32 also fits nice but I cannot find my calipers so I cannot ensure my holes will be lined up perfect as they would need to be almost perfect with #6 screws. #5s are very close to 3mm but not something lowes caries.
I picked up a Skil drill press from lowes for $100 with $20 off $100 coupon code. Hopefully chuck/spindle does not wobble too bad.

Oh,
and a washer should be used with the 4-40s. You could get away with out them as the head is big enough but I plan to use them. With only using two screws it will help distribute the force when tightening and ensure I dont crack the vero29 and I wont have to worry about trying to center head on the hole as much...blablabla
 
Last edited:

avnewb

Well-Known Member
Your going to want the whole surface coated with thin layer of thermal compound I wouldnt just put them centered over what is there now if it wont cover the entire thermal inferface. I would get a small tube of thermal compound of your choice its cheap enough and should be able to get it within a few days or a week off ebay or similar.
Ya, I was hoping it would squeeze out when warm to cover 1-2mm around edges that it doesn't reach.
Took your advice and I will remove the MK-4 and ordered some PK-3.

Hope it gets here soon.
 
Last edited:

DonPetro

Well-Known Member
Well I got tired of waiting for cheap 300ma driver for single Vero 10 to test vF and realized through a stoned epiphany that I can use my HLG-60H-42B (dimmed with pot.) to test single Vero 10s.

So I tested 35 of my Vero 10 4000K and all were within 24.8-25.1v at 5.3w draw on kill a watt (vF did change as current went up/down) as test current was closer to the actual mA I will be running my Vero 10s (200-215mA MAX each) than if I tested them at 300mA, I think I got a little more accurate number for what each COBs vF is at/near the actual mA I will be running. Pretty cool that I could use my dimmable veg driver to test them, only wish I would have thought about it sooner. I am going to play with dimming spare Vero 10s to see how bright one of them can get just for fun.

Also @DonPetro, they did not glow when the driver was unplugged on the HLG driver like they do with the cheap 300mA drivers I have.
Thats good to know. Ive been looking at upgrading for what its worth.
 

Abiqua

Well-Known Member
FYI,
I didnt want to overpay at lowes for 3mm screws so I went with #4-40 and they also have a 4-40 tap with the right size drill bit for $5. I didnt have a 3mm-0.5 tap either and would have had to buy a set for more money ($15 at HF or $25 at lowes).
#6-32 also fits nice but I cannot find my calipers so I cannot ensure my holes will be lined up perfect as they would need to be almost perfect with #6 screws. #5s are very close to 3mm but not something lowes caries.
I picked up a Skil drill press from lowes for $100 with $20 off $100 coupon code. Hopefully chuck/spindle does not wobble too bad.

Oh,
and a washer should be used with the 4-40s. You could get away with out them as the head is big enough but I plan to use them. With only using two screws it will help distribute the force when tightening and ensure I dont crack the vero29 and I wont have to worry about trying to center head on the hole as much...blablabla
You can find 4-40 spiral flute bottoming taps and 4-40 roll tap bottomers as well on Ebay for cheap....$6 or so.....That's what I would recommend, if your tap is a spiral tip [which I have a feeling it is] they are not ideal for these type of holes.....:peace:
 

avnewb

Well-Known Member
You can find 4-40 spiral flute bottoming taps and 4-40 roll tap bottomers as well on Ebay for cheap....$6 or so.....That's what I would recommend, if your tap is a spiral tip [which I have a feeling it is] they are not ideal for these type of holes.....:peace:
I have drilled and taped before but ya my tap is clogging worse than I though and will end up just gumming thing up so done..
Im not sure what to get:
This?
http://www.ebay.com/itm/4-40-H2-Spiral-Flute-Bottoming-ANSI-CNC-Tap-HSS-V-TiN-Coated-YG-1-Part-F8162-/310549937294?pt=LH_DefaultDomain_0&hash=item484e37fc8e

I assume a 4-40 roll tap bottomer does not have a beveled edge to finish bottom threads but IDK.

Thanks.
 

churchhaze

Well-Known Member
It's too late now, but here's a better deal than lowes metric, for anyone else who's using metric screws.

https://www.boltdepot.com/Product-Details.aspx?product=7218

FYI,
I didnt want to overpay at lowes for 3mm screws so I went with #4-40 and they also have a 4-40 tap with the right size drill bit for $5. I didnt have a 3mm-0.5 tap either and would have had to buy a set for more money ($15 at HF or $25 at lowes).
#6-32 also fits nice but I cannot find my calipers so I cannot ensure my holes will be lined up perfect as they would need to be almost perfect with #6 screws. #5s are very close to 3mm but not something lowes caries.
I picked up a Skil drill press from lowes for $100 with $20 off $100 coupon code. Hopefully chuck/spindle does not wobble too bad.

Oh,
and a washer should be used with the 4-40s. You could get away with out them as the head is big enough but I plan to use them. With only using two screws it will help distribute the force when tightening and ensure I dont crack the vero29 and I wont have to worry about trying to center head on the hole as much...blablabla
 

Abiqua

Well-Known Member
I have drilled and taped before but ya my tap is clogging worse than I though and will end up just gumming thing up so done..
Im not sure what to get:
This?
http://www.ebay.com/itm/4-40-H2-Spiral-Flute-Bottoming-ANSI-CNC-Tap-HSS-V-TiN-Coated-YG-1-Part-F8162-/310549937294?pt=LH_DefaultDomain_0&hash=item484e37fc8e

I assume a 4-40 roll tap bottomer does not have a beveled edge to finish bottom threads but IDK.


Thanks.
Yep, that ebay one is the EXACT same one I bought. Works awesome!

as for a bottoming roll tap, they are pretty much the same, just a bit more, but they don't cut, they extrude and so apparently you don't have to be as precise or take as long.....youtube thread form,roll tap, roll form, etc....if your interested further....

Bicit recommends this type of tap.....

Here is a Balax on ebay, [I do think that all bottoming threads have the 1st 3 bevels tapered, that is what makes any tap a bottoming tap, I believe....]
http://www.ebay.com/itm/BALAX-4-40-H5-ROLL-FORM-BOTTOM-TAP-10725-010-NEW-/121437774401?pt=LH_DefaultDomain_0&hash=item1c46416241

fyi, the spiral tip taps are 5-7 tapered bevels and that is one reason, why they jam up and make ovals on occasion....especially in short blind holes:peace:
 

Greengenes707

Well-Known Member
I went the self tapping route recently. Tapping with hardware store quality taps blows imo. 3/16 self tapping 4-40 pan heads...100 for $7. Drill a #41 hole and then just drive them in. I self tap without the cobs...then back it out...then mount the cob. Takes no time and is just as clean looking if not more.
 

coolbreez1

Well-Known Member
Avnewb:

I think only using two screws will likely work fine, I have not done it, but I do plan on using thermal paste and kapton tape for my next builds, so I don't see why using two screws would pose a problem. Also, it is technically challenging to have all four holes line up perfectly as you mention, one of the reasons I plan on going screwless next build. Also as GG says... I did not tap my heat sinks when I mounted the Vero 29s, I did something similar to what he describes.
 
Top