Dr Pepper Bud
Member
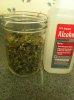
This tutorial covers making QWISO (Quick Isopropyl Alcohol) hash extraction. Isopropyl alcohol is more commonly known as rubbing alcohol. You need to use a high alcohol percentage rubbing alcohol in order for this to work best, the lower the alcohol percentage the more water. Water boils at 212f vs isopropyl alcohol which has a boiling point of only 180f. You can purchase isopropyl alcohol from various places 70% is regularly available at pharmacies and super markets, but we don't want this. Most pharmacies typically will have a few bottles of 91% isopropyl alcohol next to the 70%. However if you can find a super market that caries 91% they tend to carry larger bottles and they usually carry more bottles in stock than pharmacies. There is also 99% and 100% isopropyl alcohol available though I personally have not been able to find it other than online. The higher the alcohol percentage the more quickly it will evaporate.
Please note that like butane, isopropyl alcohol and it's fumes are flammable and dangerous please use caution whenever you work with it and if you choose use low electric heat to speed up evaporation only do so outside. Make sure to do all your smoking prior to the extraction process and wear paint masks as the fumes will effect you even if you don't apply heat.
If you follow this tutorial correctly you will have some damn fine hash to enjoy by yourself or with friends. Remember its called QWISO for a reason everything needs to be done as quickly as possible in order to obtain the best quality material. With practice your hash quality should increase.
First you start with your plant material this can be buds, trim or any combination of the two. The higher quality the plant material the higher quality the end product will be and buds will yield more than sugar leaves/trim. You can prepare your material different ways and it is really up to personal preference some may argue higher yield from wet frozen vs dry frozen vs room temp its all relative. I personally let my material become mostly dry with just a little moisture left and then i freeze it until I'm ready to run it you can experiment however you like until you find the best way for you.
Once you have your plant material ready you need to get your extraction materials. You may add or subtract to this list as you like, but this is what I make sure to have. You need to double check because once you pour the alcohol everything needs to happen like clock work for the best quality hash so there is no time to run around grabbing things you forgot.
Once you have everything ready and you double checked its time to start the process. The first step as I mentioned is the actual extraction process. Take your plant material (if you choose to keep it frozen as I do remove it from the freezer now) and pour it into your mason jar make sure not to fill it more than 3/4 of the way. You can gently pack down the plant material in the jar but you don't want it to be too tight you want the alcohol to reach the surface of all the material to get as many cannabinoids as possible. Using a paper funnel makes it easier to pour the material into the jar. I recommend using ground up plant material in order to make the whole process easier, but again it's all up to you.
(This step is optional but a good preventative measure. Set up your 4 glass cups side by side and stuff one coffee filter in the center of each. You want to leave enough of the filter above the cup so you can fold it over the lid of the cup and place a rubber band around the outside to hold it in place. This coffee filter is there in case you rip or tear the coffee filters that will hold the actual plant material in a further step. If you elect to skip this step simply set the cups up side by side without the filters.)
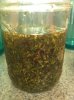
Once you have all your plant material in your jar(s) it's time to pour the alcohol (if you are using multiple jars do one at a time you can store the ones you are not using yet in the freezer once you add the plant material). You want to pour alcohol until it is just slightly higher than the plant material. Now you are going to shake the jar vigorously for exactly 20 seconds this is the only time you truly shake the jar so make sure you shake well, but do not exceed the 20 seconds for any reason.
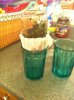
Remove the lid and take two coffee filters (one inside the other) and place them around the rim of the jar tightly, holding them in place with your hand. With your other hand flip the jar upside down above your first glass. Once you have a good grip on the filters you can slide them down so just a small amount of the filter is actually touching jar. This creates a pocket for the plant material/alcohol in the filter which will make the alcohol strain faster than if you kept the filter tight on the jar.
Once all the alcohol is out of the jar carefully remove the filter from the jar making sure to get the plant material either in the jar or filter the less in the filter the better. Then twist the top (open) end of the filter closed and continue slowly twisting it all the way to the bottom of the filter. You want to make sure to squeeze out as much alcohol as possible. Untwist the filter in the jar to get the remaining plant material back into the jar or simply discard the coffee filters with the material inside. This is where I use the Ziploc bags to hold the used filters so I can contain the remaining fumes on them.
As quickly as possible pour more alcohol into the jar until it is slightly higher than the plant material. This time I just do a single shaking motion going up and then back down. Then I remove the lid and repeat the straining process using the second glass cup.
The 3rd rinse I swirl the alcohol around the jar two times and do not shake it at all. Again repeat the previous steps with the third glass.
The 4th rinse is one final swirl to get any remaining cannabinoids from the plant material. After I finish straining the alcohol from the 4th rinse I discard the plant material with the coffee filters. I have done a 5th rinse before, but after 4 the quality of the hash begins to decline as too much chlorophyll begins to be absorbed.
If you have any more jars you can repeat the process with them now using the same or new cups.
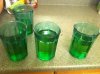
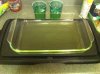
Now you are left with 4 cups of yellow/greenish alcohol. You may pour all 4 glasses into one Pyrex dish or you can keep them separate or add cups 1 & 2 in one dish and cups 3 & 4 in another. Obviously the first glass is the most potent, but if you did the process quickly enough each cup should be pretty similar so I typically just add all 4 to one dish since I have practiced this particular technique for quiet some time. As always personal preference will deviate how you choose to proceed.
Here is where the optional griddle comes into play. You may now take your Pyrex dish and place it on a griddle between Warm-200f to speed up the evaporation process of the alcohol. Make sure you do this outside away from any smokers, flames or property that could be damaged. Even if you skip the griddle I recommend leaving the tray outside to evaporate as it is still flammable and your house will smell like someone with a serious drinking problem lives there. Just make sure to watch out that no bugs fly above your fumes and fall into the alcohol bath (having a pair of tweezers nearby is handy just in case).
Evaporation times will vary greatly depending on which alcohol percentage you used, how much alcohol you used, how big your Pyrex dish is and whether or not you used a heat source. Once all the alcohol has been evaporated you are left with a nice golden/brown film of cannabinoids on your dish. If you chose to use a heat source remove the dish when there is just a small amount of alcohol remaining and then try to evenly spread that on the dish by tilting it. Always leave it for an extra 24 hours after you think all the alcohol is gone to make sure any remaining alcohol is removed. (Continued... )
)
Please note that like butane, isopropyl alcohol and it's fumes are flammable and dangerous please use caution whenever you work with it and if you choose use low electric heat to speed up evaporation only do so outside. Make sure to do all your smoking prior to the extraction process and wear paint masks as the fumes will effect you even if you don't apply heat.
If you follow this tutorial correctly you will have some damn fine hash to enjoy by yourself or with friends. Remember its called QWISO for a reason everything needs to be done as quickly as possible in order to obtain the best quality material. With practice your hash quality should increase.
First you start with your plant material this can be buds, trim or any combination of the two. The higher quality the plant material the higher quality the end product will be and buds will yield more than sugar leaves/trim. You can prepare your material different ways and it is really up to personal preference some may argue higher yield from wet frozen vs dry frozen vs room temp its all relative. I personally let my material become mostly dry with just a little moisture left and then i freeze it until I'm ready to run it you can experiment however you like until you find the best way for you.
Once you have your plant material ready you need to get your extraction materials. You may add or subtract to this list as you like, but this is what I make sure to have. You need to double check because once you pour the alcohol everything needs to happen like clock work for the best quality hash so there is no time to run around grabbing things you forgot.
- Plant Material
- 1-2 quart or pint mason jars
- 1-2 bottles of isopropyl alcohol (depending on amount of plant material and bottle size)
- Coffee Filters
- 4 large glass cups (note: the opening of the cups must be wider than the opening of your jars)
- 4 rubber bands
- Ziploc bags (various sizes)
- 1 or 2 large Pyrex glass dishes (the kind used for casseroles, dips, ect)
- 1 electric griddle (optional)
- razor blades
- rubber gloves
Once you have everything ready and you double checked its time to start the process. The first step as I mentioned is the actual extraction process. Take your plant material (if you choose to keep it frozen as I do remove it from the freezer now) and pour it into your mason jar make sure not to fill it more than 3/4 of the way. You can gently pack down the plant material in the jar but you don't want it to be too tight you want the alcohol to reach the surface of all the material to get as many cannabinoids as possible. Using a paper funnel makes it easier to pour the material into the jar. I recommend using ground up plant material in order to make the whole process easier, but again it's all up to you.
(This step is optional but a good preventative measure. Set up your 4 glass cups side by side and stuff one coffee filter in the center of each. You want to leave enough of the filter above the cup so you can fold it over the lid of the cup and place a rubber band around the outside to hold it in place. This coffee filter is there in case you rip or tear the coffee filters that will hold the actual plant material in a further step. If you elect to skip this step simply set the cups up side by side without the filters.)
Once you have all your plant material in your jar(s) it's time to pour the alcohol (if you are using multiple jars do one at a time you can store the ones you are not using yet in the freezer once you add the plant material). You want to pour alcohol until it is just slightly higher than the plant material. Now you are going to shake the jar vigorously for exactly 20 seconds this is the only time you truly shake the jar so make sure you shake well, but do not exceed the 20 seconds for any reason.
Remove the lid and take two coffee filters (one inside the other) and place them around the rim of the jar tightly, holding them in place with your hand. With your other hand flip the jar upside down above your first glass. Once you have a good grip on the filters you can slide them down so just a small amount of the filter is actually touching jar. This creates a pocket for the plant material/alcohol in the filter which will make the alcohol strain faster than if you kept the filter tight on the jar.
Once all the alcohol is out of the jar carefully remove the filter from the jar making sure to get the plant material either in the jar or filter the less in the filter the better. Then twist the top (open) end of the filter closed and continue slowly twisting it all the way to the bottom of the filter. You want to make sure to squeeze out as much alcohol as possible. Untwist the filter in the jar to get the remaining plant material back into the jar or simply discard the coffee filters with the material inside. This is where I use the Ziploc bags to hold the used filters so I can contain the remaining fumes on them.
As quickly as possible pour more alcohol into the jar until it is slightly higher than the plant material. This time I just do a single shaking motion going up and then back down. Then I remove the lid and repeat the straining process using the second glass cup.
The 3rd rinse I swirl the alcohol around the jar two times and do not shake it at all. Again repeat the previous steps with the third glass.
The 4th rinse is one final swirl to get any remaining cannabinoids from the plant material. After I finish straining the alcohol from the 4th rinse I discard the plant material with the coffee filters. I have done a 5th rinse before, but after 4 the quality of the hash begins to decline as too much chlorophyll begins to be absorbed.
If you have any more jars you can repeat the process with them now using the same or new cups.
Now you are left with 4 cups of yellow/greenish alcohol. You may pour all 4 glasses into one Pyrex dish or you can keep them separate or add cups 1 & 2 in one dish and cups 3 & 4 in another. Obviously the first glass is the most potent, but if you did the process quickly enough each cup should be pretty similar so I typically just add all 4 to one dish since I have practiced this particular technique for quiet some time. As always personal preference will deviate how you choose to proceed.
Here is where the optional griddle comes into play. You may now take your Pyrex dish and place it on a griddle between Warm-200f to speed up the evaporation process of the alcohol. Make sure you do this outside away from any smokers, flames or property that could be damaged. Even if you skip the griddle I recommend leaving the tray outside to evaporate as it is still flammable and your house will smell like someone with a serious drinking problem lives there. Just make sure to watch out that no bugs fly above your fumes and fall into the alcohol bath (having a pair of tweezers nearby is handy just in case).
Evaporation times will vary greatly depending on which alcohol percentage you used, how much alcohol you used, how big your Pyrex dish is and whether or not you used a heat source. Once all the alcohol has been evaporated you are left with a nice golden/brown film of cannabinoids on your dish. If you chose to use a heat source remove the dish when there is just a small amount of alcohol remaining and then try to evenly spread that on the dish by tilting it. Always leave it for an extra 24 hours after you think all the alcohol is gone to make sure any remaining alcohol is removed. (Continued...
Last edited:
 .
.