lilmafia513
Well-Known Member
Hey guys, i made this today and thought i would share it with ya'!!
I got the materials at Lowes and it was under $9.00:
1- 3.25x10x24 rectangular duct, for cold air return vents.= $ 6.53
2- 1/4 x 2 1/2 Eyebolts,washers and nuts = $1.76
Total = $8.29 + Tax!!
I Posted some pics of the completed hood, forgot camera when i went to make it!
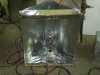
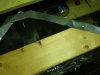
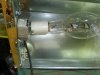
It was pretty easy to make, i traced the pattern of the inside edge of the duct work, after flexing it to my desired width, and heght for the bulb to fit in, on a piece of 2x4 lumber. ( SEE pics. 1-4)
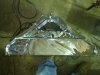
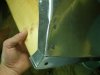
Use a saw to cut the lines and squeeze the 2x4 inside the spread ductwork. Drill pilot holes through metal into wood, and screw fast with drywall screws. You don't need many screws, just two on the top, and one on the front edge where shown. (See pics. 5-6)
***Don't sink the screwheads, they will pull through the metal and be pointless!!!***************************
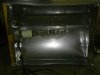
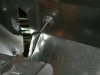
Drill pilot holes in the top surface of the hood, now put the eye screws through those holes, and fasten with a 1/4" fender washer, and 1/4" nut.
*****Make sure the holes are spaced evenly on the top of the hood, if not it will hang uneven. (See Pics. 7-9)
Now, i decided to add mylar to cover the bare lumber between the metal. Just cut strips big enough to wrap around the 2x4 and staple across the back. Duct tape works good if you put it down before you shoot the staple through. make a seam across the 2x4 on the backside(outside of the hood), and staple tight. I wasn't so worried about the backsides on mine..LOL!!!! (See Pic. 2)
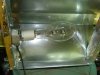
After that is in, i took the box apart that the socket is attatched to for my growlight. In the back of the socket box there are holes. Screw the box to the inside of the 2x4 through the holes.
*****WATCH THE WIRES ARE NOT IN THE WAY******* replace cover with socket, screw in light bulb(with gloves on), and clean bulb. (See Pic. 10)
Now all that is left is hanging the light. Install screws in ceiling of cabinet, rated for the weight of this hood ( My eye hooks were rated for about 65 lbs. i think). But anything should work for this, it's not heavyv at all!!! (See Pic. 11) edit:the light is not on yet...LOL!!!!!)
Sorry so long guys, but thought it would be helpful!!!
I got the materials at Lowes and it was under $9.00:
1- 3.25x10x24 rectangular duct, for cold air return vents.= $ 6.53
2- 1/4 x 2 1/2 Eyebolts,washers and nuts = $1.76
Total = $8.29 + Tax!!
I Posted some pics of the completed hood, forgot camera when i went to make it!
It was pretty easy to make, i traced the pattern of the inside edge of the duct work, after flexing it to my desired width, and heght for the bulb to fit in, on a piece of 2x4 lumber. ( SEE pics. 1-4)
Use a saw to cut the lines and squeeze the 2x4 inside the spread ductwork. Drill pilot holes through metal into wood, and screw fast with drywall screws. You don't need many screws, just two on the top, and one on the front edge where shown. (See pics. 5-6)
***Don't sink the screwheads, they will pull through the metal and be pointless!!!***************************
Drill pilot holes in the top surface of the hood, now put the eye screws through those holes, and fasten with a 1/4" fender washer, and 1/4" nut.
*****Make sure the holes are spaced evenly on the top of the hood, if not it will hang uneven. (See Pics. 7-9)
Now, i decided to add mylar to cover the bare lumber between the metal. Just cut strips big enough to wrap around the 2x4 and staple across the back. Duct tape works good if you put it down before you shoot the staple through. make a seam across the 2x4 on the backside(outside of the hood), and staple tight. I wasn't so worried about the backsides on mine..LOL!!!! (See Pic. 2)
After that is in, i took the box apart that the socket is attatched to for my growlight. In the back of the socket box there are holes. Screw the box to the inside of the 2x4 through the holes.
*****WATCH THE WIRES ARE NOT IN THE WAY******* replace cover with socket, screw in light bulb(with gloves on), and clean bulb. (See Pic. 10)
Now all that is left is hanging the light. Install screws in ceiling of cabinet, rated for the weight of this hood ( My eye hooks were rated for about 65 lbs. i think). But anything should work for this, it's not heavyv at all!!!
Sorry so long guys, but thought it would be helpful!!!
Attachments
-
 56.1 KB Views: 763
 -
 57.5 KB Views: 548
 -
 46 KB Views: 485
 -
 57.1 KB Views: 543
 -
 45.7 KB Views: 431
 -
 34.7 KB Views: 423
 -
 36.7 KB Views: 397
 -
 54.9 KB Views: 394
 -
 56 KB Views: 424
 -
 56.5 KB Views: 424
 -
 69.3 KB Views: 438
 Check out the journal in my sig to see it in action, in a few. Gotta upload them.