Puanatats' T5 Indoor Grow (Nat & White Widow Seeds) Have a Look

Puanatat

Member
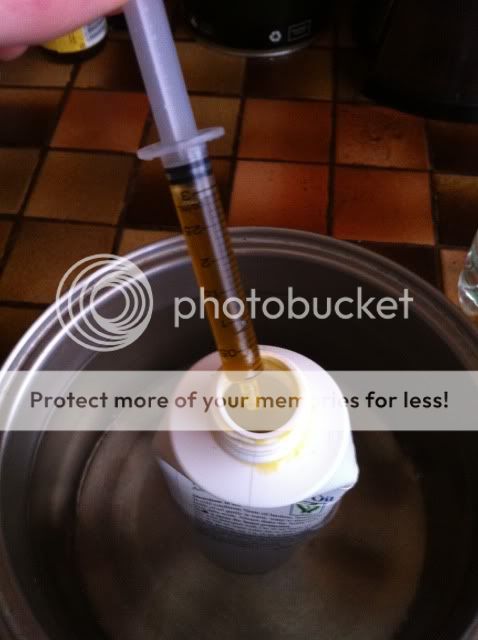
Here are the pictures of the transplant I promised yesterday:


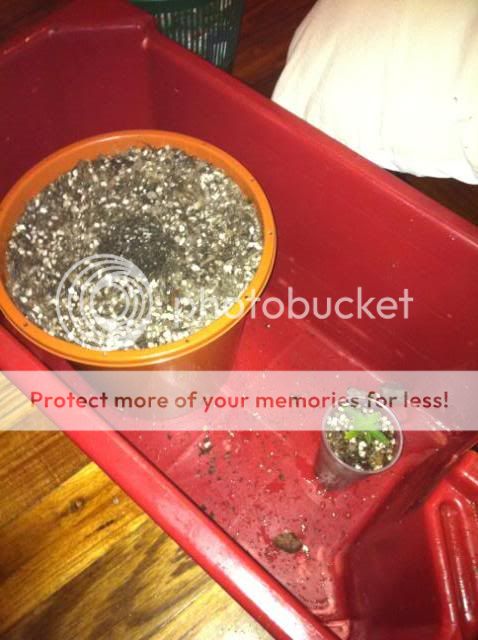
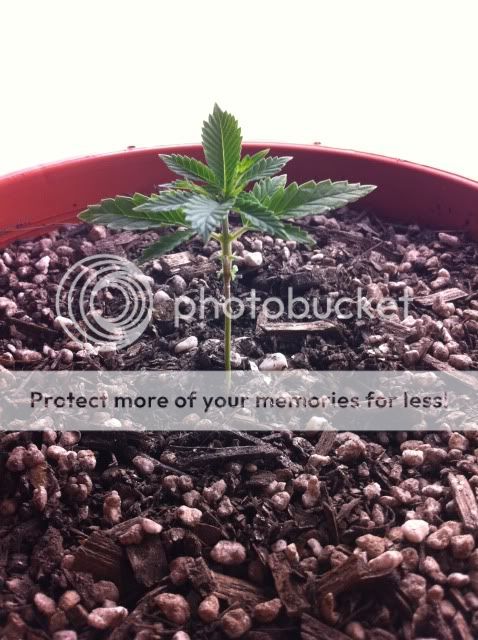
I’m not sure if you can see exactly, but there is a hole in the shape of a cup cut out of the large pots soil. Before I watered the large pots with the neem and magnesium sulphate mix - I placed a plastic cup, exactly the same size as my small pots, in the new soil. This is hard to explain for some reason ha, but I think you understand what I’m trying to say. This enabled me to easily insert the plants straight from their old pots into the new without any drama or further soil shifting.


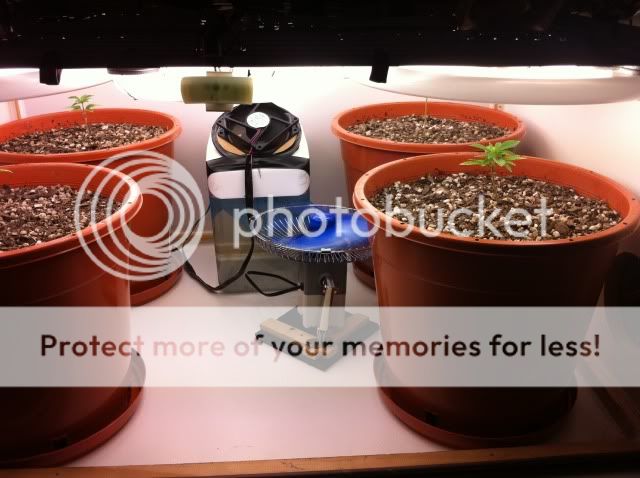
All tucked in and ready for their first day in their new pots.

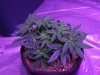
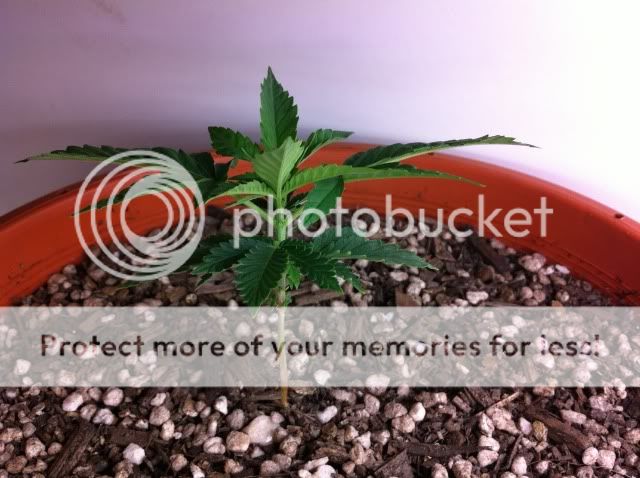
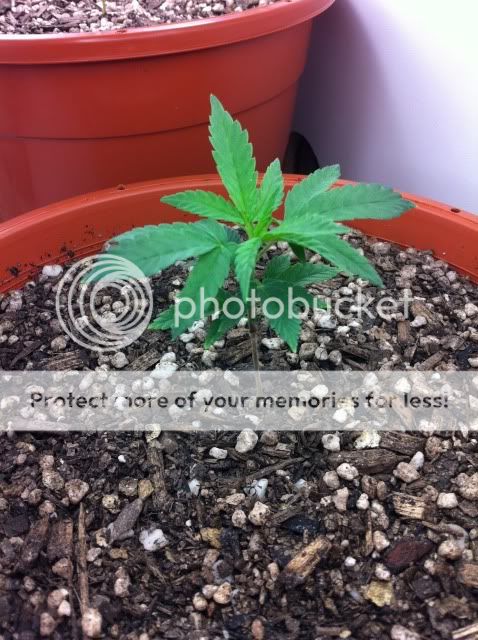
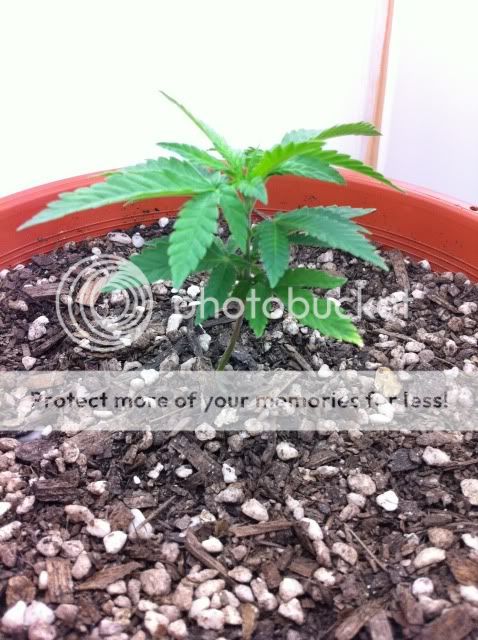
Here they are today:


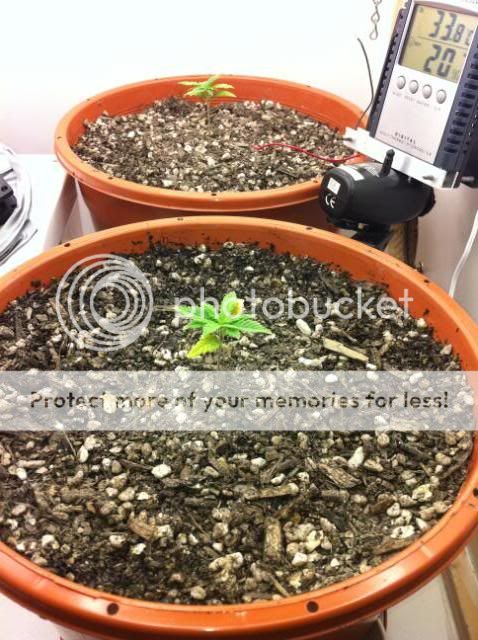
The bottom leaves were damaged from lack of nutes but I have high hopes for these babies (the new growth is looking solid and a nice shade of green). Ignore the temps and humidity; I think it’s time for a new thermometer. The temps are higher than I’d like but I’ll slowly tune things in.


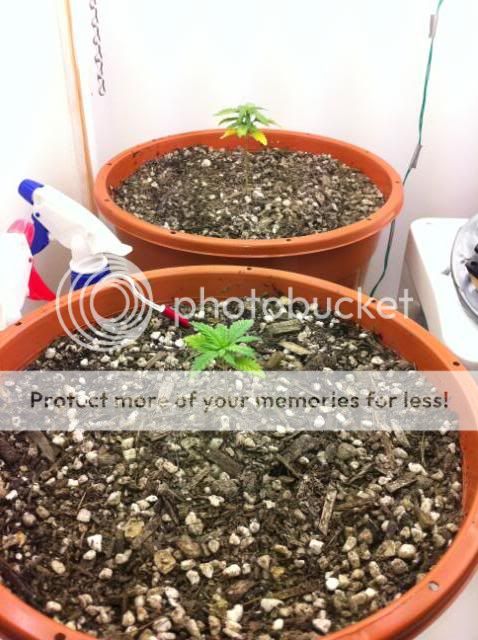
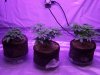
The other two, lucky is down the back.

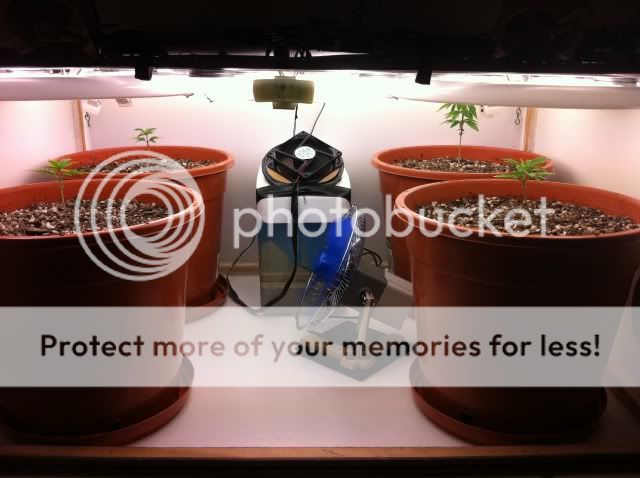
I thought I may as well chuck this up. I received that oscillating fan that I mentioned I ordered a few posts back, but it arrived broken – one of the blades was snapped. They’re sending a new one so don’t worry ha, free of charge as well. So I thought I’d cut off all the blades considering it would now be unbalanced, put it on a stand and mount a computer fan to the top. I thought it would be sweet, but it’s a little bit noisy and I think it’s because the fan blades sort or acted like a damper and absorbed some of the vibrations. It works but isn’t stealth enough for my liking. I may come up with a way to silence it, if I can find the time. I’m going to the Gold Coast in Queensland in a few days for my end of season (soccer) trip, so I’m sort of strapped for time at the moment but I’ll have plenty of time soon enough.


Puanatat

Member
My plants have taken a little bit of a beating but don't you worry puanatat will save the day... If he can find the time...

Outside of talking in the third person I've been quite busy and as all of you who grow know all too well; plants and updating your thread usually sometimes must come second to other more 'important' affairs.

Anyway. Here we are at day 32 of veg. The rate of growth is far less than amazing but this can be easily changed in ways I will now explore:

I received my $15 parts per million meter off eBay the other day, from china of course. It's reasonably accurate and has given me an insight into how concentrated my DM nutrients are. I was feeding at around 50% (2.5mL/L total A & B) of the suggested program *on the back of the bottle. This gave me a reading of around 350 ppm. At this stage I really wanted to be sitting at around 700 ppm or so. Hence my plants really haven't been getting what they need, which was my suspicion anyway -considering they were showing signs of deficiencies. All of which = one potential source of the slowed growth/deficiencies.

Point 2, and you'll have to excuse me because I feel I need to explore the reasons for my lighting issues with the aid of some thermodynamic principles, mainly heat transfer:*

Currently I have a 22 W circular tube over each plant (6500 Kelvin or so) and one 22 W in the middle of all four plants. The. Fixture is reasonable close to the plants as well.*

While this lighting arrangement is only a portion of my 314 W total lighting power. I've been forced into this position because of heating issues. 'My' T5 tubes do run reasonably cool. I can even hold the 40 W tubes between two fingers for 7 seconds or so and my hand will hardly feel anything (heat).

The issue I have, while I have to give my self some credit for the effort I have put into my grow area, is underrating the necessity for an oscillating fan (and a good one). Typical noob maneuver I know. None-the-less I need an isolating fan because; while my tubes run cool they still give off a fair amount of radiant heat.*

Radiant heat does not require a medium, like air, in order to heat something up, as a blow torch would for instance. Via electromagnetic radiation (which is light in some respect) which cannot be seen, these tubes are heating up the surroundings. Much like the sun heats up the road. When my fixture is very low down in my cabinet, in my opinion, the thermal radiation produced by these tubes is heating up a small volume of space. Even though the heat produced by such thermal radiation is relatively small, over time the surroundings located near the tubes; plants, pots, walls, air, etc. can increase in temperature *unless the heat is transferred into the air and taken away or convected - as it is known. So like the sun heating up the road on a hot day; if you stand on the road you will undoubtably feel hot air rising off the ground, even though there is air all around you at a lower temperature (natural convection). But if it's a windy day (forced convection) the air near the road will heat up then be moved to another cooler location faster than if there were no wind. Hence the road doesn't seem that hot. Feel free to correct me if I'm wrong.

So outside of my tangent. I think this is where an oscillating fan is more than essential in such a small enclosed space (having my fixture right near the bottom of the cabinet because my plants are small atm). While the air in my cabinet is being replaced quite efficiently the air movement isn't turbulent enough to effectively counteract the thermal radiation my cabinet, pots, etc. are absorbing.

I ordered a fan last week and hopefully it arrives this week and I will then be able to test my theory. This could easily not be the case but we'll have to wait and see. As for the low feeding dosage; I chose to, once again, feed with my organic liquid fertilizer at a measured 700 ppm just to get things back up to normal and to improve my soil.


As you can see: clear deficiencies and it's not loving life - killing off old growth.


Here's another plant. Fairing a bit better but showing some signs of heat stress/not enough air movement (twisting growth)


Somewhat of a combo between the first two plants. Yeah, not loving it's environment.


Finally lucky. How could you not love this little guy (hopefully girl). Showing the rest how it's done even after all the neglect or unintended neglect. I'm*Learning a lot.

Peace.*
 

MurshDawg

Active Member
My plants have taken a little bit of a beating but don't you worry puanatat will save the day... If he can find the time...

Outside of talking in the third person I've been quite busy and as all of you who grow know all too well; plants and updating your thread usually sometimes must come second to other more 'important' affairs.

Anyway. Here we are at day 32 of veg. The rate of growth is far less than amazing but this can be easily changed in ways I will now explore:

I received my $15 parts per million meter off eBay the other day, from china of course. It's reasonably accurate and has given me an insight into how concentrated my DM nutrients are. I was feeding at around 50% (2.5mL/L total A & B) of the suggested program *on the back of the bottle. This gave me a reading of around 350 ppm. At this stage I really wanted to be sitting at around 700 ppm or so. Hence my plants really haven't been getting what they need, which was my suspicion anyway -considering they were showing signs of deficiencies. All of which = one potential source of the slowed growth/deficiencies.

Point 2, and you'll have to excuse me because I feel I need to explore the reasons for my lighting issues with the aid of some thermodynamic principles, mainly heat transfer:*

Currently I have a 22 W circular tube over each plant (6500 Kelvin or so) and one 22 W in the middle of all four plants. The. Fixture is reasonable close to the plants as well.*

While this lighting arrangement is only a portion of my 314 W total lighting power. I've been forced into this position because of heating issues. 'My' T5 tubes do run reasonably cool. I can even hold the 40 W tubes between two fingers for 7 seconds or so and my hand will hardly feel anything (heat).

The issue I have, while I have to give my self some credit for the effort I have put into my grow area, is underrating the necessity for an oscillating fan (and a good one). Typical noob maneuver I know. None-the-less I need an isolating fan because; while my tubes run cool they still give off a fair amount of radiant heat.*

Radiant heat does not require a medium, like air, in order to heat something up, as a blow torch would for instance. Via electromagnetic radiation (which is light in some respect) which cannot be seen, these tubes are heating up the surroundings. Much like the sun heats up the road. When my fixture is very low down in my cabinet, in my opinion, the thermal radiation produced by these tubes is heating up a small volume of space. Even though the heat produced by such thermal radiation is relatively small, over time the surroundings located near the tubes; plants, pots, walls, air, etc. can increase in temperature *unless the heat is transferred into the air and taken away or convected - as it is known. So like the sun heating up the road on a hot day; if you stand on the road you will undoubtably feel hot air rising off the ground, even though there is air all around you at a lower temperature (natural convection). But if it's a windy day (forced convection) the air near the road will heat up then be moved to another cooler location faster than if there were no wind. Hence the road doesn't seem that hot. Feel free to correct me if I'm wrong.

So outside of my tangent. I think this is where an oscillating fan is more than essential in such a small enclosed space (having my fixture right near the bottom of the cabinet because my plants are small atm). While the air in my cabinet is being replaced quite efficiently the air movement isn't turbulent enough to effectively counteract the thermal radiation my cabinet, pots, etc. are absorbing.

I ordered a fan last week and hopefully it arrives this week and I will then be able to test my theory. This could easily not be the case but we'll have to wait and see. As for the low feeding dosage; I chose to, once again, feed with my organic liquid fertilizer at a measured 700 ppm just to get things back up to normal and to improve my soil.


As you can see: clear deficiencies and it's not loving life - killing off old growth.


Here's another plant. Fairing a bit better but showing some signs of heat stress/not enough air movement (twisting growth)


Somewhat of a combo between the first two plants. Yeah, not loving it's environment.


Finally lucky. How could you not love this little guy (hopefully girl). Showing the rest how it's done even after all the neglect or unintended neglect. I'm*Learning a lot.

Peace.*
You got some good observations, Pun. You are right to add the fan to move that hot air around. Stagnant air is warm air. T5 circular bulbs have always fascinated me how many lumens per watt bulb do they throw?
 

Puanatat

Member
The 40 W tubes throw out a min 70 lumens/watt and the 22 W tubes throw around 68 lumens/watt or so. You can get high output ones which given you a 10-15 % increase in lumens.

This thread shows the potential T5 tubes have, if you're interested, it's some next level shit though:

https://www.rollitup.org/indoor-growing/358190-led-without-leds-my-first.html

All together the fixture, with all the lights plugged in (which I hope I will be able to do soon), should have an output of 21,700 lm.

The thing is, the light is evenly distributed over a larger area and I was thinking: There isn't really any direct light over the tops of the plants because it's the centre of the circular tube, if you get what I mean. Hopefully this encourages the plants to grow outward (bush like).

P.s I am yet to see a bug anywhere, whilst being smelly that neem oil does work as described.*
 

MurshDawg

Active Member
The 40 W tubes throw out a min 70 lumens/watt and the 22 W tubes throw around 68 lumens/watt or so. You can get high output ones which given you a 10-15 % increase in lumens.

This thread shows the potential T5 tubes have, if you're interested, it's some next level shit though:

https://www.rollitup.org/indoor-growing/358190-led-without-leds-my-first.html

All together the fixture, with all the lights plugged in (which I hope I will be able to do soon), should have an output of 21,700 lm.

The thing is, the light is evenly distributed over a larger area and I was thinking: There isn't really any direct light over the tops of the plants because it's the centre of the circular tube, if you get what I mean. Hopefully this encourages the plants to grow outward (bush like).

P.s I am yet to see a bug anywhere, whilst being smelly that neem oil does work as described.*
Yea, I love the Pr0fesseur's thread! I am using his lighting techniques. Check my sig and journal for updates.
 

Attachments

Puanatat

Member
Yea, I love the Pr0fesseur's thread! I am using his lighting techniques. Check my sig and journal for updates.
Yeah, he's definitely started something that has a lot of potential. I wish I almost didn't get the circular after reading his thread. Ah-well, I bought them a year or so ago. I've only got around to using the grow space recently. I wonder if you can get circular 'marine' tubes. Let me know if you've ever come across any. Or even tubes close to my 22 W & 40 W ballasts. I'd love to try it in the future. The internal reflectors are an awesome option as well.

Your plants are looking nice. How have you found the grow bags, are they the self pruning type? What's your strategy? Looks as though you prunned some of them early on....
 

MurshDawg

Active Member
Yeah, he's definitely started something that has a lot of potential. I wish I almost didn't get the circular after reading his thread. Ah-well, I bought them a year or so ago. I've only got around to using the grow space recently. I wonder if you can get circular 'marine' tubes. Let me know if you've ever come across any. Or even tubes close to my 22 W & 40 W ballasts. I'd love to try it in the future. The internal reflectors are an awesome option as well.

Your plants are looking nice. How have you found the grow bags, are they the self pruning type? What's your strategy? Looks as though you prunned some of them early on....
I am using air pots for a container and "coco pebbles" (80% sunshine mix #4 20% hirgormite grow rocks). The containers are the air pruning type. I really like them for a number of reasons; no more root bound plant, I can 'feel' about how moist they are through the container, and it helps me avoid over watering. I'm pretty noob at all this but I essentially FIM and trim. I'll FIM the top and couple of shoots, that'll get clipped later on. I also keep the bottom half clean and bear. I also trim fan leaves away from the center so that I can get light more evenly across the tops and shoots. Thanks for the props, Pun.
 

Puanatat

Member
I am using air pots for a container and "coco pebbles" (80% sunshine mix #4 20% hirgormite grow rocks). The containers are the air pruning type. I really like them for a number of reasons; no more root bound plant, I can 'feel' about how moist they are through the container, and it helps me avoid over watering. I'm pretty noob at all this but I essentially FIM and trim. I'll FIM the top and couple of shoots, that'll get clipped later on. I also keep the bottom half clean and bear. I also trim fan leaves away from the center so that I can get light more evenly across the tops and shoots. Thanks for the props, Pun.
Yeah, it's funny that you're using 'spectrum specific' lighting. I would have never guessed... I checked out your journal a while ago and had no idea you were a T5 fan, yet using the professors lighting method. And it's even more of a coincidence that I was looking into self pruning pots a few days ago. Ha. Yeah any time. I'll be watching.

P.s I'm not sure about the IR lighting, I've read a little about UV - in regards to your latest post. It'll be interesting to see what you end up doing.

Peace
 

Puanatat

Member
As I suspected, things are improving and my rate of growth should now start to increase exponentially.*

The biggest issue was the nutrients I was feeding my plants. Whether it was too little or whether my Dutch Master Grow nutrients are not 'complete' enough is the real question. I'm erring on the underfeeding side of things. I think that if I fed at larger doses (double what I was feeding, at least) the plants would look healthy. It makes me wonder though; my organic power feed liquid compost works very well and considering I'm growing in soil this may be a better option (only using liquid composts). Liquid composts contain microbes, organic matter and have a number of beneficial properties. Which go hand in hand with soil as opposed to hydro. My DM nutes were very cheap and I know this is working. So for now I'm going to stick with the power feed at 700 ppm.*

The following pictures are in the same order as my update at day 32 (before i got the oscillating fan). Make a comparison if you can be bothered scrolling. Either way, they are looking a lot healthier.*


Lucky spewing with solid growth.


On another positive note; my uber good truck driver oscillating fan arrived. It took me quite some time to nut out how I was going to support it.

I opted for on the ground facing up and oscillating. I put it on the ground because the air is coolest down there, around 5-7 degrees, which is considerable. *And I located in on the side nearest the inlet fans so this may be for the best. My theory as to why the area gets so hot (hotter than I'd like) or rather the solution I had proposed hasn't change the temp considerably. On the plus side I know that my plants are getting a burst of cool air pretty frequently.

I will explore a few more options to decrease my temps but I know the major issue is that I have 314 W of light/heat bombarding a very small volume of space. I know this because when I put the fixture at the top of the grow space temps are much lower. (I have a lot of thoughts on how to fix this so don't worry hahaha, it's all in good fun)

The following pics are at day 35 and show the limits of the oscillating fan. Being a trucker fan, the rang of movement is only 90 degrees or less. I'm yet to figure out a way to centralize the oscillation, it's very well made and it's not as simple as twisting the base of the motor.*


I ended up using the base I made for the first stand and attached it to some rubber to dampen any vibrations. It runs relatively quite - enough for my needs anyway. *

Thanks for reading...
 
hey mate... great job on your box build and inventive creations... a few tips.. when you water your plants give them a good soaking like pour water into the soil until it is saturated.. dont over water let the soil dry out completely before you water again epically in the early stages, also i wouldnt be using much ferts this early if any... also your stems look a little small i would bury them in dirt a few inches more up (put more soil in so more of the main stem is covered) but ya.. dont over care for them bro
 

Puanatat

Member
hey mate... great job on your box build and inventive creations... a few tips.. when you water your plants give them a good soaking like pour water into the soil until it is saturated.. dont over water let the soil dry out completely before you water again epically in the early stages, also i wouldnt be using much ferts this early if any... also your stems look a little small i would bury them in dirt a few inches more up (put more soil in so more of the main stem is covered) but ya.. dont over care for them bro
Yeah thanks for the comment man. Noted. I usually water appropriately though; about every 5 days or so. My medium drains very well and these large pots get about a litre or so when I water each feeding. 50% of the water runs off. Hence the roots get what oxygen they need. So I'm left with about 500ml of additional water to whatever was already in the pot. I can read the plants relatively well and the droopy growth was due to lack of nutes and not enough recirculating air as opposed to over watering. My soil always absorbs water readily also, so they never dry out too much. I'll increase the frequency of waterings when they start to drink a bit more.

Yeah well spotted. I did mean to burry them deeper. I tried putting additional soil around the base but it just washes away. I'm not too fazzed though.

Peace.
 

radeonDEUS

Active Member
wow man kudos. this thread is an inspiration. i am JUST getting into the growing aspect...trying to sort out even where to start! Definitely want to build a cabinet like yours, although not as much need to be as stealthy, which hopefully means less mula to begin with. debating what light source to use. what do you think of LEDs? i actually just ordered a 30in t5 2x24 watt for one of my aquariums...something like that is what im thinking, rather than looking for a MH and HPS for veg/flowering. looking to have about the same number of plants as you as well...anyway probably going to start with any seeds i can find, as this being the first try will probably not yield much...any suggestions?

thanks! (sorry if this isnt an appropriate post, first one in this forum!)
 

Puanatat

Member
wow man kudos. this thread is an inspiration. i am JUST getting into the growing aspect...trying to sort out even where to start! Definitely want to build a cabinet like yours, although not as much need to be as stealthy, which hopefully means less mula to begin with. debating what light source to use. what do you think of LEDs? i actually just ordered a 30in t5 2x24 watt for one of my aquariums...something like that is what im thinking, rather than looking for a MH and HPS for veg/flowering. looking to have about the same number of plants as you as well...anyway probably going to start with any seeds i can find, as this being the first try will probably not yield much...any suggestions?

thanks! (sorry if this isnt an appropriate post, first one in this forum!)
*
Yeah you're fine. By all means ask whatever you want. I'm quite new to the forum as well.*

I like LEDs but not really for grow lights. The theory seems to be there but they just don't perform very well, from what I've seen. If you're *interested in T5's and LEDs you should check this thread out, I posted it a page or so back but it will give you an insight into T5 lighting and how efficient it can be (minimal energy loss unlike MH or HPS ). Just click on it and it should work:

https://www.rollitup.org/indoor-growing/358190-led-without-leds-my-first.html

I'd aim for 4-6 tubes minimum. More tubes means you have more sources of light and in order to have good light distribution with T5's you'll need a few. Possibly use two fixtures. I grew one plant off less than 70 W using CFL's. They're a lot simpler; no fixtures or ballasts but it's worth mentioning that more lower rated globes is better then one 60 W light and always rotate your plants.*

Maybe start with just some basic potting soil that says it can feed for 3 months or so and mix in some sand. This way it should drain well and feed your plants what they need whilst you learn how to dial in other aspects. Over watering is pretty common. If your plants are drooping and there are a few bugs or gnats flying around, that's usually a good indication. Watering once or twice a week is standard.*

Other than that just take your time, do some reading and you'll be fine. Ask any question you like, there's a lot of info out there. I've been reading home brewers threads a fair bit:

https://www.rollitup.org/members/homebrewer-231911.html

He's a really level headed guy that throws out a lot of good info. *

Take it easy.
 

radeonDEUS

Active Member
thanks much man! i think for my first cab im guna go with cfls because they are pretty cheap and easy to switch out. im debating how big to go now actually lol. i have the room to do...well way too big to be safe lol and i do have to build a cabinet...lockable...etc. anyway guna go with flat white paint for the inside. what do you think of using a bathroom fan assembly for venting? cheap, top mounted with a duct leading unobtrusively to a basement window, carbon filter at either end...i believe the fan is rated for 50cfm...should be sufficient for any size cab really...

so lets say i build a box out of simple plywood and 2x4s. somewhere in the realm of 2m by 1m by 1m...french door opening front with some type of sealing for when its closed. interior painted flat white. bathroom fan mounted on top. passive grille intake. i could build in some type of shelving or something to keep the younger plants closer to the lights, or should i keep them closer to the bottom of the box? either way, its plywood and not hard to unscrew and move a shelf. for that matter i think the light system im going to use is power strips mounted on a 2x4 with plug to socket adapters with y adapters screwed into the previous, so if the power strip has 8 plugs in line, could have 8x42 watt 6500k cfls per strip...each light putting out supposedly 1750 lumens! soooo those strips are like a foot long...so that would be a shit ton of light. right? is there such a thing as too much? on second thought maybe a meter cube would be plenty lol. i dont even have seeds yet! (for that matter anything, all speculative) i would say 3 strips in the cube is what im thinking...having them mounted on a 2x4 so that i could move where the lights are mounted very easily

anyway gotta get all the other basics covered too...should i bother using the slitted cups from the garden shop for the seedlings? do i need a tray to catch overflow from when i water? definitely going to take a page from your book, or two, and set up a sponge humidifier. gotta get a digital thermometer too...

so how much does one water a seedling? twice a week and daily misting? no food or 'nutes' lol until flowering right? lights on 24/7 until flowering? how long is the veg stage supposed to be? lol wow i didnt realize how many questions i still had. lol. i am trying to be completely prepared i guess...

thanks so much man, definitely look forward to seeing more of your progress as well! im really digging this forum, seems like my kinda place. i will definitely head over to home brewers and do a lil more research now that i have left you a novel lol...thanks again man cheers
 

Puanatat

Member
thanks much man! i think for my first cab im guna go with cfls because they are pretty cheap and easy to switch out. im debating how big to go now actually lol. i have the room to do...well way too big to be safe lol and i do have to build a cabinet...lockable...etc. anyway guna go with flat white paint for the inside.

what do you think of using a bathroom fan assembly for venting? cheap, top mounted with a duct leading unobtrusively to a basement window, carbon filter at either end...i believe the fan is rated for 50cfm...should be sufficient for any size cab really...
Should be sweet man, just make sure you wire it correctly and that it is in decent condition. I would install two at a minimum. If one fails the other will keep things under control and the temps will only rise slightly, if you only had one… I think you get what I’m saying. Possibly one at either end of the ducting.

so lets say i build a box out of simple plywood and 2x4s. somewhere in the realm of 2m by 1m by 1m...french door opening front with some type of sealing for when its closed. interior painted flat white. bathroom fan mounted on top. passive grille intake. i could build in some type of shelving or something to keep the younger plants closer to the lights, or should i keep them closer to the bottom of the box? either way, its plywood and not hard to unscrew and move a shelf. for that matter i think the light system im going to use is power strips mounted on a 2x4 with plug to socket adapters with y adapters screwed into the previous, so if the power strip has 8 plugs in line, could have 8x42 watt 6500k cfls per strip...each light putting out supposedly 1750 lumens! soooo those strips are like a foot long...so that would be a shit ton of light. right? is there such a thing as too much? on second thought maybe a meter cube would be plenty lol. i dont even have seeds yet! (for that matter anything, all speculative) i would say 3 strips in the cube is what im thinking...having them mounted on a 2x4 so that i could move where the lights are mounted very easily
4 two socket adaptors in line sounds good. I’d use a 2x4, using your suggestion, and cut it to a bit over a metre, then add some additional metal or plywood (whatever) to the sides of 2x4 but facing down at an angle similar to the y connectors, if I understand your connection type correctly. This would reflect a lot of the additional wasted light towards the plants. Depending on how well you vent it, 42 watts per globe sounds about right but make sure you do not exceed 10 amps. One fixture like this (4 x 2-Y connectors, with 42 W globes in each) would be good for 2-4 or so plants in line, one plant under each Y-fixture, or 1 between would work better (2 plants total). Make sure to drill a few holes in the reflector, in-between the globes, to allow for hot air to escape.

Don’t forget to purchase some warm white globes, if you don’t already know, to use for flowering – 6500K globes for growing and 3000K (or so) for flowering. About a 70(to 80)% percent warm white globes (3000K) to grow lights (6500K) is probs cheaper and works better than 100% warm. Warm white is heavier on the red spectrum which helps grow flowers to put it simply, while the ‘cool white’ globes (6500K) are heavier on the blue spectrum, which to put it simply helps with vegetative growth (stems, leaves, etc.). When ‘vegging’, using the 6500K globes, use 18 hrs of light to 6 hours of dark and for flowering use 12 on 12 off – pretty common knowledge once again but I thought I’d throw it in.

As for 2x1x1 (edit: I'm guessing you ment 2 m long?)2 metres in height is too big in my opinion. CFL light won’t grow plants very well that far away. Just over a meter is pretty good, from the base of the globe, then leave about 30 cms or so above for venting. In other words, keep your plants low and bush like and you’ll yield more.

Yeah no such thing as too much light, but a lot of light can dry out plants and your grow area.

anyway gotta get all the other basics covered too...should i bother using the slitted cups from the garden shop for the seedlings? do i need a tray to catch overflow from when i water? definitely going to take a page from your book, or two, and set up a sponge humidifier. gotta get a digital thermometer too...
All of your pots, whether for seedlings or full grown plants, should have adequate holes in the bottom and a layer of rocks for drainage. If they don’t drain things can get ugly and your plants may rot in there pots. In saying that, any container can be used, even the bottom half a 2L coke bottle, with some holes in the bottom. Definitely use trays, or a container lid or anything really. As long as they can catch water and stop it from rotting the base of the cabinet. Never leave plants in a tray that does have water in it, hence always empty your trays when they have water in them. Preferably water your plants over a grate, let them drain, then place them in the trays and finally into the grow area on the trays.

For seedlings the medium, ‘soil’, needs to be kept wet until they germinate or sprout.

so how much does one water a seedling? twice a week and daily misting? no food or 'nutes' lol until flowering right? lights on 24/7 until flowering? how long is the veg stage supposed to be? lol wow i didnt realize how many questions i still had. lol. i am trying to be completely prepared i guess...
Keep the medium wet as I said but not soaking. Put the seeds in the soil with the pointy end facing down – this is where the root comes out to push the head of the plant through the soil. If upside down I’m sure you can imagine what will happen. Soaking them for 12 hrs, no more, in water will help speed things up. No nutrients for the first 5 days at least.

As I suggested though; to start with, buy some potting soil (organic for fast growing plants, eg. Tomatoes) that says it can feed for 3 months. This means you only need to use tap water and that’s it, no pH’ing or anything. This will allow you to veg for 4 weeks, not including germination time, starting from when the seed sprouts. And flower for 6 weeks, which is typical of most indicia dominate strains (total 12 week grow, or 3 months). As opposed to sativa dominate strains, which are not ideal for cabinets because they like to stretch, grow rapidly when put into flower, resulting in long branches but not a lot of buds.

thanks so much man, definitely look forward to seeing more of your progress as well! im really digging this forum, seems like my kinda place. i will definitely head over to home brewers and do a lil more research now that i have left you a novel lol...thanks again man cheers
No worries. I’d have a good read of a few of his threads before you start worrying about nutes IMO.

Peace
 

Puanatat

Member
Quick update. Things are going to schedule. Bit of a shame I didn't start feeding appropriately earlier on.*

One watering ago I backed the ppm off to 600, instead of 700 (0.5 conversion I believe). I know that soil doesn't need a lot of nutrients because it retains them to some degree, in comparison to other 'cleaner' mediums. Other than that, the reason I backed it off was because the plants were starting to get what they need and I don't want to over feed them.

It seems that I chose the right time to back off the nutrients because, while lucky (larger plant) is doing fine, 1 or two of the smaller plants are - as far as I can tell, experiencing minor nute burn.*

It was getting to the point where I had f'ed a number of consecutive times, as opposed to feed, feed, water or even feed, water, feed. So regardless of whether I had noticed any over feeding I felt this watering needed no nutes.*

It's also worth mentioning that when I f'ed at 600 ppm. I used a mix of the Organic Power Feed (12-1.4-11.08) and the Dutch Master Flower parts A & B (2.66-0.9-4.54). Considering there is a slight different in concentration I mixed up 300 ppm of the power feed then added the appropriate amount of A & B to bring it up to 600 ppm. My reasoning for doing this is that the power feeds ratio is too far away from the ideal N-P-K for growing marijuana - 3-1-2, for my liking anyway. So mixing it with the flower brings it down to a ratio of 6.38-1-5. I'm still not 100% happy with this but it's going to be better for the plants than just feeding with the power feed.

Next watering I'll bring the nutrients down to 500 ppm (0.5 conversion) and it will be a mix of the DM and the Power Feed. I'm thinking of feed, feed, water (plain).

It's almost flower time. Another week or two.*


As you can see, Lucky's extra fan leaf per node has increased her growth rate, compared to all the others.*


I elevated the rest so I have an even canopy *with some cardboard cores from my work.*
 

Puanatat

Member
Nutrients
As i mentioned in my last post. I decided to give 50/50 of organics(Power Feed)/synthetics(Dutch Master Grow) a go. It's hard to tell whether the DM actually helps my plants in any way. There are so many levels to nutrients and this being my first run; it's hard to draw solid conclusions considering I only need to water once - twice a week.

I feel that the organics is the way to go for now. I honestly don't know enough about the properties of organic products to be substituting synthetic nutrients in just to for fill the ideal N-P-K ratio. It may bite me in the ass later or could be completely unnecessary. I know the power feed isn't the most ideal nutrient but the plants react well to it, for the majority. I think dosing correctly at 500 ppm will be more than enough for my needs, given my level of experience. Keeping it simple and consistent will now become a priority. I can draw conclusions at the end of the grow and do more research for the next time round.

I am seriously considering buying some Dyna-Gro nutrients for my next run. Grow, Flower and Protekt will be the products of choice. I have seen what they are capable of (via homebrewers threads) and the only adjustment I should need is a little pH up, outside of a good feeding schedule.

Anyway, back to my grow. I'm planning on doing the flip (to flower) in the next few days. I will need to purchase some organic bloom nutrients though. I am yet to have a look around at my local hardware store (ha).

I want to give watering with less water more frequently a go. I’ll let you know how it fairs.

Soil
I think a higher quality base soil is needed for my next grow. There seems to be too much wood chips and what not as opposed to 'soil', which obviously won't benefit my plants greatly - as opposed to a nutrient rich, fine grade soil.

Temps
After reading, thinking, reading, thinking and some more reading. The issue I mainly face is growing in a cabinet. Radiant heat is not my friend, no matter how cool my tubes run. The walls, pots, etc, heat up over the 18 hr, lights on period. My ambient temperature sits around 20 C most days at this stage of the year, which doesn’t assist as much as it can with my stealth fan arrangement. The chip board my cabinet is made out of doesn’t transfer much heat to its surroundings and insulates the cabinet, keeping the heat in.

To combat this I think I’m going to make one last attempt at redesigning my air flow. My plan is to drill a number of holes behind each tube, around their entire circumference. Plus take chucks of the reflector out in some areas that don’t assist too much in reflecting light and will be better served as allowing hot air to pass. In addition to taking material out, two ducts (collapsible)running from the rear exhaust fans directly to the light fixture, will be fitted. Where they meet the fixture I plan to have two large holes (in the metal reflector) and on the on the other side of the reflector (where the plants are) have two fans pushing hot air up the ducts. I want to increase the size of the openings the large inlet and outlet fans are fitted to as well, as they could be made bigger and block some of the air flow.

Outside of that monumental task (given my free time), I was thinking of rewiring my ballasts to be on two timers. Hence half the lights would be on for say 9 hrs at a time (during veg, 18 hrs total). I think the plants respond well to varying intensities of light during the lights on period. As the days ware on my plants always seem to slump a bit, which could be contributed to minor increases in heat but I think they just get over the consistent intensity, the smaller plants seem to always be facing up towards the lights. It’s worth mentioning that when I say half the lights I mean the lights on one half of the cabinet. In other words, for 9hrs the left side of the cabinet will be illuminated – once that 9hrs passes that timer will turn off and the right side will come on for another 9 hrs – then 6 hrs of no light. This has a number of benefits but the main point is; the temps will only go up by 5 degrees or so at any time, compared to the ambient temperature, without any adjustments to airflow. The reason for this isn’t worth getting into but I proved this when I moved the plants at the seedling stage to left side of the cabinet and only had that left side illuminated (157W of the total 314 Watts). It made a massive difference to temps. At the moment I’m only running 4 22W tubes and they increase the temps by 6-10 degrees in the worst case. Whereas with 157 W on one side the temps only increased by half of that.


It’s also worth mentioning I hooked my humidifier up to my timer. So when the lights come on the humidifier does as well. This helps to keep an even humidity throughout the day and night.


That’s what I’ve been thinking anyway. I’ll post some pics up soon. Ta.
 

Puanatat

Member
Thought I’d upload some pics. I’ve been quite busy studying for exams so I’ll have to keep it brief. There are a number of things I want to mention but I’ll save most of them for another time.

I watered today using the Powerfeed at 500 ppm (0.5 conversion). I thought it was time to reapply the Neem Oil as I’ve spotted a gnat or two flying around. This watering I’ve chosen to decrease the volume of water by half to see how the plants react. This will most likely mean I will need to water twice as much but we’ll see.

I made a mixture of 1.2 L nutrient solution (500 ppm) to water 3 plants with. I chose to skip watering lucky because she/he was showing signs of overwatering for some reason and wasn’t taking up the nutrients. Hence each plant received 400 mL of nutrient solution. I also mixed up a small bottle of neem oil. With the help of a few calculations I added 9 mL of Neem Oil to 300 mL of water (Less than 1 %/L). I watered each plant with 100 mL of the Neem mixture, meaning that each plant got 500 mL of total water.

I mixed up the neem oil by placing it in a pot of boiling water that I had allowed to sit for 5 mins or so - to let it cool down so the bottle didn’t melt.


This makes it easier to handle because at ambient temperature it is usually a mush of sorts.


After taking 9 mL of Neem Oil, I added around 2-3 drops of detergent to my 300 mL of hot tap water that I had in a small bottle. I used hot water to stop it from solidifying and the detergent helps mix the neem oil and water together – shouldn’t hurt plants.


These are the bottles I made with appropriate increments. The small one I used for the neem mixture and the large for the nutrient solutions.

I kept the small bottle of neem mixture in the pot of hot water so it didn’t separate due to temp change. Considering the neem mixture that I watered with first was warm, I added a few ice blocks to my nutrient solutio. This should, I would think, balance out the temperature of the water as it is absorbed by the soil. I watered with neem separately because if you have worked with it before you know that mixing up large patches isn’t effective and it becomes very labour intensive due to the pure form of the neem oil solidifying at room temperature.

The plants :):


Some pre flowers on lucky (taller tri-foliar plant). I think it might be male. The rest of the pre flowers on the other plants look to be female – werd.


I balanced my oscillating fan with some super glued bluetack on the outer rim of one of the blades. It had started to vibrate and wasn’t too stealth (noisy) and I finally figured this out after an hour or two haha…


I’ll be finished with school for the year soon enough, which hopefully means more time with the plants. Happy growing, peace.
 

MurshDawg

Active Member
Thought I’d upload some pics. I’ve been quite busy studying for exams so I’ll have to keep it brief. There are a number of things I want to mention but I’ll save most of them for another time.

I watered today using the Powerfeed at 500 ppm (0.5 conversion). I thought it was time to reapply the Neem Oil as I’ve spotted a gnat or two flying around. This watering I’ve chosen to decrease the volume of water by half to see how the plants react. This will most likely mean I will need to water twice as much but we’ll see.

I made a mixture of 1.2 L nutrient solution (500 ppm) to water 3 plants with. I chose to skip watering lucky because she/he was showing signs of overwatering for some reason and wasn’t taking up the nutrients. Hence each plant received 400 mL of nutrient solution. I also mixed up a small bottle of neem oil. With the help of a few calculations I added 9 mL of Neem Oil to 300 mL of water (Less than 1 %/L). I watered each plant with 100 mL of the Neem mixture, meaning that each plant got 500 mL of total water.

I mixed up the neem oil by placing it in a pot of boiling water that I had allowed to sit for 5 mins or so - to let it cool down so the bottle didn’t melt.


This makes it easier to handle because at ambient temperature it is usually a mush of sorts.


After taking 9 mL of Neem Oil, I added around 2-3 drops of detergent to my 300 mL of hot tap water that I had in a small bottle. I used hot water to stop it from solidifying and the detergent helps mix the neem oil and water together – shouldn’t hurt plants.


These are the bottles I made with appropriate increments. The small one I used for the neem mixture and the large for the nutrient solutions.

I kept the small bottle of neem mixture in the pot of hot water so it didn’t separate due to temp change. Considering the neem mixture that I watered with first was warm, I added a few ice blocks to my nutrient solutio. This should, I would think, balance out the temperature of the water as it is absorbed by the soil. I watered with neem separately because if you have worked with it before you know that mixing up large patches isn’t effective and it becomes very labour intensive due to the pure form of the neem oil solidifying at room temperature.

The plants :):


Some pre flowers on lucky (taller tri-foliar plant). I think it might be male. The rest of the pre flowers on the other plants look to be female – werd.


I balanced my oscillating fan with some super glued bluetack on the outer rim of one of the blades. It had started to vibrate and wasn’t too stealth (noisy) and I finally figured this out after an hour or two haha…


I’ll be finished with school for the year soon enough, which hopefully means more time with the plants. Happy growing, peace.
Nice update, mate! Have you thought about predatory nematodes to eat the gnat larvae? I really like your pics. Way to rep the t5 method!
 
Top