Greengenes707
Well-Known Member
I love the display. I am debating one for my new project. Was it fairly easy to put together?
Not easy for me, I've never used any of these components before and I don't really understand the computer connections.I love the display. I am debating one for my new project. Was it fairly easy to put together?

"Perforated Stainless steel sheet "Just somewhere to screw things down without making a million holes in the case. The mesh is nice and rigid and can be screwed right into. Mounting points galore..
Thanks mandragoras...sounds excellent! Really looking forward to some new genetics
Got some DIY stuff done. Put a nzxt fan controller on but it wouldn't control the pwm fans. So I put a 2 wire fan on to replace the zalman CPU cooler 4 wire pwm fan. Works well but now I have to order some better replacements to keep the fan speed up.
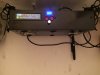
So it reports temp on each 3590, one ambient case, and one middle led star and one star at the end. Early readings are about a 8*C rise at the full 1a. So from 30*C to 38*C on the big cxas and about a 3*C rise on the back of the heatsink right behind the stars. 3w royal blues and 430nm violet on at 700ma
Having problems with my current ammeter too...
Can't get it to read out correctly and I'm wondering if I need a shunt for it. If I do I might just scrap the idea..
Coming along....it's not too bad building when your in no rush to light a room..
View attachment 3294438
View attachment 3294439
Full draw
View attachment 3294440
 ..
.. fficial&channel=nts&biw=1280&bih=903&tbm=isch&tbo=u&source=univ&sa=X&ei=mmJoVOOfEsbIyAPo9oHwBg&ved=0CB4QsAQ
I don't care for them much either. Looks dated now. There was a silver one irritating me so I put a black one on for now, little better. I had a mesh filter that I was hoping would fit but it was for a 140mm fan. That's my preferred way right now...to filter the air coming in with a washable filter.-Lately (although I've used them plenty of times ) I kinda do not feel sympathetic about those fan grills.
I tried that way. There's only one led driver per cob so it's easy to put one before and after the led. But all I got was a erratic bunch of numbers coming out. I figured maybe it needed a shunt to lower the current to a readable level. I noticed some have shunts built in that show being wired in series. Mine shows a shunt in the directions. Ahhh well...lots of brain stimulation..hahaAs for the 7 seg digital meter ....
If its an Ampere meter it should be connected in series with led out ( + & - ) ,thus in series with the leds/cobs driving line.
And does not need a shunt .
Better to be powered from another DC source though.
(Except in the case having one black wire (cathode ) ,thus it has to be commong grounded with the led drivers .
Powering directly from led drivers ,might be impossible,as most of these meters have a max VDC of ~30 Volt.
I've always had something against toggles..lol. Was looking at lots of switches but none really struck me..need to look more. The ones I got the price was right so I just got a bunch of them.Regarding pots and knobs
Yeah..don't need that fine an adjustment. I do like the 10v dimming way though. Works how I would expect a dimmer to work. The resistor was pretty abrupt. The only thing I favor on the resistor is a few less wires...wiring adds up quickly!Regarding pots and knobs ....
I'm always looking into it. Might jump in soon...it's interesting for sure. Just trying to get other things a bit more dialed in first. I'm sure once I get comfortable I'll be looking for a new challenge.Make you own pcbs ..
As for actual electronics designs & circuits ...
The web is full of almost whatever you wish .
Full of different examples of same thing or almost ..
You do not have to be an expertise in electronics ..
(Tought by time your knowledge will definately increase ,that's for sure ...)
Just copy & paste ,and make your own knight rider led circuit pcb or whatever else you wish !
Trust me ..
Comparing with what you are able to build right now ...
It should be a piece of cake for ya !
I think you might like it a lot ,actually !
Thanks sds..always appreciate your input and critique.You 're getting exceptionally good ,in the art of making high quality led grow lights.
The projects never end for me either. Besides having a full time job and working with my own projects, I am also building a stealth CXA cabinet for one guy and a couple XM-L2 veg bars for another guy. I like your new build Pos, its a nice look with the integrated controller. I have been working on a arduino controller project that monitors temp/humidity and controls the on/off of the main lights, flower initiator and cycle timer for uv if its used. All of the functions work at this point I'm just waiting for some more parts to show up before putting it into use for testing.
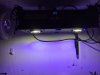
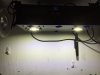

You built that Poz?!Alright...got it running.
Fan controller works, even with pwm fans now. Maybe not all types...you never know. Ammeter is online. Had it running side by side and not through the ammeter that was the main problem. The new ammeter with built in shunt had heavier gauge wire for the driver so the other one wouldn't have worked without a shunt...not with the puny wires it had.
All in all, I love knowing what current and temp my 3590s are running at. Build was pretty enjoyable for the most part. Kudos to sds for the idea..
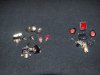
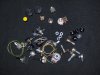
So 2 5k 3590 cd bin, 4 luxeon 450nm, and 2 luxeon 430nm. Everything ready to be swapped out at any time...
View attachment 3297986 View attachment 3297983 View attachment 3297984 View attachment 3297987
Just finished...done with mostly hand tools and a small workbenchYou built that Poz?!
I have so much to look forward to after reading this page! I'm going to have to dig into this thread during my spare.
It will be for now. I'm curious to see how it affects my veg cab with the blues and 5k. It was running on a neutral/warm XML mix previously.So thats the new veg light?
So the 3590's will still be 5k along with the 660's?Just finished...done with mostly hand tools and a small workbench
It will be for now. I'm curious to see how it affects my veg cab with the blues and 5k. It was running on a neutral/warm XML mix previously.
Going to redo all my lights in a similar style. May try some different parts but very similar. If I'm done by my next run I'll do a grow journal with 2 3590 lights like this. Just switch the blues for some 660s
I'm impressed. It looks like something you'd buy online for a ton of money!Just finished...done with mostly hand tools and a small workbench
Keep up the amazing Job !Alright...got it running.
Fan controller works, even with pwm fans now. Maybe not all types...you never know. Ammeter is online. Had it running side by side and not through the ammeter that was the main problem. The new ammeter with built in shunt had heavier gauge wire for the driver so the other one wouldn't have worked without a shunt...not with the puny wires it had.
All in all, I love knowing what current and temp my 3590s are running at. Build was pretty enjoyable for the most part. Kudos to sds for the idea..
So 2 5k 3590 cd bin, 4 luxeon 450nm, and 2 luxeon 430nm. Everything ready to be swapped out at any time...
Blindingly bright at 200w..tempted to flower with this thing. Thank god for the dimmers...
View attachment 3297986 View attachment 3297983 View attachment 3297984 View attachment 3297987