Tanuvan
Well-Known Member
Tan's DIY Halogen Vaporizer
Takes about 1hr to build.
Tools:
Hammer
Phillips Screwdriver
Drill
1in wood drill bit (not the flat kind, but the round one)
Drill bit to drill air hose line (your choice of size)
Supplies:
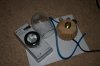
UtiliTech 120V 20-watt Xenon Accent Kit light
1 or 1 1/2 long 3/4in Dia. brass pipe fitting
1 Brass Cap fitting to match
air hose line
1 Hardwood base (I used a wood couch foot)
What To Do:
Drill a 1inch hole into the base, followed by a half inch hole.
The half inch hole is for the lamp chord. The 1 inch hole is for the
1inch brass pipe fitting.
Drill a hole at a diagonal from the top of the base, through the side. This will be
for the air tubing.
Drill at least 1/4 inch hole in brass end cap.
Remove the light from the casing. It should then just contain the
lamp chord and halogen light with socket.
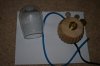
Place the brass pipe fitting into the 1 inch hole of the base.
Place the lamp chord and socket down inside of the brass pipe fitting.
There should be about 1/4 in or so space from the halogen light to the top
edge of the brass pipe fitting.
Under the base I drilled a groove so that the unit will sit flush. You can
use some pegs for stands if you like.
Almost done!
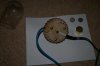
Take wire mesh and use a quarter for a circle guide (if you don't have any
screens around) Cut TWO of these.
You need two because the herb will be sandwiched in between both screens
and placed into the top of the brass end cap with the hole.
Screw the brass end cap onto the brass pipe fitting with bulb in it.
Insert air hose, and plug in.
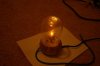
Vaporize will glow a yellowy orange due to the reflections off the brass.
(Looks like fire almost).
Within 30 seconds, you will see vapor appear. Gently inhale and enjoy!
Warning...do not peer directly into light. It emits UV radiation. That
is why I have the end cap on it, with a hole in the top for the vapor.
Pics to follow.
Takes about 1hr to build.
Tools:
Hammer
Phillips Screwdriver
Drill
1in wood drill bit (not the flat kind, but the round one)
Drill bit to drill air hose line (your choice of size)
Supplies:
UtiliTech 120V 20-watt Xenon Accent Kit light
1 or 1 1/2 long 3/4in Dia. brass pipe fitting
1 Brass Cap fitting to match
air hose line
1 Hardwood base (I used a wood couch foot)
What To Do:
Drill a 1inch hole into the base, followed by a half inch hole.
The half inch hole is for the lamp chord. The 1 inch hole is for the
1inch brass pipe fitting.
Drill a hole at a diagonal from the top of the base, through the side. This will be
for the air tubing.
Drill at least 1/4 inch hole in brass end cap.
Remove the light from the casing. It should then just contain the
lamp chord and halogen light with socket.
Place the brass pipe fitting into the 1 inch hole of the base.
Place the lamp chord and socket down inside of the brass pipe fitting.
There should be about 1/4 in or so space from the halogen light to the top
edge of the brass pipe fitting.
Under the base I drilled a groove so that the unit will sit flush. You can
use some pegs for stands if you like.
Almost done!
Take wire mesh and use a quarter for a circle guide (if you don't have any
screens around) Cut TWO of these.
You need two because the herb will be sandwiched in between both screens
and placed into the top of the brass end cap with the hole.
Screw the brass end cap onto the brass pipe fitting with bulb in it.
Insert air hose, and plug in.
Vaporize will glow a yellowy orange due to the reflections off the brass.
(Looks like fire almost).
Within 30 seconds, you will see vapor appear. Gently inhale and enjoy!
Warning...do not peer directly into light. It emits UV radiation. That
is why I have the end cap on it, with a hole in the top for the vapor.
Pics to follow.