BurnzyBurnz
Well-Known Member
Hey everyone,
So after several grows I've always dreaded germination of seeds. I've never really had a full failure, I've always managed to save them or they grew properly. However after the last 4 seeds I've germinated (expensive humbolt seeds) I have had issues.
From start steps I use...
Paper towel method, wait til I see a good tap root usually within 48hrs to soil.
I plant about nuckle deep " 2cm " ... I plant in a Coco earth casting mix with added perlite. Room temp 26C humidity 65% - 70%. Light on for 12hrs a day.
Again I've never had an unsuccessful seed to break soil and continue onwards. However I do notice it can take upwards to 7 days before breaking soil. Also, typically the shell needs help to fall of via me. I also notice even after the shell is off the cotyledons are still stuck together by some sort of film.
I always plant root down and yet a couple times I've had to dig up the cotyledons to insure it doesn't grow down and die in the soil. I had to do that to both of these seeds. Clearly I am making a mistake somewhere. Can you help me ?
I've read tones and feel like I'm understanding everything and am following the steps properly. Also prior grows have been successful.
Am I supposed to keep the seeds always in the dark while performing the paper towel method... " Because I do. "
When I plant the tap root in soil am I supposed to keep it in the dark also ?
Am I not planting the tap root properly ? Or deep enough ?
* * * Do you know a better full proof method of successfully germinating / starting seedlings ??? * * *
All replies are greatly appreciated and welcomed. Thank you for taking the time to read and lend a helpful hand. Cheers.
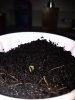
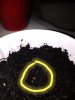
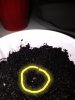
See pictures for details. Ask me anything. In the picture I had just watered using the spray bottle method. Hence why so wet looking.
So after several grows I've always dreaded germination of seeds. I've never really had a full failure, I've always managed to save them or they grew properly. However after the last 4 seeds I've germinated (expensive humbolt seeds) I have had issues.
From start steps I use...
Paper towel method, wait til I see a good tap root usually within 48hrs to soil.
I plant about nuckle deep " 2cm " ... I plant in a Coco earth casting mix with added perlite. Room temp 26C humidity 65% - 70%. Light on for 12hrs a day.
Again I've never had an unsuccessful seed to break soil and continue onwards. However I do notice it can take upwards to 7 days before breaking soil. Also, typically the shell needs help to fall of via me. I also notice even after the shell is off the cotyledons are still stuck together by some sort of film.
I always plant root down and yet a couple times I've had to dig up the cotyledons to insure it doesn't grow down and die in the soil. I had to do that to both of these seeds. Clearly I am making a mistake somewhere. Can you help me ?
I've read tones and feel like I'm understanding everything and am following the steps properly. Also prior grows have been successful.
Am I supposed to keep the seeds always in the dark while performing the paper towel method... " Because I do. "
When I plant the tap root in soil am I supposed to keep it in the dark also ?
Am I not planting the tap root properly ? Or deep enough ?
* * * Do you know a better full proof method of successfully germinating / starting seedlings ??? * * *
All replies are greatly appreciated and welcomed. Thank you for taking the time to read and lend a helpful hand. Cheers.
See pictures for details. Ask me anything. In the picture I had just watered using the spray bottle method. Hence why so wet looking.
Attachments
-
 855.7 KB Views: 31
 -
 933.6 KB Views: 27
 -
 3.4 MB Views: 27
 -
 3.4 MB Views: 29