The Brummie Bubbler

neo12345

Well-Known Member
The Brummie Bubbler is a drip fed DWC system, the name is supposedly to have come from the original company making these posting most of them to the Birmingham area of the UK.

bubbler.jpg

To build this system you will need the following items, these can be bought separately or as a kit from good hydroponic shops for around £50.

1 x 90L Black plastic utility tank
1 x 15L Subsurface tray
1 x Mimouse water pump
1 x Twin outlet air pump
2 x 50mm Round air stones
2 x 1m 4mm Air line
1 x 15L Clay pebbles
1 x 1m of 13mm flexi hose
1 x 13mm T joint
1 x 13 Elbow joint

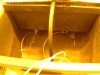
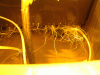
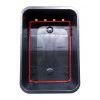
Start by drilling holes in the bottom of the smaller 15L subsurface tray (inside red area), you will need lot's of holes all over the bottom of the tray for the roots to grow through. Use a drill bit that is smaller than the size of the clay pebbles as you don't want them falling through the holes, I think clay pebbles are 8-10mm so I used a 6.5mm drill to drill my holes.

tray.jpg

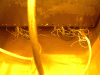
I also drilled a line of holes along the base of the container, and you can drill as many holes as you like but the idea is to encourage your roots to grow downwards towards the nutrient solution. Trust me by the time you drilled the base you won't want to start drilling the sides too!

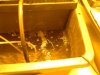
Once the holes have been drilled take the tray outside and fill with clay pebbles, give these a very good rinse with a hosepipe as you will get a lot of grit and dust come out of the bottom. Flush with clean water until it starts running clear. If the wife is not at home this can be done in the kitchen sink or bath, I did hear about someone washing the clay pebbles in the washing machine but you could be in big trouble if she comes home early and catches you doing this!!

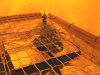
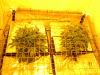
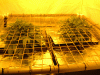
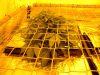
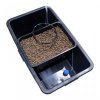
Fill with pebbles but not right to the top, leave some space so that the pebbles don't wick water out of the system and onto your floor! Your tank should now look like this but the smaller tray will be full of pebbles:

tanks.jpg

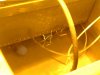
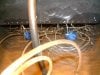
Now place the water pump on the bottom of the 90L tank, and cut a length of the 13mm hose that will run from the pump and up to the drip ring. Cut this a couple of inches longer than you think you will need, it can be adjusted afterwards but you can't add hose back on if you cut it too short! It's useful at this stage to get a bowl of hot water to dip the ends of the 13mm pipe in as the pipes slip on to the fittings much easier, and it helps to mold the drip ring.

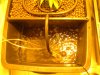
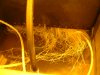
Attach the pipe to the water pump and fit the 90 degree elbow at the other end, then make the drip ring by softening up a length of 13mm pipe in water and use the 13mm T joint to create a circle for the drip ring. The drip ring will need to be drilled on one side with a 3mm drill bit to allow the water to drip, I drill the holes approx 1" apart.

Then attach the drip ring to hose coming from the pump with a small section of 13mm pipe. The dripper system is open to modification, which is the first thing I did as I saw a better way of doing it but I will go in to more detail later.

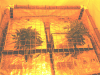
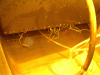
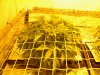
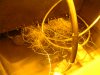
Drop in your air stones and your system should now look something like this:

brummie-bubbler-system (1).jpg
Fill the system with water to just underneath the tank with the clay pebbles, and you're ready to switch on the water pump and air pump to check everything is working fine. The dripper ring should be dripping water on to the clay pebbles and the airstones should be bubbling away, it's worth checking the airstones are working correctly as I've had a few that were blocked on one side.

That's it, you are ready to roll. I'll add some hints and tips and show a grow using this system, and will welcome any questions.
 

neo12345

Well-Known Member
I can fit two of these tanks comfortably side by side in a 1.2m x 1.2m tent.

20 feb (7).jpg

If you look closely you will see that the two tanks and the air pump are sitting on 3" thick foam, this is used to stop the vibration through the floor from the bubbler system. Luckily I'm using mine on a concrete floor but you can still get a humming from them, this is 10 times worse if you have a wooden floor and if you live in a semi or terraced house this hum can travel into your neighbours house and the last thing you want is them asking if you can hear something humming! So get some foam down before you start installing your system or some other kind of insulation or anti vibration mats.

You may also notice the silver lids my tanks now have, some kits come with lids and others don't. You need to keep the nutrient solution in the dark to help to reduce the chances of nasty things growing in it, so I made my own with some bits I had just laying around.

I used some cardboard to make the lids and covered them in some mylar I had left over, then sealed it all up with some foil tape. Make sure that your lids are water tight as the one side facing the nutrient solution will get fairly damp and you don't want the cardboard going all soggy. You can use some lightproof black plastic sheeting which is available from most stationers or craft shops.

20 feb (3).jpg

You can see from this picture how I modified the drip ring, as I found their suggestion was a ring that was either too big like the first ring or too small like the second so I incorporated the two to give a nice even delivery around the plant and roots for now and in the future as the plant gets bigger.

The plants have been in the system for 2 days now and are starting to perk up after their transplanting shock.

20 feb (1).jpg 20 feb (2).jpg 20 feb (4).jpg 20 feb (5).jpg 20 feb (6).jpg 20 feb.jpg
 

neo12345

Well-Known Member
Day 4.

The plants seem to be enjoying their new home.

22 feb (4).jpg

I use the dripper system sporadically for the first week, to encourage the roots to search out that lovely nutrient solution that it craves. It seems to enjoy that and has grown a 12" root by the 4th day!!

22 feb (3).jpg

The plant on the right was supercropped quite early on in it's life with a technique that I call the Fidi technique.

It stands for F**k I dropped it, which is what I did whilst watering it one day. It landed plant side down, obviously!! This is a highly advanced technique and I would not recommend this if you are a newbie to growing.

22 feb (5).jpg 22 feb.jpg
 

dr green dre

Well-Known Member
Nice write up there neo.. I've been using this system for sometime now ,and they always produce some impressive trees. I think growell made up the name for them as that seems only place selling it in brum like that.. There like marmite around here you either love them or hate them :) ..
I noticed your air pump is lower than the tubs so if you lose power the water will syphon back in the pump ..its happened a few times to me - either it starts getting noisier or stops working..

Whats that strains your running in there anyway? Got quite alot of pics in these tubs if you want to look through the thread .. growell have a tent net that would suit that set up fine too if you was going to scrog those plants..

Good luck with this ..

Dgd
 

neo12345

Well-Known Member
Good to hear from you Doc, I was beginning to think I was just talking to myself!! I think Growell just copied the name, I can't for the life of me remember the name of the company that first coined the term.

I've been using them for a while too but couldn't really find much on this forum about them so I decided to start this thread, I was hoping people would join in and post pics of their systems/grows and we could share tips and information about using them and what results they are getting. So please feel free to add anything you like on here, and that goes for other people too.

This was my first attempt using it so it's already completed but I thought I'd make it sort of like a journal rather than just post the results up straight away, just to keep a bit of interest in the thread.

I am using non return valves on the air pump which you can't see in the pictures, great tip though as they are very important from a safety point of view. You'd be surprised how many people I know don't actually use them, but then again I know people that have overloaded extension sockets on the floors of their grows with all that water around!!

The strain is Big Bud, a cross between Northern Lights #1 and Super Skunk #1. There will be some topping/scrogging action too, for those that like their ladies being submissive!!

I like your hash pics, even though they do remind me of what my neighbours cat keeps leaving on my lawn!! I miss the good old hash days, it's sad that the yoof of today won't get to experience 'hot rocks' and the alertness needed as they dropped in your lap. :mrgreen:

What nutrients do you use with your system? Feel free to post some pics up and any information you think might help people, why do you think they are marmite why do you think people don't like them? I find it a very easy system to use with some fantastic growth rates, and great results from it.
 

dr green dre

Well-Known Member
=neo12345;10369282]Good to hear from you Doc, I was beginning to think I was just talking to myself!! I think Growell just copied the name, I can't for the life of me remember the name of the company that first coined the term.

I've been using them for a while too but couldn't really find much on this forum about them so I decided to start this thread, I was hoping people would join in and post pics of their systems/grows and we could share tips and information about using them and what results they are getting. So please feel free to add anything you like on here, and that goes for other people too.
Cool neo.. yeah i haven't seen much info on here regarding those tubs either i did take a few pics of the setup before i ran it in one of my earlier grows.. Nothing like your tutorial tough..
This was my first attempt using it so it's already completed but I thought I'd make it sort of like a journal rather than just post the results up straight away, just to keep a bit of interest in the thread.

I am using non return valves on the air pump which you can't see in the pictures, great tip though as they are very important from a safety point of view. You'd be surprised how many people I know don't actually use them, but then again I know people that have overloaded extension sockets on the floors of their grows with all that water around!!

The strain is Big Bud, a cross between Northern Lights #1 and Super Skunk #1. There will be some topping/scrogging action too, for those that like their ladies being submissive!!
Yeah i've seen people do so weird stuff in there grow rooms too ..like life is nothing :) ..I've a setup were there water was uncovered and the roots were growing up out the serimis in the sub tray..shocking ..
I guess thats why there like marmite as loads of people use them based on wild claims with out the basic know how and wonder why they don't get those 20+oz yeilds..
I think its a simple system too when you cover the basics , but i always seem to get root rot in one bucket ! thats what keep me from linking them into rdwc as thats where the yields are at imo.. Root rot isn't that hard to treat from you catch it early so its good to have so oxy+ about or you can go down the live bennies route but i haven't tried that myself.. Theres a thread on here about it -i'll come back with a link

The big bud should give you some huge colas in that tub..a bit Lst and all that ..i have'nt grown it myself but if its stretches a lot then i'd get a screen and scrog them hard i think you could fill out that whole tent that way with a even canopy..

I like your hash pics, even though they do remind me of what my neighbours cat keeps leaving on my lawn!! I miss the good old hash days, it's sad that the yoof of today won't get to experience 'hot rocks' and the alertness needed as they dropped in your lap. :mrgreen:
Thanks man ..that hash theres almost done now .. does look kinda shit :) but smokes like fiyah.. Funny how all the none skunk smokers love it the most!! Hot rocks ...those were some days ..mainly on the wrong side of the wall .. were you could tell who got a parcel by a mans tracky or tshirt the next morning:).. Funny thing not getting much rocks of these though..

What nutrients do you use with your system? Feel free to post some pics up and any information you think might help people, why do you think they are marmite why do you think people don't like them? I find it a very easy system to use with some fantastic growth rates, and great results from it.
I've ran a few nutes threw this but at the moment im on Vitalink max range -grow bloom and buddy plus vitalink bio+ , big bud and bcuzz hydro booster were used in the last run. the current run will be done minus the big bud .. I don't feed the recomended dosage on the bottle as i find its too high for most strains i run... I learnt that less is more with dwc but i get burns every now and then as i do one big res for all plants..

Another tip is to have another 90ltr outside to feed and empty your pots from, you can take the current mini pump and attach a piece of hose pipe to it so you can change res and vice a versa for feeding plus you get the food mixed together/ph'd before it hits the roots.. Make things so much easier for me..

going to look for some pics that i've posted ..

Think this is one of the first i posted.. cheese

View attachment 3036356View attachment 3036357View attachment 3036358
Another early shot
View attachment 3036359View attachment 3036360

Some from the last early veg and roots in flower
IMG_4943 (1280x853).jpgIMG_2990.jpgIMG_2989.jpgSAM_2271.jpg

sunshine daydream..
SAM_1097.jpgSAM_1010.jpg

Cheese and cheeseXs from a while back
SAM_6496.jpgSAM_8900.jpgSAM_8769.jpgSAM_8768.jpgSAM_8730.jpg

Gets decent yeilds when done right but its strain dependant too ..

:peace:

dre
 

jtdubz

Well-Known Member
Ooh I like this may have to look into switching once I get more funds. Looks clean easy and low maintenance.
 

neo12345

Well-Known Member
Yeah i've seen people do so weird stuff in there grow rooms too ..like life is nothing :) ..I've a setup were there water was uncovered and the roots were growing up out the serimis in the sub tray..shocking ..
I guess thats why there like marmite as loads of people use them based on wild claims with out the basic know how and wonder why they don't get those 20+oz yeilds..
I think its a simple system too when you cover the basics , but i always seem to get root rot in one bucket ! thats what keep me from linking them into rdwc as thats where the yields are at imo.. Root rot isn't that hard to treat from you catch it early so its good to have so oxy+ about or you can go down the live bennies route but i haven't tried that myself.. Theres a thread on here about it -i'll come back with a link
That's a good tip about having an extra tank to fill your nutrient reserve from, I actually bought a spare water pump and a length of hose so I can pump the old solution out of the tank and straight into the drain outside. Then I refill the tanks with a hosepipe.

I've never fallen foul of the root rot either in any of my systems, touch wood. I change out the nutrient solution religiously every week on a sunday, and I check the ph everyday. The moment I see it rise wildly I change the solution using just fresh water which comes out at 6.8-6.9 anyway, and I add either some Hydrogen Peroxide (2ml per tank 24% solution) or some Rot Stop and let it run that for 24 hours before adding in nutes and adjusting ph. That seems to work as a preventative measure then it will remain stable again for a few weeks.

I also clean my air lines regularly with an h2o2 solution as this seems to be where the slime comes from, I can feel slime on them after a while and you can see the inside discolour with stuff growing inside them!

So I've never tried the beneficial tea either, unless you count a nice cup of PG Tips pyramid bag with milk and two sugars!

Awesome pictures, they really show what can be achieved using this system. Please feel free to post any more that you find, or any other information that other people may find useful. There must be more than just us two using this system?!
 

neo12345

Well-Known Member
Day 8

The ladies were topped today so they are looking a little shorter. The idea being that when the screen is added I can grow one of the tops towards the back of the tent and one towards the front, with the other branches filling in the other holes on the screen.

26 feb 8.jpg 26 feb 8 (4).jpg

As you can see the ladies are settling in to their new homes nicely and are starting to grow.

Only 8 days in the system and more roots are now starting to appear through the bottom of the tray, the dripper system is now running 24/7 delivering fresh oxygenated water and nutrients to the root mass in the clay pebbles.

26 feb 8 (2).jpg 26 feb 8 (3).jpg
 

neo12345

Well-Known Member
Ooh I like this may have to look into switching once I get more funds. Looks clean easy and low maintenance.
It's ever so simple JT, it takes 5 mins to check ph and ppm's and add some water if needed everyday. Then half an hour once a week to change out the tanks. That's it.

And you'll never get your hands dirty!

The growth rate is just outstanding, this is just six days growth!

20 feb 2 (3).jpg View attachment 3037611
 

neo12345

Well-Known Member
Why not just bend the top over while still young?
Hi Ben and welcome,

the idea of topping them to grow in two different directions was to fill the screen out more evenly from front to back as I'm trying to grow the plants into a rectangle shape as there are two of them together, if you had just one plant in the middle of the tent I guess you could lst it and grow it outwards in every direction that would work pretty well too.
 

neo12345

Well-Known Member
Day 10

Just a quick update on the ladies. The scrog screen has been fitted as the plants are well established now and are growing quickly, I can now start to grow the plants flatter by tucking the growing tips under the screen. Some leaves were defoliated in the adding of this screen, so if you are of a nervous disposition then please look away now.

28 feb 10.jpg 28 feb 10 (1).jpg 28 feb 10 (2).jpg

Some root porn.

28 feb 10 (3).jpg
 

neo12345

Well-Known Member
Day 13

The plants seem to have survived the defoliation and after just 3 days are continuing to grow, this is a pic from day 10 and today day 13:

28-feb-10.gif 03-mar-13-(2).gif

There are no signs of stunted growth, in fact the plants seem to have doubled in size in just 3 days after the defoliation. The growing tips are starting to penetrate above the screen and will be ready to start tucking under over the next few days.

03-mar-13-(3).gif 03-mar-13.gif

03-mar-13-(4).gif 03-mar-13-(1).gif
 

neo12345

Well-Known Member
Day 17

The plants have gone from this first picture to the second in just 15 days:

20-feb-2-(7).gif

07-mar-17.gif
Considering the defoliation and topping they don't look in too bad a condition? There are lot's of growing tips already to start tucking under the screen, and the plants are growing very bushy in a nice domed shape.

07-mar-17-(1).gif
07-mar-17-(5).gif 07-mar-17-(2).gif
07-mar-17-(4).gif 07-mar-17-(3).gif
 
Top