OK! So this is my first grow journal. I wanted to grow but I didn't want it to be too suspicious and I wanted to do it very cheap so I built my 2x2x2 grow box experiment. I didn't have much money to spend so i tried to do it with $100 budget! So hopefully this works! I know that this is very small but I might just get a small yield (anything to help save $$!) Comments are more than welcome!
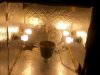
The Setup $25
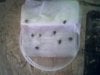
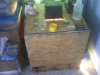
I bought a sheet of osb board for $11 at lowes. I had them cut it into 8 pieces of 2x2 (there was 2 extra pieces) I then lined the 6 pieces with the dull side of aluminum foil ($3) and cut 3 holes on each side (see pic) and cut a 7x9 inch hole on top (see pic) After that I took weather stripping ($3) and insulation foam ($6) to the cracks and to secure the lights. I put hinges ($2) on one piece for a door.
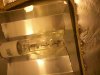
Lighting $35- $120
For lighting I bought 4 75 watt sockets for about $25 bucks and put 13 watt cfls about $10 bucks for an 8 pack (I got a coupon) in them. They each produce 880 lumens of cool white (good for veg growth) so total about 3500 lumens. Also on the top of the box I have a 150 watt hps (about 15000 lumens) which will produce warm light good for all stages of growth! (I was given the hps for free usually they are anywhere from $50-$80 may include ballast) I added up the lumens 18500 and divided it by my total amount of sq. feet which was 4. So
2x2=4---------------------------My sq. ft.
15000+3500= 18500--------Total lumens
18500/4=4625----------------meaning I will get about 4625 lumens per sq. foot
Air $10
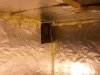
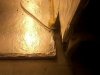
I attached 2 fans (sale! $3.96 each!) to the square holes I had cut. I put the exhaust fan on the top left and the intake on the bottom right to push hot, stale air out and cool, fresh air in. I just took some duct tape to them and tightened up the air flow
I placed one more inside (sale $2!) for more air flow and to strentgthen stems. The temp varies from 75 F to about 85 F.
Soil $3
I just bought some miracle grow seed starting mix. But I sifted through it to get more perlite and added it to my soil for better pockets. I will be getting some nutes when they grow out a bit.
Watering $...free!
I poured some of my tap into a spray bottle and let it sit out for about a day to release chlorine vapors.
So for a total amount I was able to build my setup for about $75! But realistically it would cost about $200 without all the sales and free hps!
 The Grow---From germination to end!
Thurs. Aug. 20, 2009
I placed some of the better looking seeds I had into a wet paper towel and folded it up to germinate. Within about 24 hours the seeds had cracked open with stems and I was ready to plant.
Fri. Aug 21, 2009
I mixed together my soil and made it nice and fluffy with lots of perlite. I planted 3 seeds about 3/4 inch from top then I watered them and placed peat moss on top of soil then lightly watered again. I began my 24/0 lighting schedule for veg growth.
Sun. Aug 23, 2009
One has sprouted! So far so good!
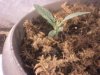
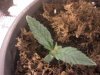
Fri. Aug. 28, 2009
The one sprout seems to a type of sativa because its leaves are very fat and large. The sprout is very healthy with a dark green color to the leaves and purple stems. The temp is about 80 F. Although it has a new set coming in, they seem a little yellow near the stem. I figure that this is because I accidentally watered too much yesterday!
As they grow up I will transplant them into larger pots and I only plan on growing 3 plants at most.
The Setup $25
I bought a sheet of osb board for $11 at lowes. I had them cut it into 8 pieces of 2x2 (there was 2 extra pieces) I then lined the 6 pieces with the dull side of aluminum foil ($3) and cut 3 holes on each side (see pic) and cut a 7x9 inch hole on top (see pic) After that I took weather stripping ($3) and insulation foam ($6) to the cracks and to secure the lights. I put hinges ($2) on one piece for a door.
Lighting $35- $120
For lighting I bought 4 75 watt sockets for about $25 bucks and put 13 watt cfls about $10 bucks for an 8 pack (I got a coupon) in them. They each produce 880 lumens of cool white (good for veg growth) so total about 3500 lumens. Also on the top of the box I have a 150 watt hps (about 15000 lumens) which will produce warm light good for all stages of growth! (I was given the hps for free usually they are anywhere from $50-$80 may include ballast) I added up the lumens 18500 and divided it by my total amount of sq. feet which was 4. So
2x2=4---------------------------My sq. ft.
15000+3500= 18500--------Total lumens
18500/4=4625----------------meaning I will get about 4625 lumens per sq. foot
Air $10
I attached 2 fans (sale! $3.96 each!) to the square holes I had cut. I put the exhaust fan on the top left and the intake on the bottom right to push hot, stale air out and cool, fresh air in. I just took some duct tape to them and tightened up the air flow
I placed one more inside (sale $2!) for more air flow and to strentgthen stems. The temp varies from 75 F to about 85 F.
Soil $3
I just bought some miracle grow seed starting mix. But I sifted through it to get more perlite and added it to my soil for better pockets. I will be getting some nutes when they grow out a bit.
Watering $...free!
I poured some of my tap into a spray bottle and let it sit out for about a day to release chlorine vapors.
So for a total amount I was able to build my setup for about $75! But realistically it would cost about $200 without all the sales and free hps!
The Grow---From germination to end!Thurs. Aug. 20, 2009
I placed some of the better looking seeds I had into a wet paper towel and folded it up to germinate. Within about 24 hours the seeds had cracked open with stems and I was ready to plant.
Fri. Aug 21, 2009
I mixed together my soil and made it nice and fluffy with lots of perlite. I planted 3 seeds about 3/4 inch from top then I watered them and placed peat moss on top of soil then lightly watered again. I began my 24/0 lighting schedule for veg growth.
Sun. Aug 23, 2009
One has sprouted! So far so good!
Fri. Aug. 28, 2009
The one sprout seems to a type of sativa because its leaves are very fat and large. The sprout is very healthy with a dark green color to the leaves and purple stems. The temp is about 80 F. Although it has a new set coming in, they seem a little yellow near the stem. I figure that this is because I accidentally watered too much yesterday!
As they grow up I will transplant them into larger pots and I only plan on growing 3 plants at most.