Hi there,
I decided to share some info about my small build. Project will be called Sunshine2013 , Stage 1 (I love codenames") ).
).
This is a small panel for 1 bigger plant or few small plants, which will to be aided with CFL`s (sorry). Hopefully I will manage this issue with Stage 2, which will follow in... few months
This is for red liking (sun) plants. I personally grow tomatoes, stevia, lettuce and many more (all indoors). I use this forum, b/c I love leds and would like to share with people who are interested too (vegetable forums are not tech enough for me). I hope you can accept this and check my build. I will show the build step by step with some important informations how and why. All constructive feedback is welcome!
Deadline for this project is due in 3 weeks. I already made the most part, but I`ll be busy, so I will need some time to finish. In this time maybe your comments will change the design, so I decided to post now.
BTW sorry for my english.
1. I decided to use 10cmx20x1 aluminium (99.5%) base. I choosed it arbitrary, just gave it a go. No idea how it will perform in real life.
I was thinking about copper, but due to money shortages and the whole crisis in Europe I decided otherwise. I was also sure that I will do some errors and didn`t want to wreck precious copper.
Here it`s the plate I will use. Sadly it`s far from perfect, some scratches are really deep.
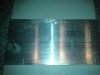
Imho it`s not absolutely necessary to lap (on the led side) but I decided to work this out.
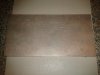
2. Lapped it with 60 waterproof paper. For instructions search heatsink lapping on google. Don`t forget to add some detergent for nice sliding movement.
BTW Lapping IS pita :/ About 2hrs to get here (of course 1 side HEHEHE). There were not only scrathes, but the wider edges were curved inside, so I had to flat it out. On both sides...
3. 800 grit waterproof.... (after 150, 200, 320 & 500") )
)
4. Final lap with 1000 will follow right before mounting the elements.
No pic here
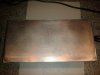
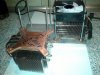
5. You surely managed, that this plate can`t be the whole radiator... Here are two little guys who`ll be a lil help... Pictures from lapping (this whole lapping part took me 2 days or so). Next time I`ll outsource it. Radiators ready for lap with 500 and 1000 paper. They`re laying on 60 grit paper.
6. I drilled and tapped M4 holes in on one side of alu plate.
7. Here is the idea how the heat management will look like
This is really a custom build. Just wanted that the things run cool...
This is were the heatsink project part is now (current status)
8. Next step will be final lap on the radiator side. Between alu plate and the radiators arctic ceramique 2 thermal grease will be used. Nothing better is needed for radiators. Forget diamond or silver things.
9. Now after this (maybe) boring mechanical part comes the led design incl. wiring. The led`s will be driven with constant current drivers. Drivers will be attached to constant voltage power supplies.
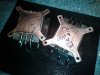
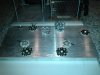
10. I have all parts, some of them on their `place`. You even see some optics.
11. Did I mention that I lapped the star bases too? 1000 grit _!without water!_. Cleaned them with isopropyl alocohol. I lapped them with the optics on, to not touch them, and to (partially) save them from the aluminium dust...
12. Optics will be used, but the LED`s were first buyed and then it was designed. It applies to all leds; they are good for growing but I bought without a plan how to install them. I designed later having already specific parts... So the whole design isn`t actually best of the best... it`s far from it.
The plan for Stage2 is adding red in 630-660nm (osram) and xml2 ww, but we will see...
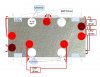
The layout of the 4 xpg muliled stars and the 3 inner deep red multileds is designed b/c of the optics. I have 15 and 18 degree optics. Here is a pic how it will throw given 25cm (10 inch) distance. The circles mean 50% power output area, out of it is 49 and less Generally the coverage will be very good on about 8x8 inch area. The centre will be covered b/c of those less than 49% coverages.

So lets say first 20 days with optics in the centre (eg. for a tomato). On later grow phases the optics will be dismounted. Both margin deep reds will (probably) not be used in first 20 days. XML`s - maybe.I suppose the current for the start will be like 150mA per led, b/c more would possibly kill the plant. But this is only assumption. We will see. I have a luxmeter
13. BTW the LED`s used will be: (This was shown on the design above, but let write this out):
-4x stars with 4x xpg cool whites (6000k). r5 bin. 137 lumen _each led_ @ 350mA. Each star can do between 500 and 2k lumen (5-20W), b/c each xpg can be driven up to 1.5A
-5x stars with 3x luxeon deep red, 350 product line (47% efficient@ 350mA). They can go up to 700mA. So each star is capable of 2.1W pure optical radiant power (not power consumption or heat)
-8x 1x1cm square XML warm white 2700k, e8, t6 - 200lm @ 700mA. Can go up to 2A. Ca. 480 lumen each then.
-2x star of 1x far red Ledengine LZ1-10R300. About 350mW at 1A. Far reds will be used for EOD (end of day) signaling, that mean phytochrome Pr->Pfr conversion (short day plants hormone signal)
14. I`ll be back with when some progress will be made.
Happy New Year
I decided to share some info about my small build. Project will be called Sunshine2013 , Stage 1 (I love codenames
This is a small panel for 1 bigger plant or few small plants, which will to be aided with CFL`s (sorry). Hopefully I will manage this issue with Stage 2, which will follow in... few months
This is for red liking (sun) plants. I personally grow tomatoes, stevia, lettuce and many more (all indoors). I use this forum, b/c I love leds and would like to share with people who are interested too (vegetable forums are not tech enough for me). I hope you can accept this and check my build. I will show the build step by step with some important informations how and why. All constructive feedback is welcome!
Deadline for this project is due in 3 weeks. I already made the most part, but I`ll be busy, so I will need some time to finish. In this time maybe your comments will change the design, so I decided to post now.
BTW sorry for my english.
1. I decided to use 10cmx20x1 aluminium (99.5%) base. I choosed it arbitrary, just gave it a go. No idea how it will perform in real life.
I was thinking about copper, but due to money shortages and the whole crisis in Europe
Here it`s the plate I will use. Sadly it`s far from perfect, some scratches are really deep.
Imho it`s not absolutely necessary to lap (on the led side) but I decided to work this out.
2. Lapped it with 60 waterproof paper. For instructions search heatsink lapping on google. Don`t forget to add some detergent for nice sliding movement.
BTW Lapping IS pita :/ About 2hrs to get here (of course 1 side HEHEHE). There were not only scrathes, but the wider edges were curved inside, so I had to flat it out. On both sides...
3. 800 grit waterproof.... (after 150, 200, 320 & 500
4. Final lap with 1000 will follow right before mounting the elements.
No pic here
5. You surely managed, that this plate can`t be the whole radiator... Here are two little guys who`ll be a lil help... Pictures from lapping (this whole lapping part took me 2 days or so). Next time I`ll outsource it. Radiators ready for lap with 500 and 1000 paper. They`re laying on 60 grit paper.
6. I drilled and tapped M4 holes in on one side of alu plate.
7. Here is the idea how the heat management will look like
This is really a custom build. Just wanted that the things run cool...
This is were the heatsink project part is now (current status)
8. Next step will be final lap on the radiator side. Between alu plate and the radiators arctic ceramique 2 thermal grease will be used. Nothing better is needed for radiators. Forget diamond or silver things.
9. Now after this (maybe) boring mechanical part comes the led design incl. wiring. The led`s will be driven with constant current drivers. Drivers will be attached to constant voltage power supplies.
10. I have all parts, some of them on their `place`. You even see some optics.
11. Did I mention that I lapped the star bases too? 1000 grit _!without water!_. Cleaned them with isopropyl alocohol. I lapped them with the optics on, to not touch them, and to (partially) save them from the aluminium dust...
12. Optics will be used, but the LED`s were first buyed and then it was designed. It applies to all leds; they are good for growing but I bought without a plan how to install them. I designed later having already specific parts... So the whole design isn`t actually best of the best... it`s far from it.
The plan for Stage2 is adding red in 630-660nm (osram) and xml2 ww, but we will see...
The layout of the 4 xpg muliled stars and the 3 inner deep red multileds is designed b/c of the optics. I have 15 and 18 degree optics. Here is a pic how it will throw given 25cm (10 inch) distance. The circles mean 50% power output area, out of it is 49 and less
So lets say first 20 days with optics in the centre (eg. for a tomato). On later grow phases the optics will be dismounted. Both margin deep reds will (probably) not be used in first 20 days. XML`s - maybe.I suppose the current for the start will be like 150mA per led, b/c more would possibly kill the plant. But this is only assumption. We will see. I have a luxmeter
13. BTW
-4x stars with 4x xpg cool whites (6000k). r5 bin. 137 lumen _each led_ @ 350mA. Each star can do between 500 and 2k lumen (5-20W), b/c each xpg can be driven up to 1.5A
-5x stars with 3x luxeon deep red, 350 product line (47% efficient@ 350mA). They can go up to 700mA. So each star is capable of 2.1W pure optical radiant power (not power consumption or heat)
-8x 1x1cm square XML warm white 2700k, e8, t6 - 200lm @ 700mA. Can go up to 2A. Ca. 480 lumen each then.
-2x star of 1x far red Ledengine LZ1-10R300. About 350mW at 1A. Far reds will be used for EOD (end of day) signaling, that mean phytochrome Pr->Pfr conversion (short day plants hormone signal)
14. I`ll be back with when some progress will be made.
Happy New Year