shroomyshroom
Well-Known Member
Hi guys I see so many ppl on here giving advise on what they claim to be the easiest and most effective way of cloning... and to them I say.....

The method I am about to show you is about as set and forget as you can get..... You basically set it up come back in 7 - 10 days and they are ready to be transplanted and it wont cost you more than $10.00 Australian
First off you are going to need the following equipment:
1 x ice-pole tray (used to hold the medium and clone)
1 x plastic bowl (used as the rez)
1 x bag of vermiculite (used as medium)
1 x knife or drill (to make holes in the ice-pole tray)
OK lets get started...
I'm not gonna go into it to much cause there is 10,000 threads on how to cut clones and how to prepare them b4 transplanting them into the cloning medium... all I am simply showing is the method used once you have cut them
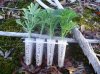
Step #1 Drill holes into the bottom of the ice-pole tray.
Step #2 Fill the ice-pole tray with vermiculite.
Step #3 Moisten the verm in the ice-pole tray with water.
Step #4 Fill plastic bowl with water.
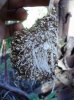
Step #5 Place ice-pole tray with moistened vermiculite into the plastic bowl with water in it.
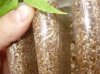
Step #7 Cut your clones on a 45 degree angle.
Step #8 Dip your clones in rooting powder or gel, you can even skip this step if going organic.
Step #9 Poke hole into medium and place clone in hole, Then firmly press medium around the clone.
Presto you have just created a set and forget for your cloning no humidity done needed no misting needed
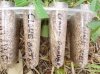
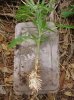
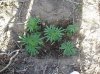
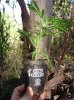
This is what it should look like once you are done
I will try take photos of the whole process on the week end to help ppl who still have no clue
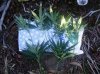
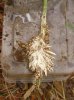
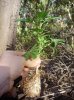
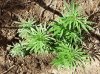
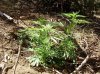
the 4th photo is what they will look like after a day or 2
Ohhh yeah i forgot to mention i do a this out side so if it worked for me... the ppl that do everything inside should have no probs at all....
The method I am about to show you is about as set and forget as you can get..... You basically set it up come back in 7 - 10 days and they are ready to be transplanted and it wont cost you more than $10.00 Australian
First off you are going to need the following equipment:
1 x ice-pole tray (used to hold the medium and clone)
1 x plastic bowl (used as the rez)
1 x bag of vermiculite (used as medium)
1 x knife or drill (to make holes in the ice-pole tray)
OK lets get started...
I'm not gonna go into it to much cause there is 10,000 threads on how to cut clones and how to prepare them b4 transplanting them into the cloning medium... all I am simply showing is the method used once you have cut them
Step #1 Drill holes into the bottom of the ice-pole tray.
Step #2 Fill the ice-pole tray with vermiculite.
Step #3 Moisten the verm in the ice-pole tray with water.
Step #4 Fill plastic bowl with water.
Step #5 Place ice-pole tray with moistened vermiculite into the plastic bowl with water in it.
Step #7 Cut your clones on a 45 degree angle.
Step #8 Dip your clones in rooting powder or gel, you can even skip this step if going organic.
Step #9 Poke hole into medium and place clone in hole, Then firmly press medium around the clone.
Presto you have just created a set and forget for your cloning no humidity done needed no misting needed
This is what it should look like once you are done
I will try take photos of the whole process on the week end to help ppl who still have no clue
the 4th photo is what they will look like after a day or 2
Ohhh yeah i forgot to mention i do a this out side so if it worked for me... the ppl that do everything inside should have no probs at all....