Seedling/Clone Tub

DubB83

Well-Known Member
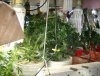
As promised here is my manual Ebb & Flow that is now inside the 'Tub:


My seedlings in my test "manual" Ebb&Flow box.


Lid for the top box, ugly as sin isn't it.


Inside the Ebb&Flow where the plants live and the magic happens.


Water solution.


Place one box in the other and allow to settle.


Allow to drain slowly and return to the light with the lid on.


Whole "manual" Ebb & Flow setup.
 

DubB83

Well-Known Member
I might put an airstone in the bottom res and just leave the top on on it. Any thoughts?
 

DubB83

Well-Known Member
I ended up putting my old res under the setup and letting it run. It works great!

Here are a few pictures with a basic description:

My old res...


I mixed up a rooting solution... (I recommend a better pH meter, Santa might bring me a new one)


Reborn under my manual ebb & flow to make a DWC kinda...

Ignore the two dead plants on the left, they died yesterday because of the "manual" ebb & flow being able to keep up with the rockwool drying out.

Clones will go in the ziplock bag on top until it seems healthy enough to go into the hydroton.

Healthy seedling about to go into the hydroton...


Seedlings that are testing the hydroton... In the future it will be one clone per medium container, considering using solo cups with hydroton for lollipoping technique.


From here the clones will move to the flowering chamber once they have developed a root system more than just a tap root.

They will go straight into 12/12 in the 1-2 week section of my flowering ebb & flow table that is divided into 1-2 week section, 3-4 week section, 5-6 week section, 7-8 week section.

Keep an eye on this thread for the construction of the ebb & flow and room setup.
https://www.rollitup.org/do-yourself/138816-diy-3-x-3-ebb.html
 

DubB83

Well-Known Member
Ha ha ha, here is the picture of my PPM and pH meters...

My meters for pH and PPM or EC

Dee da deee, that is what I get for posting while high.
 

DubB83

Well-Known Member
The box is about to go through a transformation to allow more space for growing the clones in a veg stage. Fresh cuttings will be placed in sandwich bags and the rooted cuttings will be placed in the Mass DWC or miniature aeroponic (not ultrasonic) veg system for a little while in 2" net cups.
 

Anotheroldephart

Well-Known Member
Good DIY. I've never had any luck with rockwool cubes..I still have 0ver 300 of the dam things.*l* I use a 35 40 25 mix of perlite, vermiculite, and coco coir in 7 oz solo cups..makes it easier for me to transplant. As for the box..if I had anything that small, it would be covered with something else..seeing how it's a horizontal surface*s* I just bult a new closet..only problem there is.. So much room, well..gotta fill it up, right?
 

Attachments

DubB83

Well-Known Member
Good DIY. I've never had any luck with rockwool cubes..I still have 0ver 300 of the dam things.*l* I use a 35 40 25 mix of perlite, vermiculite, and coco coir in 7 oz solo cups..makes it easier for me to transplant. As for the box..if I had anything that small, it would be covered with something else..seeing how it's a horizontal surface*s* I just bult a new closet..only problem there is.. So much room, well..gotta fill it up, right?
Thanks for the nice comment, I now get a better use out of the system, check out my other threads in my signature.:bigjoint:
 

DubB83

Well-Known Member
hmm plants directly on the heating mat? from my experience thats a big no no
Unless it is -25*F outside and you have a temperature controller.

Someone didn't make it past the first page obviously.

I am not using this system in it's entirety anymore, please check my aeroponic cloner thread to see the evolution.
 

The Metal Veg

Active Member
hey dude can u give me tips on the splicing 3 lights into 2 extention cords, any help would be appriciated, btw pretty nice grow box u have going here
 

DubB83

Well-Known Member
hey dude can u give me tips on the splicing 3 lights into 2 extention cords, any help would be appriciated, btw pretty nice grow box u have going here
Your light moguls should have a black wire and a white wire. Take two moguls and twist their white wires together and black wires together. Cut your cord in half or two what ever length you want. The fat blade on your cord goes to your black wire the thin blade on the socket end goes to the white wire. Use wire nuts to put it all together and tape over your work. For the other one light do the same with the other cord.

Thanks for the compliment, you should see what it evolved into in my Aeroponic/fogoponic cloner and veg unit.
 

stephen94

Well-Known Member
question, i wAnted to build something about the same size with 2 125W CFL (actual wattage) that can fit 15 red 20oz cups that can get to about 7" tall, would the 2 125W CFL's burn the plants? to much light? or would it be ok...like i said the light is about 6 inches from the tops of the cups, i might get smaller cups, i dont plan on doing it for about 2 weeks so i want to get input now, the bulbs are freakin 14" long!
 

LJB

Active Member
Dub83's tub inspired me to put this together:


This thing is really simple and not automated for anything.

The power strips are strapped to the top of a cardboard box. The folding flaps are removed from the box. The box is slightly bigger than the tray that the plants are in. It can rest with the bulbs literally centimeters from the coco line. When the cover/lights need to be raised I have wooden blocks to put under the corners (told you all it was simple). The box(es) sit on a shelf. There is a clip fan on one end of the shelf and hole in either side (lengthwise) of the box cover for ventilation. What you see in there are eleven Blue Haze seedlings that are seventeen days old. Roughly 5 leaf sets. What you can't see are four, 1/2" tall Trainwreck seedlings that are two days removed from the paper towel.
 
Top