Rubbermaid & cfl starter kit

Dragonsmoke

Well-Known Member
So This is gonna be my first go at starting my lil ones in a rubbermaid tub with cfls, Ive always done it natural in the past but I now have 2 cats that eat anything that grows.

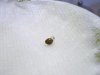
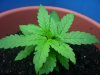
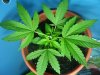
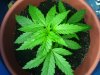
Anyhow, I started the seeds like norm: papertowels and plates in a warm dark place. Got me some designer seeds but a mixed bag of sativas and indy strains that the supplier lost track of.

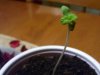
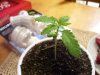
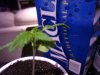
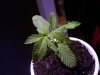
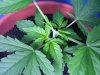
Once sprouted I put two (for now) in to cups and let them start in the sun as I get great sunlight in the day, not long after the cats knocked them over. Luckily I managed to save them and decided on other tactics.
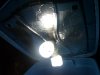
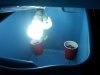
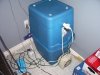
Rubbermaid tub=$5
light sockets =$5
bulbs = $10
timer = $8
already had a small fan that served no purpose till now.

and WAHLAH!!!!

Bear in mind this Not yet finished I still have to paint the inside white and add more lights, but like I said its only 2 lil ones..
 

Attachments

  • 100_3020.jpg
    100_3020.jpg
    41.1 KB · Views: 84
Just a lil preview.
 

Attachments

  • 100_2860.jpg
    100_2860.jpg
    31.9 KB · Views: 23
  • 100_2967.jpg
    100_2967.jpg
    44.3 KB · Views: 23
  • 100_2997.jpg
    100_2997.jpg
    50.3 KB · Views: 30
nice set up man, i wanna try doing something like that. What are you gonna do when they start getting bigger tho
 
nice set up man, i wanna try doing something like that. What are you gonna do when they start getting bigger tho

check it bro
made this for anyone wanting to try it
works awesome


How to Create a 400 Watt HID Rubbermaid Grow
by gman


You Will need
:


Three Rubbermaid bins

Three higher velocity fans
One lower velocity fan
A sharp razor or knife
Mylar, or flat white paint


Step one:
Place one Rubbermaid bin right side up take cover of and put to side

Step1.png


Step two: remove the cover of a second Rubbermaid bin and place face down over the first Rubbermaid bin

Step2.png


Step Three: Cut a hole in the bottom of the top box

Stap3.png


Step Four:
put last Rubbermaid right side up with cover on top cut hole in bottom of Rubbermaid bin first

Step4.png


Step Five:
Cut a hole in the second bin up on the side for one high powered fan


Step six:
Cut directly opposite for the second high powered fan
both will be pumping air in

Step5and6.png


Step Seven:
Cut a hole on the side of the top box so that the third and final high powered fan will fit blowing air out


Step eight:
Cut a hole on the side of the bottom box so that the low powered fan will fit and blow on your plants nicely

Step7and8.png


Step nine: Affix hood and bulb so that it can hang from the cover of the top box

Step9.png


Step ten: put mylar all over the inside, if Mylar is not an option use flat white paint


Step Eleven: put them plants in there and let em grow


To access the plants simply take the top bin off the top,
to get all the way to the plants take the middle and top off


Anyway here of some pics of it and its results

S5000275.jpg

S5000361.jpg

S5000351.jpg

S5000352.jpg

S5000384.jpg

S5000297-1.jpg

S5000275.jpg

S5000278.jpg
 
do you need to let them grow a little bit before you put them in there??? like wont they stretch and/or not be strong enough for a fan???
 
Thanks for the tutorial Growman that is wicked awesome! The pics are cool too. Hey Refer my plants are bout 2-3 weeks and yes I will be stacking more bins when my ladies are bigger. But only till late june when they go outdoors because I will be away a couple times for days at a time. Thanks for all the info and keep it coming. Like nutes: what the best ratios for veg and flower.?. I just started 8-7-6 very deluted for now but I know it will have to change later.

here are a pics from just days after putting them in there.

the First one is Twisted Sister & the other is my Indy.
 

Attachments

  • 100_3024.jpg
    100_3024.jpg
    44.6 KB · Views: 14
  • 100_3035.jpg
    100_3035.jpg
    44.4 KB · Views: 16
dude how do you hook up the lights.... thats all i have is lamps and i want to hook up some lights in a socket but those 3 wires that they come w ii dunno what to do with
 
I got a thing from H.Depot that looks like a light socket with a plug on the back. so you can plug it into a wall if you wanted to and plug a bulb in the otherside. It would look like a bulb coming right out of the wall. costs a dollar. then I got a bulb splitter for 2 bucks. and then two 6500k 23w cfl phillips bulbs. extention cord and timer.
 
This is the basic set up I have. and you can use as many as you want!

I know its a lil crude but its the IDEAR anyhoo! Each rig will give you 3200 lumens but you can find bigger bulbs too! or just ad more.
 

Attachments

  • light set up.jpg
    light set up.jpg
    22.2 KB · Views: 19
  • 100_3019.jpg
    100_3019.jpg
    26.9 KB · Views: 27
BTW those are cucumber and tomatos in the background.....Had to let my daughter be involved too. That way there are no questions about the box thats lit up like a xmas tree! LOL
 
haha good call with you daughter lol. but looks like a solid set up man. and when they get too big for one tub all you have to do is add one and put the lid on top of the new one. good call. good luck man. ill defiantly check this one out.
 
NICE! ... Ya I'm probably gonna grab another tub and put it upside down in top of my original 1. Thank for the link
 
This is a pretty simple, cool setup.

Would it work to set up another setup of tubs for flowering and keep a continuous grow cycle going?

Thanks for posting this, but I have acouple of questions.


How many plants will that hold?

What size pots are the plants in?


Thanks


I may try this to replace the VERY small closet grow I'm doing now.
 
Yes my friend! you can do this in multiple tubs with separate cycles for each but keep in mind that for every tub at a diif stage you will need individual timers. I'm just using beer cups with holes in the bottom till next week when I will switch the girls to a 5gal pot and stack another tub on top. By late june they will migrate outdoors till the end. That way they get a jump on the season. When they got outside I will start some Dwarf indicas that can live indoors the whole lifespan. That way I can harvest the outdoor ladies in early sept or late august, then the indoors ladies in jan-feb or sooner If I keep'em small.
 
So this is were I'm at for now.
 

Attachments

  • 100_3116.jpg
    100_3116.jpg
    66.6 KB · Views: 10
  • 100_3119.jpg
    100_3119.jpg
    46.4 KB · Views: 9
  • 100_3121.jpg
    100_3121.jpg
    57.6 KB · Views: 17
1 week later

2nd photo is twisted sister (because she grows clockwize and puts out three leaves every node).
the other 2 are my Indy kush just topped 2 days ago.
 

Attachments

  • 100_3162.jpg
    100_3162.jpg
    69 KB · Views: 8
  • 100_3161.jpg
    100_3161.jpg
    64.3 KB · Views: 7
  • 100_3160.jpg
    100_3160.jpg
    72.2 KB · Views: 7
DUDE! what are you doin with my plant!!!! Lol thats crazy how they look the same! what breed ya got there growman?:weed:
 
Back
Top