Prawn Connery
Well-Known Member
If you have purchased any QB324 boards from HLG and have used the supplied screws without nylon washers, then you may be in for a nasty shock - quite literally!
To recap another thread, I was sent two different types of screws with my QB324/Slate 2 combos. No washers were included. Full account here: https://www.rollitup.org/t/quantum-board-short-live-circuit.968781/
HLG's website explicitly says to use washers: https://horticulturelightinggroup.com/collections/quantum-boards/products/qb324-with-slate-2-single-combo
However, when I emailed to ask if washers were needed for both types of screws I was inexplicable told "No". I was also told at various stages one type of screw required washers (black button head screws), the other (silver) didn't.
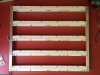
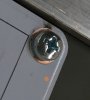
This is what we found today after one of the QB324s failed. There were at least three shorts on this board and a few more potential issues on other boards that showed the same wear.

I'm compelled to write this because HLG is still telling customers the silver screws they are now sending out to replace the black button-head screws do not require washers and will not contact the copper matrix under the board as they fit inside the matrix.
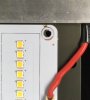
This is not true, as you can see below:

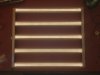
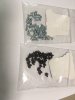
These are the offending screws that were sent out with the kit:
I will admit right now that I should have known better and should have simply used nylon washers to begin with - despite what HLG initially informed me. But M3 nylon washers are not easy to come by in my part of the world, so I decided to go with "Option B" - I bought some more silver M3 screws without button heads identical to those supplied by HLG. It was only after test fitting that I discovered there is no "Option B".
There is not enough room around the screw holes to prevent a screw head from making contact once they are in place and the boards heat up and cool down, expanding and contracting and eventually wearing away the white matrix cover.
You must use nylon washers with any screws on these boards if you plant to screw them to the supplied heatsinks (or even your own heat sinks).
Thankfully no-one was injured and the boards fired up again after I removed the offending screws.
But you've been warned - learn from my complacency.
To recap another thread, I was sent two different types of screws with my QB324/Slate 2 combos. No washers were included. Full account here: https://www.rollitup.org/t/quantum-board-short-live-circuit.968781/
HLG's website explicitly says to use washers: https://horticulturelightinggroup.com/collections/quantum-boards/products/qb324-with-slate-2-single-combo
However, when I emailed to ask if washers were needed for both types of screws I was inexplicable told "No". I was also told at various stages one type of screw required washers (black button head screws), the other (silver) didn't.
This is what we found today after one of the QB324s failed. There were at least three shorts on this board and a few more potential issues on other boards that showed the same wear.
I'm compelled to write this because HLG is still telling customers the silver screws they are now sending out to replace the black button-head screws do not require washers and will not contact the copper matrix under the board as they fit inside the matrix.
This is not true, as you can see below:
These are the offending screws that were sent out with the kit:
I will admit right now that I should have known better and should have simply used nylon washers to begin with - despite what HLG initially informed me. But M3 nylon washers are not easy to come by in my part of the world, so I decided to go with "Option B" - I bought some more silver M3 screws without button heads identical to those supplied by HLG. It was only after test fitting that I discovered there is no "Option B".
There is not enough room around the screw holes to prevent a screw head from making contact once they are in place and the boards heat up and cool down, expanding and contracting and eventually wearing away the white matrix cover.
You must use nylon washers with any screws on these boards if you plant to screw them to the supplied heatsinks (or even your own heat sinks).
Thankfully no-one was injured and the boards fired up again after I removed the offending screws.
But you've been warned - learn from my complacency.