Thanks for the warningYour picture is broken.
Attachments
-
 1.9 MB Views: 76
 -
 4 MB Views: 80
Thanks for the warningYour picture is broken.
Properly done, crimped connections are very reliable and widely used in all manner of equipment, including aviation.I hope that people emulating this are careful. Butt splices are frowned upon by many electricians in most circumstances as they are less reliable and certainly less servicable than other methods of joining wires. From the picture it seems that the crimping tool used was for non-insulated crimps, yet the connectors are insulated; also keep in mind that butt splices are designed to join two wires together as opposed to four. Be safe and do 'tug tests' on the wires before heat shrinking. Have fun and stay safe out there!
Properly done yes. Done by someone just learning to wire things up using relatively high DC voltages? Perhaps Wagos would be more suitable for most people to start.Properly done, crimped connections are very reliable and widely used in all manner of equipment, including aviation.
I certainly agree on the tug test though, the military has specs for it. A tug or pull test is always part of a proper crimp!
I recommend flowing some solder into the open ends once you are happy with all your connections...I hope that people emulating this are careful. Butt splices are frowned upon by many electricians in most circumstances as they are less reliable and certainly less servicable than other methods of joining wires. From the picture it seems that the crimping tool used was for non-insulated crimps, yet the connectors are insulated; also keep in mind that butt splices are designed to join two wires together as opposed to four. Be safe and do 'tug tests' on the wires before heat shrinking. Have fun and stay safe out there!
That's a really slick build man. I wish I had 80/20 lying around or at least that it wasn't so incredibly expensive. I wouldn't mind using it.lastest build. for a 3'x3'x6.5' tent. 4 hlg qb96elitev2 on sstx heatsinks. ran on HLG-600h-54v remote mounted. dimmed to 66%. frame, 80/20, 24"x24". QB centerpoints are 9" from the tent and 18" from eachother. planning to upgrade the frame and run the same fixture with the pot all the way up in a 4'x4' later.
View attachment 4224582
thanks! i appreciate it. i love 80/20. i do have a bunch in my closet. hahaThat's a really slick build man. I wish I had 80/20 lying around or at least that it wasn't so incredibly expensive. I wouldn't mind using it.
I wish I could find it at a decent price.thanks! i appreciate it. i love 80/20. i do have a bunch in my closet. haha
Yes! Crimp AND solder. If it's good enough for NASA it's good enough for our lights. Wago should not be used outside an enclosure.I recommend flowing some solder into the open ends once you are happy with all your connections...
I'm at the level of PCB design, so I guess I take more liberties.
Some info on the build would be nice, there ANC!!! 4' F Strips?


Nice build..Specs? Space size?
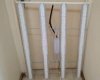
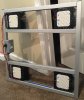
Top is it all wired up, bottom is it prior to wiring.


2x4 16 2foot fstrips 3500kNice build..Specs? Space size?

Epic is one word that could be used. Peak insanity are two others that could also be used.That's a pretty epic set up @Hot Diggity Sog.