it was fairly inexpensive. slightly more that your average 600w equivalent china board. it cost around 230-250.
ill post a couple shots now. i may post the whole build, but it is much easier to link you to the build i scaled from. im actually considering adding another single cob so i can have a broader spectrum. but it should be good for now.
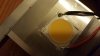
currently it has 2 3000k and 1 5000k CXA3070 lights.
The Battlestar Ganjatica. i basically copied this build and scaled it for a 2X4 tent.
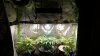

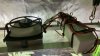

i have it stacked with the viparspectra in veg to add a wider light spectrum. its probably unnecessary, but i cant think of a reason not to.
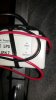
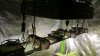
a couple shots show how its wired. if you have questions, ill gladly answer. the fans were slightly difficult, but that's because the molex pins kept popping out so i had to plug them together and bypass the molex. yes, everything is grounded. this is a must IMO.
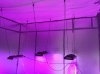
ill post a couple shots now. i may post the whole build, but it is much easier to link you to the build i scaled from. im actually considering adding another single cob so i can have a broader spectrum. but it should be good for now.
currently it has 2 3000k and 1 5000k CXA3070 lights.
The Battlestar Ganjatica. i basically copied this build and scaled it for a 2X4 tent.
i have it stacked with the viparspectra in veg to add a wider light spectrum. its probably unnecessary, but i cant think of a reason not to.
a couple shots show how its wired. if you have questions, ill gladly answer. the fans were slightly difficult, but that's because the molex pins kept popping out so i had to plug them together and bypass the molex. yes, everything is grounded. this is a must IMO.