Keep adding more features, EB Gen2 build

noodle-led

Well-Known Member
Or - If the LED light fixture still works, it just doesn't have enough features yet.

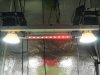
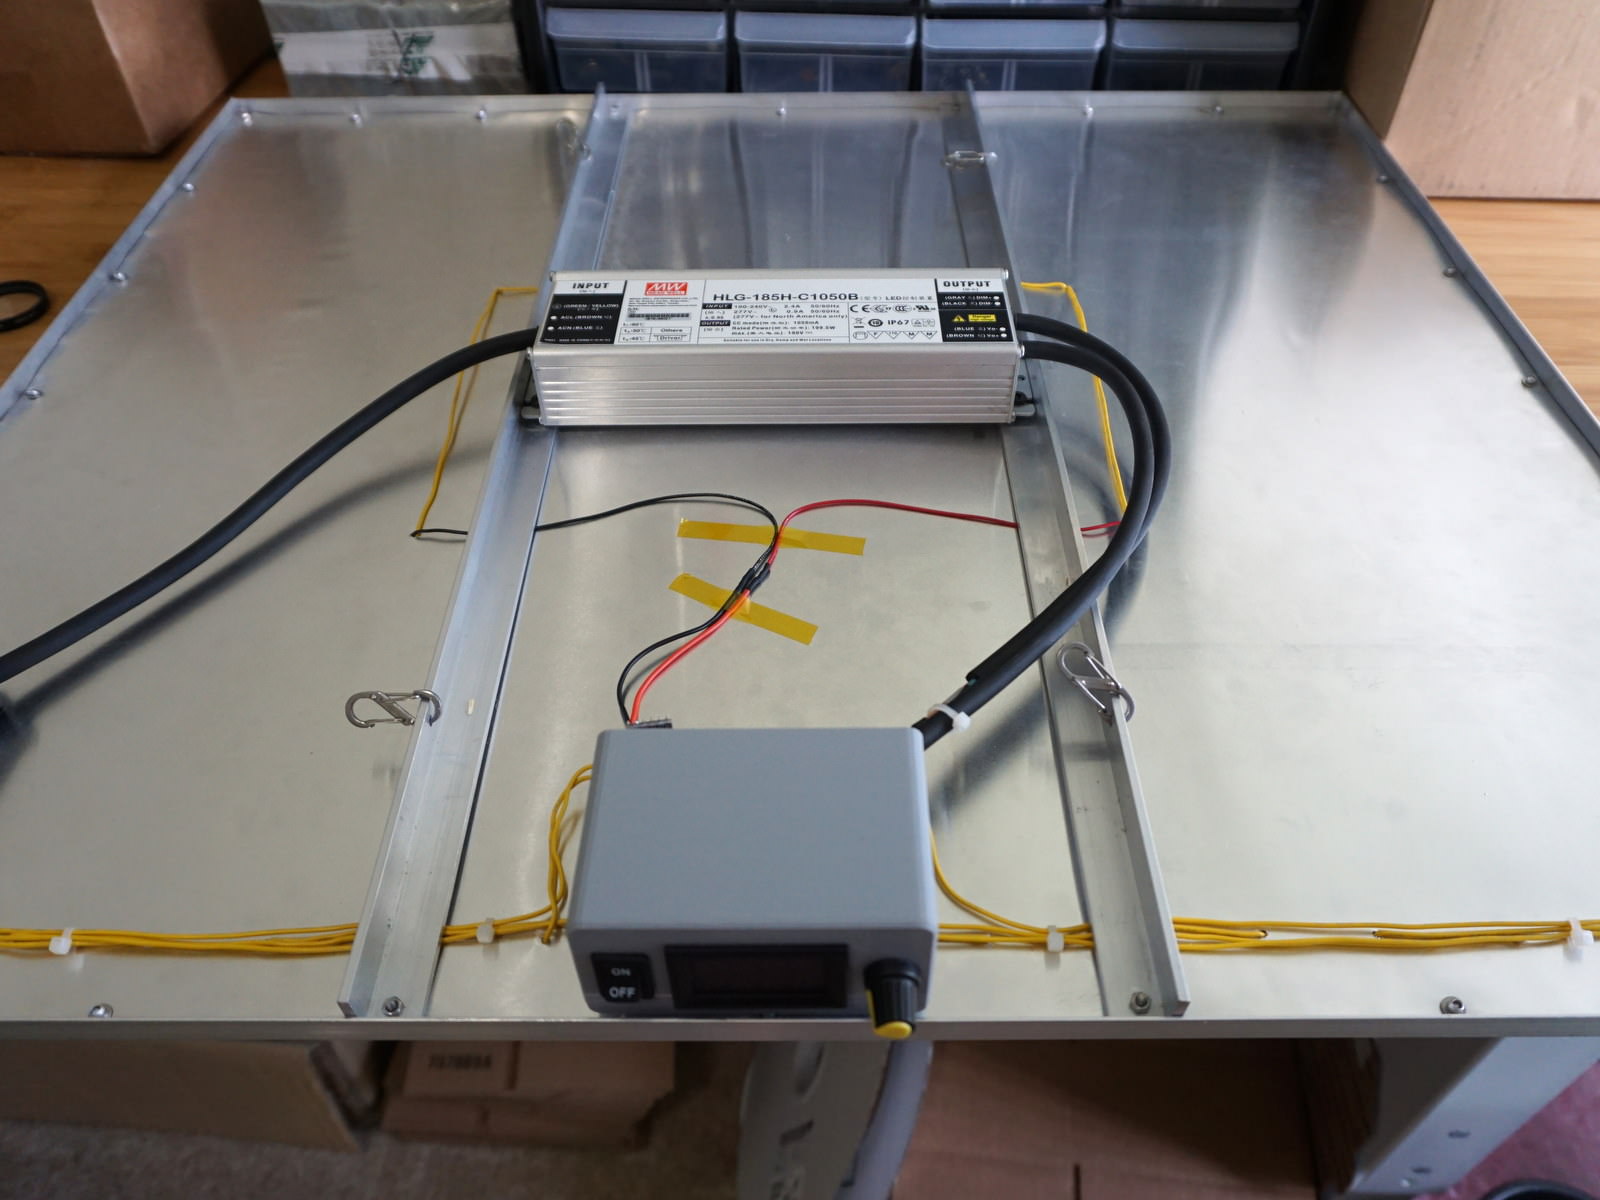
I replaced my 2x Vero29 light in my 30"x30" tent with a new Bridgelux EB Series Gen2 build and took the time to implement some new features. On its face I have 9x 560mm strips (5x 3000k, 4x 5000k) run by a HLG-185H-C1050 which can run them at 1100mA for a total of about 210W at the wall. Strips are attached to 24" wide aluminum flashing with 20mm thermal tape with spacing from the center out of 85mm, 83mm, 79mm, 73mm. The two center cross members are 3/4"x3/4"x1/8" aluminum L and the outside frame is 1/2"x1/2"x1/16" which is plenty sturdy for the frame and saved some bucks over using 1/8" for the whole thing which is overkill. The flashing is attached with pop rivets apart from the corners which have M3 screws in them for no good reason.


Because I only grow one plant at a time I don't need the whole 28" wide fixture lit up all the time, especially in veg. I added a switch which simply shorts out 4 of the 3000k strips and consolidates most of the light toward the middle. This drops the voltage from around 190VDC to 95VDC but the important point is that I'm running two circuits of strips on the same single driver. All my strips are in series but this method would work even better on parallel setups where you won't have to worry about keeping the combined voltage in the driver's constant current range-- a 20V driver could have switches that would disable as many of the strips as desired and always put out 20V.


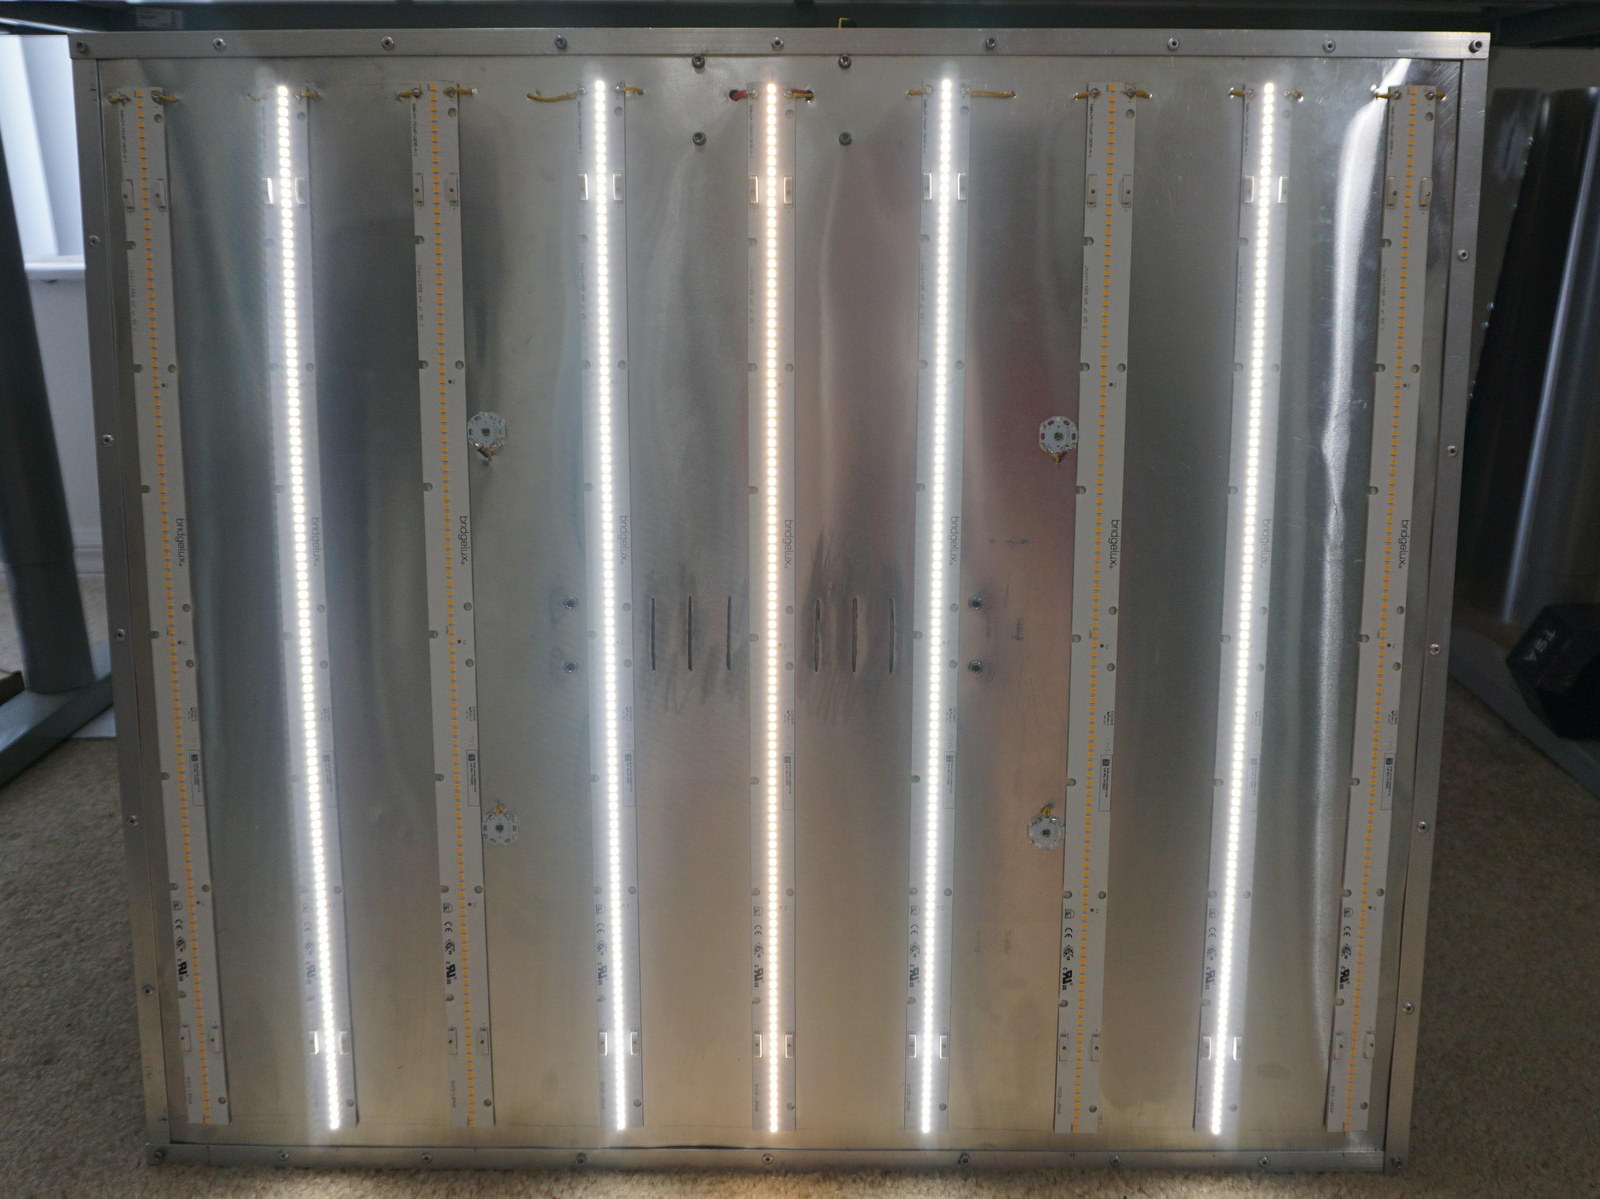
Keen-eyed observers will note I tried cutting some vent holes under the driver. It gets up over 55C in still air when pushing 1100mA and the vent holes maybe lowered the temp 1-2C and I added a spacer to lift the driver away from the sheeting to allow better airflow. The original design had space for one of my Initgnokt wifi far red pucks but I decided I didn't want the wiring of it to get in the way of the lights so I just used some aluminum stars and spaced out the same 4x Cree XP-E 730nm LEDs.


Speaking of the far red LEDs, they are run by a separate 12V power supply that drives them up to 700mA and is controlled via wifi / MQTT, fully 5V PWM dimmable 0-100%. Because I had the controller there anyway, I've also wired in the HLG's dimmer wires with open-collector (~10V) PWM so those are digitally controllable over the wifi (for ramp up/down if desired) as well as able to be overriden by the standard knob on the front we all are familiar with.


Not having enough features yet, I also wired in a DC volt and current meter for instant feedback of power usage. This is wired into the HLG driver's output so there will be no light emitted when the main fixture is off. That is controlled separately by a sonoff relay, but there is an open GPIO on the microcontroller so if someone really wanted to they could also implement an AC relay. I opted to avoid having to deal with mains power. Lastly, I added an environmental sensor, a DHT22 temp/humidity sensor. I wasn't getting very accurate humidity readings so I swapped it for a BME280 in the final version. Eventually I will make a little extension cable for the sensor to move it away from the radiated heat of the light. A 3D printed enclosure (link) holds all the goodies.


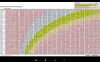
Control of the homemade Ebb & Flow system as well as data logging of Temp / Humidity / VPD is run through Node-RED on a Raspberry Pi 2 with a dashboard for at-a-glance status. (sad trombone) You can see the humidity is a little low for my new seedling. The new ventilation system is too powerful even on low speed.


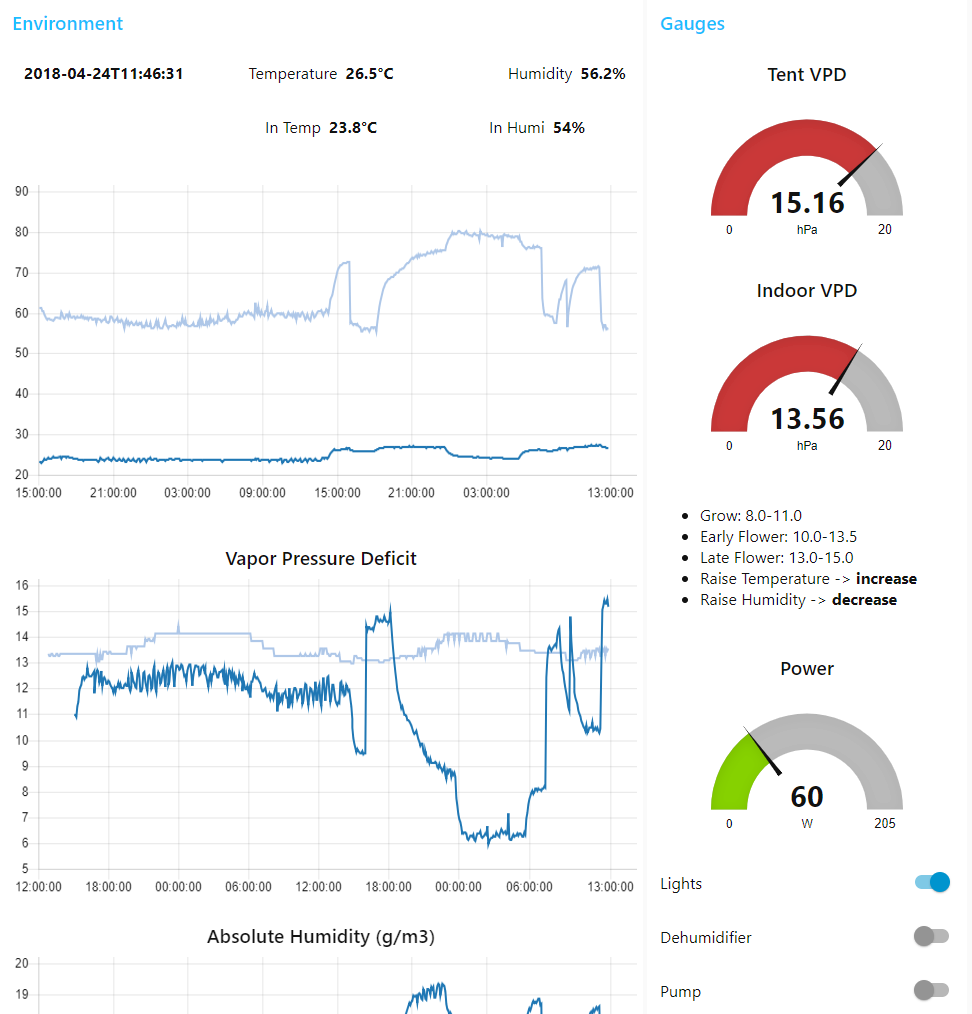
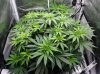
Now grow you little plant, grooooowwww!
 
Last edited:

Humple

Well-Known Member
Nice build, man!! Only thing I'd be worried about would be airflow - I would imagine that using one big plate of aluminum would tend to hamper the free flow of air? Still, it's damn impressive work!
 

Colo MMJ

Well-Known Member
How are your temps versus vero 29s? I am wondering how many strips and which meanwell for 4x4 to take on 1000 watt HPS SE.

Growmau5 was pretty negative on 1/16" L aluminum but attached to flashing like your rig - it seems to work well.
 

swedsteven

Well-Known Member
Nice build you could run higher temp to get your rh higher like this your fan will run even less

I love your thecnology aproach .
 

Chip Green

Well-Known Member
I've used the flashing on several 8 strip, 2x2 builds with Gen1 EBs, been running them at 1050ma for months, and months, and months......
190 V cold startup, 189V at full operating temp(hours later).....well within the comfort zone.
The flashing rocks.
 

Viceman666

Well-Known Member
Your setup is very nice ! I loved your detailled explanation of pretty much everything you did and everything you used it was great reading it!
 

noodle-led

Well-Known Member
How are your temps versus vero 29s? I am wondering how many strips and which meanwell for 4x4 to take on 1000 watt HPS SE.
You can see full details of the thermals of this build in an older thread I created before I had all the bells and whistles Bridgelux EB Gen 2 Thermals. My old 2x Vero 29s were only being run at 1050mA as well but I never saw more than 170W at the wall for them.
DSC04519.JPG

It would run completely passive up to 100W at 60C even in still air with the ole 120mm Northern Grow Lights pin heat sinks. For full power, with the fans on top on their lowest power it wouldn't pass 50C and had spill-over air that would cool the driver and Cree XP-E HE Photo Red diodes which are on their own 1" passive heatsink bar. Compare that to this fixture which runs about 55C max completely passive or down to 51C with just a little air movement in the tent.

I got the flashing ideal from @Chip Green and it works great for providing cooling and structure to the build. Growmau5 is right about 1/16" aluminum in that I wouldn't try to lift the light by the outside frame because I am sure it would bend, but the 1/8" bars keep the whole thing rigid. The driver makes a great handle because 1.2kg of the 1.5kg weight of the light is the driver itself.

I am a bit concerned about if the airflow around the light (as @Humple pointed out) but there's about 1"x4" border along the outside for air to flow around the light and its heat may cause enough of a convection current to keep things moving. My backup plan is to cut H patterns into the flashing and fold them up (essentially making flashing-based U channel) and use some 3D printed spars to reinforce them. We'll see how it goes though!
 

Nutria

Well-Known Member
I love it. That is what I would like to do with added remote arduinos (esp8266/nodemcu) to monitor and send data to a Pi through MQTT.
I like the HTU21D for temp and humidity monitoring, the DHT22 isn't enough accurate.

What are the 4 red leds on the board? Did you make it?
 

noodle-led

Well-Known Member
What are the 4 red leds on the board? Did you make it?
Yeah I've seen a bunch of people strap one of the Growmau5 Far Red Intitiator Pucks on their build. I wanted to try it but $29 and I'd need another timer/relay to turn it on and off? Forget about it! I laid out my own version with integrated esp8266 to drive it (just using the Sonoff-Tasmota firmware) and because there were left over GPIOs I added a visible light sensor (OPT3001), the DHT22, and digital control over the main driver dimming. It worked fine just mounted to my old light but I ended up not liking the way it integrated into this light so I just desoldered the 4x LEDs off of it, mounted them on star PCBs, and ran a wire to drive them.

It was fairly economical because I think only payed about $29 for the parts to be able to make 3x of the boards, although I probably spent a dozen hours creating it. I also learned that even with careful thermal design, a 2 layer 1oz copper PCB is a poor substitute for aluminum core. At full 700mA power, the LEDs get up to around 80C if they're on the PCB. On their little star breakouts attached to that big aluminum sheet, they don't even break 50C.
 

noodle-led

Well-Known Member
Eeee they're kind of in the sameish ballpark. The Samsung F564B series (2x rows of LEDs 560mm) 3000K strips are about $29 for 8670 lumens (168/W at 1120mA) and the EB Gen 2 are $7.50 for 2390 lumens (175/W at 700mA). So for the same lumen output you'd need 3.63 of the EB strips which would be $27.23. The EB are a little cheaper and are rated to run without any heatsinking at 700mA so it could end up even cheaper overall. The Samsungs I think require heatsinks.

For the single row F562B Samsungs, that's $16 for 4335 lumens, which would be 1.81 EB strips or $13.60 for the same light output. If you wanted super economical you could just screw all the EB strips into a frame made of 1"x2" furring strip lumber and make a 2'x2' frame for a dollar. However, a 200W light would be 15x EB strips or $113. I went with 9x driven at 1050mA for $68 and spent the $20 on a roll of flashing and tape and rivets for roughly the same light output. (driver and frame not included)

There are plenty of factors to consider when you ask about cost, because you can either go cheap by no using any heatsink material and spend more on strips, or spend some money on thermals and less on strips and find the right balance of cost and driver parameters to suit you.
 

nfhiggs

Well-Known Member
The Samsungs I think require heatsinks.
They will run without. But they are very flexible and need something to stiffen them up if not supported in the center. Cheap 3/4" aluminum channel work well for this. The .601 profile heatsink from HeatsinkUSA works well and is just under $1 per foot.
 

Randomblame

Well-Known Member
Beautiful light with everything that one can imagine.
I wish I had more skills in microelectronics.

Only the VPD calculations confuse me a bit. Based on my documents, 56.5% at 26.5°C should be well within the green range.(~1,1kpa or 11hpa) But my paper is based on 2°C less leaf temps vs ambient which could be a reason.


Screenshot_20180428-164049.png
 
Last edited:

noodle-led

Well-Known Member
Thanks @Randomblame! You're right, the numbers do not seem to match up at all with that chart. If I check using this chart generator with a 0C difference between leaves and air I get 15.2 which is exactly what I calculated there. But if I manually subtract 2C from the air temp and use the 0C graph but with Air-2C for the temperature I get 13.5. If I use the 2C leaf offset chart, 26.5C is 11.3 VPD but 28.5C is 12.8. I guess the leaf temperature vs ambient temperature is a more complicated formula than just VPD at -2C offset which makes sense (calculate the Vapor Pressure of the environment vs the vapor pressure at the leaf) but my calculations only take into account ambient temp and humidity. I have no way of measuring leaf temp vs ambient automatically.

This is the calculation I do:
Code:
// saturated vapor pressure (Pa) at Temp (C)
function calcSVP(T) {
    T=parseFloat(T);
    var tmp = 7.591386*T/(240.7263+T);
    return 611.6441*Math.pow(10,tmp);
}
var VPD=((100-Humidity)/100) * calcSVP(Temperature);
VPD = (VPD / 100.0).toFixed(2); // Convert to hPa
I use it as more of a ballpark but at some point I would consider automating this by comparing the inside VPD to the outside conditions and pumping more or less air to stay in the range so I appreciate you bringing the relationship to my attention. Clearly I have a little more math research to do as it looks like I am only calculating the VP saturation of the air?
 
Last edited:

Randomblame

Well-Known Member
Yeah! On top of all, I found that with white LED's the leaf temperature is often 3 or even 4°C less than the air-temperature inside the tent, especially when air-temps are high ~30°C.
Granted, I only use a cheap infrared thermometer(5$) and at 20°C the difference is only 2° (18° leaf temps). So it could be the cheap thermometer.
On the other side, I've read a comparison test (sorry, don't remember where) HPS vs warmwhite vs blurple LED at 25°C ambient and white LED was measured with 22° leaf temps and the blurple light even only with 20°C.
Therefore the general recommendation with LED's to grow with 30°C ambient, while for HPS 25°C are still recommended.
So you need less energy for cooling, but at the same time you must keep an eye on the humidity.
The first time I tried it with 30°C I woke up in the morning and found ambient temps of 31° but with only 30% humidity and I had to make some changes to keep it where I need it (mainly in the room where the tent is).
 

Nutria

Well-Known Member
I am using the same chart Randomblame posted
that is why I would like to implement a ir temp module to check leaves temperature.

I am also interested to understand what difference the lack of IR wavelenghts makes compared to HPS
 

wietefras

Well-Known Member
VPD calculation should be a function of ambient temperature (AT), relative humidity (RH) and plant temperature (PT). Something like this:
((0.6108*EXP((17.27*PT)/(PT+237.3))) - (0.6108*EXP((17.27*AT)/(AT+237.3)))*RH/100)

It's the saturated vapour pressure at the leaf (first part of the formula) minus the ambient vapour pressure (second part)

Here is a link to my VPD "project"
http://rollitup.org/t/arduino-experiments-datalogger-for-the-grow-room.893752/#post-12174758
 
Last edited:

noodle-led

Well-Known Member
Oh man real nice work there @wietefras with the IR sensor for plant temperature. I put my FLIR in there to make some thermal image timelapses but unfortunately, the FLIR firmware will charge the device's battery over the USB connection (to which it appears as a standard webcam and mass storage device). Once the battery is full, it will stop charging the battery and then let the it run down until the battery dies and it turns off. There's no way to keep it running 24x7, sadly.

As an update here is that plant from the OP in its 7th week. This is one plant filling almost the whole 3x3 (actually 32"x32") with a ton of bright green new growth.
  • Started with the switch off (5 strips) at around 700mA at a distance of 5-6 inches but it was killing the seedling so I dropped to around 500mA.
  • Around week 3 or 4 it went up back to 600mA-700mA, still around 5 inches away.
  • Week 5 it was getting pretty wide so I went to 9 strips x 600mA and increased the distance to 9" because it was growing so fast.
  • I flipped to 12/12 on Sunday and upped the power to 900mA, all strips, with a 5min + 5min far red schedule that straddles the light turn off time.
  • Next week I may go up to 1000mA or 1100mA depending on if I see buds forming or not.
DSC05543.JPG
 
Top