VWFringe
Active Member
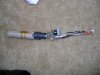
I don't know if homemade vaporizer threads are allowed but this idea uses all glass on glass for the vapor path, it's not exactly convection but close, and is so cheap to make that i believe this is the new ghetto vape...
re-boot for the next gen
gimme a beat
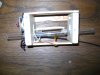
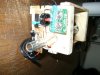
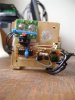
mass produced miniature ovens
designed operating temperatures 375-450 F
available from any Walmart starting at $10


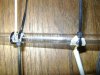
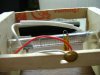
pyrex test tube installed into curling iron, "flour paste" to seal around hole
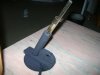
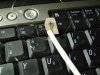
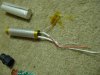
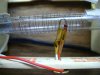
another thin glass tube acts as the pipe, ss pot scrubbe r to keep the herb in 3" at one end that gets inserted in the test tube after it's hot
i'm still learning the right way of using this (never vaped), so feel free to correct me about anyth ing really, but specifically about where the herb should be placed in this configuration
if you make this yourself:
toxic chemicals are being outgassed by the heating element and electroni cs of any curling iron, instant-on ceramic heating elements probably outgas really bad stuff, but none of it's in the vapor path here. Still, mitigate your exposure by maintaining a go od flour paste seal around the end. Do not expect the seal to last more than five or six sessions, but it should take no more than a couple of minutes to whip up and apply a new one.


newbie note: pre-burn the Stainless Steel pot scrubber, just to red hot, and don't use fake plated brass scrubbers from wallyworld
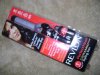
Sally Beauty has an intelligent max heat ceramic curling iron for $35, it says it has better temperature holding
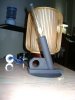
re-boot for the next gen
gimme a beat
mass produced miniature ovens
designed operating temperatures 375-450 F
available from any Walmart starting at $10
pyrex test tube installed into curling iron, "flour paste" to seal around hole
another thin glass tube acts as the pipe, ss pot scrubbe r to keep the herb in 3" at one end that gets inserted in the test tube after it's hot
i'm still learning the right way of using this (never vaped), so feel free to correct me about anyth ing really, but specifically about where the herb should be placed in this configuration
if you make this yourself:
toxic chemicals are being outgassed by the heating element and electroni cs of any curling iron, instant-on ceramic heating elements probably outgas really bad stuff, but none of it's in the vapor path here. Still, mitigate your exposure by maintaining a go od flour paste seal around the end. Do not expect the seal to last more than five or six sessions, but it should take no more than a couple of minutes to whip up and apply a new one.
newbie note: pre-burn the Stainless Steel pot scrubber, just to red hot, and don't use fake plated brass scrubbers from wallyworld
Sally Beauty has an intelligent max heat ceramic curling iron for $35, it says it has better temperature holding

