People like to over complicate things, myself included. After I tried using bubble buckets, sprayers, pumps, ect ect ect. I realized that I was really not getting any more consistent results than I did when I started. Here is my clone setup, and I have had 100% success with the hundreds of clones I have cloned. If you need 500 clones a week, this might not cut it for you. For those of you who are growing a few plants and keeping a mother this is the easiest and cheapest way to clone.
Equipment needed: 1 26w light, 1 clear tote of any size, rockwool, rubber band(or string), rooting powder, something to cut with, glass of water, alcohol(if you want)
1) moisten your rockwool, run some water over it, then flick it while its in your hand. This gets a lot of the water out but leaves the rockwool moist.
Some people advocate soaking from between 5 minutes and 100 years due to the PH of the rockwool. Since you aren't giving your clones nutrients, the pH doesn't really matter. If you it makes you feel better to soak it in PHed water, feel free, but Ive used different types of rockwool, from Grodan Plugs to generic 6 foot long blocks of rockwool and never had a problem.
2) Set up everything - lay it all out so you can do it quickly.
Ive cut clones and left them in the fridge for days or in cups of water as a test and never had a issue or lost a clone.
3) Sanitize your cutting tool with alcohol
If you want. Ive done it both ways as a test, and never had a issue. I brew beer though, and I always sanitize my equipment, and it takes all of a minute to set your scissors/knife/blade in alcohol and then let it dry.
4) Cut your clone
Ive cut it with everything from a razor blade to a steak knife to dull pliers, never had failure even if I butchered the bottom of the clone, however, a clean sanitized razor knife is my regular tool. The rest were just tests to see if it mattered. Preferably cut a clone just below the second node, then trim off the limbs from the lower node. Preferably cut it diagonally. Some people like to cut the tips of the leaves off/trim them. Don't bother, it is unnecessary.
5) Dip the end of your clone in water
6) Dip it in your rooting powder
I use the cheap kind from walmart it was a couple dollars. Shultz Take Root I think it was, though the label has fallen off. It will root without the powder though if you run out or don't have any.
7) Put it in the rockwool.
If you are using plugs, just open the side and put it in. If you are cutting your own just cut a small square, then cut a slit halfway through it. Don't poke a hole in it and try to slide it in, this basically rubs all the root powder off.
") Put a rubber band around it
Put a rubber band around it
Just to hold the rockwool firm.
9) Lay the lid of the tote down, Pour water into the lip of the tote.
Most tote lids have a raised part in the center and a dip on the outside you are filling that dip with water. Use tap water, the water will have chlorine in it which means its fairly sterile water, the water wont be touching the plants anyway, only the humidity from it.
10) Put the clones in the center of the tote
11) Put the bottom of the tote on.
12) Put 26w cfl above them
13) Take tote bottom off and fan them once a day to exchange the air and make sure there is still water around the outside.
If you forget to fan them, it wont hurt them, but you know you want to check them anyway.
14) 7-10 days you will have roots, and you can either put them in a net pot full of hydroton or you can plant them in soil.
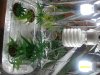
Here are some pictures of my mother/clone setup. The ones on the bottom are clones I just rooted, and they are vegging under cfls. As soon as they are big enough I will flower them under my 600w hps, and then move the 2 on top down, veg them until I am 2-3 weeks out from needing more in my flower chamber. Then I cut 6 clones, root them, use 2 to fill in the gap til I need more and veg 4 of them for my flowering. This keeps me from needing to keep mothers long term. I used a yellow light on the ones up top because that's what I had on hand, Ive used both colors. The light color doesn't matter since you aren't getting any significant growth during the cloning. The clones respond equally to either color. The light really only keeps them from going into flower and keeps them warm. If your clone area is cold, a 60 watt incandescent light would work well to give you light and heat. Ive adjusted the temperatures from 70 - 90 on the clones by turning off ventilation and restricting it, and there isn't really a noticeable difference in cloning times. +/- 1 day.


Equipment needed: 1 26w light, 1 clear tote of any size, rockwool, rubber band(or string), rooting powder, something to cut with, glass of water, alcohol(if you want)
1) moisten your rockwool, run some water over it, then flick it while its in your hand. This gets a lot of the water out but leaves the rockwool moist.
Some people advocate soaking from between 5 minutes and 100 years due to the PH of the rockwool. Since you aren't giving your clones nutrients, the pH doesn't really matter. If you it makes you feel better to soak it in PHed water, feel free, but Ive used different types of rockwool, from Grodan Plugs to generic 6 foot long blocks of rockwool and never had a problem.
2) Set up everything - lay it all out so you can do it quickly.
Ive cut clones and left them in the fridge for days or in cups of water as a test and never had a issue or lost a clone.
3) Sanitize your cutting tool with alcohol
If you want. Ive done it both ways as a test, and never had a issue. I brew beer though, and I always sanitize my equipment, and it takes all of a minute to set your scissors/knife/blade in alcohol and then let it dry.
4) Cut your clone
Ive cut it with everything from a razor blade to a steak knife to dull pliers, never had failure even if I butchered the bottom of the clone, however, a clean sanitized razor knife is my regular tool. The rest were just tests to see if it mattered. Preferably cut a clone just below the second node, then trim off the limbs from the lower node. Preferably cut it diagonally. Some people like to cut the tips of the leaves off/trim them. Don't bother, it is unnecessary.
5) Dip the end of your clone in water
6) Dip it in your rooting powder
I use the cheap kind from walmart it was a couple dollars. Shultz Take Root I think it was, though the label has fallen off. It will root without the powder though if you run out or don't have any.
7) Put it in the rockwool.
If you are using plugs, just open the side and put it in. If you are cutting your own just cut a small square, then cut a slit halfway through it. Don't poke a hole in it and try to slide it in, this basically rubs all the root powder off.
Just to hold the rockwool firm.
9) Lay the lid of the tote down, Pour water into the lip of the tote.
Most tote lids have a raised part in the center and a dip on the outside you are filling that dip with water. Use tap water, the water will have chlorine in it which means its fairly sterile water, the water wont be touching the plants anyway, only the humidity from it.
10) Put the clones in the center of the tote
11) Put the bottom of the tote on.
12) Put 26w cfl above them
13) Take tote bottom off and fan them once a day to exchange the air and make sure there is still water around the outside.
If you forget to fan them, it wont hurt them, but you know you want to check them anyway.
14) 7-10 days you will have roots, and you can either put them in a net pot full of hydroton or you can plant them in soil.
Here are some pictures of my mother/clone setup. The ones on the bottom are clones I just rooted, and they are vegging under cfls. As soon as they are big enough I will flower them under my 600w hps, and then move the 2 on top down, veg them until I am 2-3 weeks out from needing more in my flower chamber. Then I cut 6 clones, root them, use 2 to fill in the gap til I need more and veg 4 of them for my flowering. This keeps me from needing to keep mothers long term. I used a yellow light on the ones up top because that's what I had on hand, Ive used both colors. The light color doesn't matter since you aren't getting any significant growth during the cloning. The clones respond equally to either color. The light really only keeps them from going into flower and keeps them warm. If your clone area is cold, a 60 watt incandescent light would work well to give you light and heat. Ive adjusted the temperatures from 70 - 90 on the clones by turning off ventilation and restricting it, and there isn't really a noticeable difference in cloning times. +/- 1 day.