The Entrepreneur
Member
Thought I would document my first hydroponic grow attempt! Feel free to ask any questions, and I would really appreciate any comments or suggestions ") First I will explain how I went about making the system which is now set up and waiting for my cuttings to root.
First I will explain how I went about making the system which is now set up and waiting for my cuttings to root.
Materials used in initial construction:
- 54L heavy duty storage container
- 2x 20cm net pots
- 8.5L/min air pump
- 30cm air stone
- submersible water pump
- 2x max 100L/hr trickler
- 13mm black poly tubing & accessories
- 4mm back poly tubing & accessories
- Hydroton clay pebbles
- 1.2 x 1.2 x 2.0m grow tent
- HYDRO 48 432W (8x 4 foot T5) fluorescent light (6500k globes for grow, 2700k globes for bloom)
- 2x 24hr timer
Assembly:
I modified the net pots as I have seen done elsewhere. I used a sharp hobby knife and it took ages as these net pots are quite large! Apparently this should help the roots from being damaged when hanging over the edges of the net pot opening.

I cut two holes in the storage container lid to accommodate the net pots. I traced the pots and used a pair of tin snips to easily cut through the heavy duty plastic lid.

Because my net pots are so big I decided to use tricklers to water the plants while they are in their early stages. The submersible pump has suction cups on the bottom to hold it in place. I used 13mm poly tubing and a 90 degree adapter to route the water up to two openings I drilled for the trickler water supply tubes. I used super glue to stick the air stone to the bottom of the container. A third hole was drilled for the air supply hose. I used the same black irrigation hosing for the air and water supply. I am using 20 liters of rainwater and plan to keep the PH around 5.8.

After a few days of rinsing and soaking the Hydroton in low PH water I half filled the net pots, leaving room for the Rockwool cube. I connected the tricklers and gave it a test run, everything seems ok!

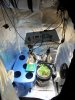
Here is a photo of the complete tent set up. Container, suspended light with air pump and electrical sitting on top. I plan to cover the lid and hydroton up to the stem to stop light from entering the lower tank.

Materials used in initial construction:
- 54L heavy duty storage container
- 2x 20cm net pots
- 8.5L/min air pump
- 30cm air stone
- submersible water pump
- 2x max 100L/hr trickler
- 13mm black poly tubing & accessories
- 4mm back poly tubing & accessories
- Hydroton clay pebbles
- 1.2 x 1.2 x 2.0m grow tent
- HYDRO 48 432W (8x 4 foot T5) fluorescent light (6500k globes for grow, 2700k globes for bloom)
- 2x 24hr timer
Assembly:
I modified the net pots as I have seen done elsewhere. I used a sharp hobby knife and it took ages as these net pots are quite large! Apparently this should help the roots from being damaged when hanging over the edges of the net pot opening.
I cut two holes in the storage container lid to accommodate the net pots. I traced the pots and used a pair of tin snips to easily cut through the heavy duty plastic lid.
Because my net pots are so big I decided to use tricklers to water the plants while they are in their early stages. The submersible pump has suction cups on the bottom to hold it in place. I used 13mm poly tubing and a 90 degree adapter to route the water up to two openings I drilled for the trickler water supply tubes. I used super glue to stick the air stone to the bottom of the container. A third hole was drilled for the air supply hose. I used the same black irrigation hosing for the air and water supply. I am using 20 liters of rainwater and plan to keep the PH around 5.8.
After a few days of rinsing and soaking the Hydroton in low PH water I half filled the net pots, leaving room for the Rockwool cube. I connected the tricklers and gave it a test run, everything seems ok!
Here is a photo of the complete tent set up. Container, suspended light with air pump and electrical sitting on top. I plan to cover the lid and hydroton up to the stem to stop light from entering the lower tank.