Building another RDWC system

Hey Everybody,
I'm at it again with another DIY RDWC build... :)
I've been wanting to build this for a very long time... Finally gonna pull the trigger!!!
Please keep in mind that this build is for my 4' x 4' VEG tent...
I plan on building the same but with 13 Gallon EZ STOR Buckets for my 6' x 6' FLOWER room...
Please give me your thoughts...RDWC5.png
 

5BY5LEC

Well-Known Member
Me, I would cut out the manifold, sample pot and lines and feed the chiller direct from the epi to pump.
You don't need all of that if you have some kind of meter to monitor PH PPM and you get your top off right. Your top off is where you adjust.
 

HighFlow

Active Member
Hook the chiller up to the main res. Even though you are providing the correct temperature to your root zone, you've still got a warm res...
 
Me, I would cut out the manifold, sample pot and lines and feed the chiller direct from the epi to pump.
• The reason I have a manifold is to keep everything neat and tidy as well as being able to easily drain the system...

• The sample pot is a very important part of any monitoring/dosing system. I will mount this sample pot on the wall near the controller, and place the pH and/or EC probe into it. A pump from the reservoir will keep water flowing 24/7, so the probes are always getting the most accurate readings. Keeping the probes in the sample pot makes sure they cannot be broken or accidentally removed from the reservoir and they are easy to calibrate. As well if there was a pump failure the probes would remain wet and safe. If they dry they die!!!

• I took your advice and revised my design to feed the epicenter from chiller...

Hook the chiller up to the main res. Even though you are providing the correct temperature to your root zone, you've still got a warm res...
• I took your advice and revised my design to have the chiller feed the epicenter...

RDWC6.png
 

5BY5LEC

Well-Known Member
I like diagrams.
Food for thought. Here, your return lines back to the epi will always be pumping chilled water to your roots. Stick your meters and make your adjustments right in the epi. Your adjustment pot is just a place for extra leaks, only in my opinion.
You can get something like a bluelab and mount it on the wall like you were saying and run the lines to epi.
LOL. If your system runs dry, your meters are the last thing you will be worried about.
Throw a spin filter on your return line where I marked it, or somewhere to protect your pump from broken root clogs.
One more thing....IIRC my 1/4hp is only rated for 600 gallons max flow but others may be different.
RDWC6.png
 

5BY5LEC

Well-Known Member
And dont forget a drain line somewhere. You can add a "T" fitting and ball valve between the pump and chiller. When you wanna drain it, turn that valve and pump that bitch out. I saw you had already integrated it into the manifold.
 
Last edited:
I like diagrams.
Food for thought. Here, your return lines back to the epi will always be pumping chilled water to your roots. Stick your meters and make your adjustments right in the epi. Your adjustment pot is just a place for extra leaks, only in my opinion.
You can get something like a bluelab and mount it on the wall like you were saying and run the lines to epi.
LOL. If your system runs dry, your meters are the last thing you will be worried about.
Throw a spin filter on your return line where I marked it, or somewhere to protect your pump from broken root clogs.
One more thing....IIRC my 1/4hp is only rated for 600 gallons max flow but others may be different.
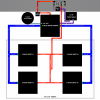
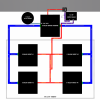
Thanks 5BY5LEC for the diagram...
I have multiple Bluelab Guardian Monitor Connects to show values when I'm home or away of both my RDWC systems in mirrored perpetual grows...
They are mounted in-between my (4'x4' VEG Tent) and (6'x6' Flower Room) on a suspended wall hanging from the ceiling above both RDWC Remote Epicenters where I have both Bluelab probes... with a total of 14- 5 Gallon buckets/6" net pot lids with multiple 1000GPH mag pumps from 1" to 3/4" to 1/2" waterfalls and multiple 1" bulkheads per bucket with strainers in all bulkheads to ensure no clogs in return lines... Also, had to run a separate waterfall on a valve back to Epicenter to keep water levels maintained evenly... With 1000GPH pumps pressuring up and heating the system I had to add multiple Alita-40 Linear air pumps with 1/2" air diffusers in each bucket to cool down the system as well as constantly adding 2L frozen water bottles...
All this with no chiller and water temps sticking around 72F-78F... :( EEKS,,, but luckily I have never had a root pathogen,,,
I think mainly in part because I plumped in a Reverse Osmosis system...
I figure I haven't flooded yet and I want to grow longer flowering plants without worrying about flooding...
I'm always worried about clogging/flooding due to 1" return lines with the previous system and I've decided it's time to upgrade to 2" return lines and 8 Gallon buckets for my Veg Tent,,, and mirror it for my Flower Room but with 13 Gallon buckets... I want to grow TREES!!! :)

Was at the verge of flooding late in Flower when the roots were pushing the plant up and out of the bucket and blocking 1 of the 2 bulkheads in a bucket... That's when I decided I needed strainers for each bulkhead!!!, and learned how to root prune!!!

I would have flooded 1 time for certain if I wasn't around to catch it when a probe decided to unsecure itself from it's suction cup and block a 1" bulkhead... That's when my Epicenter got strainers too!!!

Bluelab doesn't recommend probes be directly where the mixing of nutrients/pH Up/Down/Frozen water bottles/Air bubbles are being delivered...
The probes can malfunction and will need more calibrating when around air bubbles as it is not good for the life of the probes,,, I want bubbles!!!

The Probes are fairly expensive to replace as I found out, when... You know... You invite a friend over to babysit your setup while on holiday and come home to find out they accidentally pushed down on both epi lids thinking they should be closed and pinched Probes that had to be replaced...

I think including a sample pot will make things more organized and work much easier,,, especially when cleaning and calibrating probes monthly,,,
and for when I want to quickly check my Top-Off Reservoir values,,, I can easily pull both probes out of the sample pot and drop in my Top-Off Rez,,,
or in case I forget to remember to take care of probes when I'm doing a flush or a harvest clean-out so I don't have to worry about pinching the wires,
or shortening the life of probes, etc.,,, blah, blah, blah..Period

I bought a 3/4" Wye filter (40 Screen) a few years back only to return it after talking with "Current Culture" told me it wasn't necessary and that they were steering away from them... So I listened to them and have since never had the need for a filter...
If you followed my diagram below where would you suggest the filter be placed if recommended??? Between Epi-->Pump??? At the Manifold???

As for the Chiller,,, I just received it... I've never ran one before... Very excited for my next grow!!!
Another reason for a "Manifold" is because I own 2 of the AAPW1000 which is more than recommended as you can see below,,, must be regulated...
and is the reason why I want a manifold with valves to regulate how much volume flows to: -->my sample pot -->chiller -->Epicenter -->root zone...

Active Aqua 1/4 HP Water Features:
  • Large refrigeration capacity (recommended volume: 40 gal to 92 gal )
  • Anti-corrosive pure titanium evaporator for both fresh and salt water
  • Rate of flow: 1/4 HP (396‒925 gal/h -1500‒3500 L/h)
  • Rated BTU per hour: 3,010
  • PSI Rating: 10 psi maximum
  • Recommended pumps: AAPW400 or AAPW550 or AAPW800
  • 1/2"and 3/4" fittings included
  • Unit dimensions: 18"L x 13"W x 17"H
  • For cooling capability, please refer to performance chart found in the product information tab

And dont forget a drain line somewhere. You can add a "T" fitting and ball valve between the pump and chiller. When you wanna drain it, turn that valve and pump that bitch out. I saw you had already integrated it into the manifold.
I currently have my system raised off the floor by 3-3/4"... Down the road I'll add a dedicated bottom drain with Marine Thru-Hull 90 Degree fittings...
I have a shop vac for now to suck out whatever is below 2" Bulkheads...

RDWC6.png
 
Last edited:
* I've revised my original design a little...

Chillers are expensive, so I've decided to pro-long its life and NOT run nutrients through it...
With a 400 GPH water pump I'll circulate RO H2O through this closed loop system from an insulated 5 Gallon chiller reservoir to 1/4 HP Active Aqua water chiller and then onto 3/8" OD wort coil (stainless steel) in VEG epicenter and returning back to 5 Gallon bucket to complete the closed loop...
I can also expand this closed loop system by adding another wort coil to my FLOWER epicenter using only 1 chiller...
This will bring power efficiency and save me from adding another breaker box and keep the system clean!

Removed the Manifold and put a 3/4" Tee after the 1000 GPH water pump with valves and quick connectors on Sample line so I can easily Drain the system.

Added a 3/4" line from Top-Off Reservoir to Epicenter to make flushing simple and fast.

Added 1/2" PVC with 10-32 tapped holes for each bucket to create a waterfall effect.

Added an Alita al-40 linear air pump to pump clean filtered air to home made 1/2" air diffusers in each bucket.

All 2" is PVC except a couple Fernco 2" Rubber connectors with clamps for separation when cleaning between runs...
All 3/4" is PVC and 1" Black Vinyl Tubing"...

Check below: and give me your thoughts...

RDWC7.png
 

myke

Well-Known Member
Wow,I understand the need to overbuild its what we do but man, its just 4 totes and a res. One pump and done.
 

Munchling

Active Member
Make the top-off res 60 -80 gal or bigger and you does not need chiller or chiller res.:) It is not so much about the chiller and electricity cost but for fail-free system. If you have bigger res outside of the lamp heat it would work as natural heat sink. You just need to have the right proportion for your space/system. Buy a temp probe with logging function( safe temp each 1-2 min) and experiment for a couple of days till you get the right proportion. In my case it was 350l per res.

The simple rule of thumb is to put more wattage in lights and have right temp and ph then to over complicate with 10 pumps chillers and stuff that can fail and kill your crop. Overheating your water with too many pumps and creating the needs to chill it is useless. If your lids are too thin and your lightning heat your soluton, then simply isolate your lids by adding some xps or other form of isolation.
 
Last edited:

beercan90

New Member
Make the top-off res 60 -80 gal or bigger and you does not need chiller or chiller res.:) It is not so much about the chiller and electricity cost but for fail-free system. If you have bigger res outside of the lamp heat it would work as natural heat sink. You just need to have the right proportion for your space/system. Buy a temp probe with logging function( safe temp each 1-2 min) and experiment for a couple of days till you get the right proportion. In my case it was 350l per res.

The simple rule of thumb is to put more wattage in lights and have right temp and ph then to over complicate with 10 pumps chillers and stuff that can fail and kill your crop. Overheating your water with too many pumps and creating the needs to chill it is useless. If your lids are too thin and your lightning heat your soluton, then simply isolate your lids by adding some xps or other form of isolation.
Recently built a 4 bucket heisenbeans system. Last part to buy is the Res for me. Are yall using regular Home Depot / Lowes totes for these top-off reservoirs? Can they really hold up to that much pressure? From what I can tell the big ones are built with the same materials as like a 12-17gallon tote, but 60-80 gallons is a LOT of water weight against those walls...
 

Mr_Manny_D

Active Member
Well,,,,it is highly recommended that if you are using a chiller coil to cool down multiple gardens, that you use a manifold with valves to control the water flow into each coil which helps control the temp into each garden. In addition to the manifold, using the "Cool Coil" method is often put in this order: From the chiller, treated water (I used a capful of bleach- not RO water) flows into the cooling rez, where a submersible pump pushes water through the manifold (which is smaller pvc, 1/2") into the coil, then back into the chiller through a larger pvc size 3/4", then to the cooling rez and so on. You would think you'd want the water to flow directly from the chiller to the coils, but that's not the case. I'm in the process of building 6 gardens with 6 coils and 3 chillers for RDWC. For reference, look up "Surna" or look up Hydroinovation on yt.
✌✌✌
 
Top