Zeez
Well-Known Member
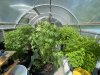
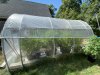
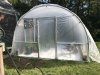
In my second season of greenhouse growing now. Here's how it was built and how to automate.
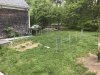
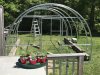
It started off with the base posts. These are the vertical posts are the posts used in chain link fence from Lowes. I used an auger on an electric drill for the holes and then drove them home with a post driver. the height of these can vary depending on your height requirements. The intention was to space them at four foot increments with extra hoops spaced 18" in from the end for overlap in a future light depending upgrade. The four foot spacing could not be perfect because we ran into rocks and needed the base posts to be parallel.
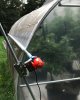
A bender for 12' hoops (*1) was purchased and secured to a garden trailer. The bending and construction was accomplished with the help of my father in law. We took turns bending the tubes. Each hoop is made of two 12' sections of chain link fence 'top rail'.
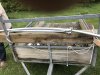
The pipes have tapered ends so they connect fitting one end inside the other. These were drilled and bolted at the connection for strength. All base posts were cut to be the same height and the hoops went in. Initially it looked like a mess.
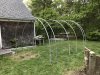
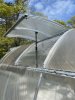
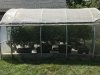
As the longitudinal stringers went in everything started falling in place and it started looking more correct. The stringers connect to the hoops with galvanized purlin clamps (2*).
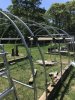
The side stringers were set to be the height for the top of the roll up and the top of the screen. Next the gable ends started with door posts cut long enough that they could be set in the ground for rigidity. The gable end construction used end clamps (3*) pivot clamps (4*) and elbow clamps (5*) on the door corners. 6x6 PT was used on the base of the sides and the base tubes were bolted through. This adds allot of weight to keep the house from flying off into the trees.
.
2x3 wood was set on the side stringers for the wiggle wire (6*) channels to keep the flat across the hoops. Wiggle wire channel was also put on the hoops strategically and in anticipation of the future light dep upgrade.
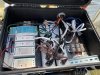
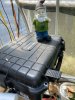
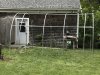
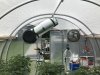
Innitially one fan was installed.
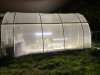
There were problems with too much heat. A second fan was installed and a duct was fabbed to pull heat out of the top. 40% shade cloth was also used to keep the heat down.

To Be Continued.
It started off with the base posts. These are the vertical posts are the posts used in chain link fence from Lowes. I used an auger on an electric drill for the holes and then drove them home with a post driver. the height of these can vary depending on your height requirements. The intention was to space them at four foot increments with extra hoops spaced 18" in from the end for overlap in a future light depending upgrade. The four foot spacing could not be perfect because we ran into rocks and needed the base posts to be parallel.
A bender for 12' hoops (*1) was purchased and secured to a garden trailer. The bending and construction was accomplished with the help of my father in law. We took turns bending the tubes. Each hoop is made of two 12' sections of chain link fence 'top rail'.
The pipes have tapered ends so they connect fitting one end inside the other. These were drilled and bolted at the connection for strength. All base posts were cut to be the same height and the hoops went in. Initially it looked like a mess.
As the longitudinal stringers went in everything started falling in place and it started looking more correct. The stringers connect to the hoops with galvanized purlin clamps (2*).
The side stringers were set to be the height for the top of the roll up and the top of the screen. Next the gable ends started with door posts cut long enough that they could be set in the ground for rigidity. The gable end construction used end clamps (3*) pivot clamps (4*) and elbow clamps (5*) on the door corners. 6x6 PT was used on the base of the sides and the base tubes were bolted through. This adds allot of weight to keep the house from flying off into the trees.
.
2x3 wood was set on the side stringers for the wiggle wire (6*) channels to keep the flat across the hoops. Wiggle wire channel was also put on the hoops strategically and in anticipation of the future light dep upgrade.
Innitially one fan was installed.
There were problems with too much heat. A second fan was installed and a duct was fabbed to pull heat out of the top. 40% shade cloth was also used to keep the heat down.
To Be Continued.
Last edited: