(90 + 36 diodes) LED lamp DIY questions

Dnl.svrr

Active Member

  • Hello, my friends. I've been a long time lurker, coming out now. First of all, immense thanks for all the info shared here. I wouldn't be able to start this project otherwise. All the info I needed was found here and around some other community-based resources and I hope the reports on my experiment contribute to someone as well. I started a thread in the Grow Journal section but found this might be the correct place to talk about the DIY lamp part of the idea. Should I request the older thread to be moved?
    My intention is to build a reasonable led lamp at a low cost, for my personal home grow. I have no commercial interests regarding my nugs or my lamp(s), so I would prefer quality and potency over yeld (regarding buds). Don't know if this is relevant to any advice you might give me.

    (Materials not acquired yet)
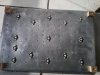
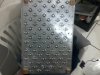
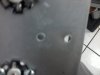
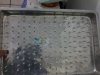
    -Large aluminum tray to house the leds (Way cheaper than a reflector)
    -Kapton tape and copper tape (as an alternative to wiring)
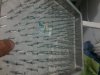
    -Shower box rails cemented to the tray using artic silver (the rails are made of aluminum and much cheaper than heat dissipators)


    (Already bought)
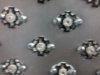
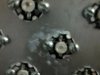
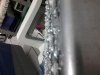
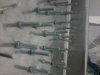
    -90x 1w Leds from Ebay, brand unknown. The seller says they're from his own factory (?) and they just don't have a brand name for now (OEM maybe?). They are: 50 Red, 18 Deep Red, 4 White, 9 Royal Blue, 9 Blue.All leds have a 120 degree viewing angle, except for the Deep Red ones which have a 140 degree angle.


    • Royal blue diodes: 445nm~450nm
      Blue diodes: 460~470nm
      Deep red diodes: 660~665nm
      Red diodes: 620~630nm
      White diodes:
      5500k~6000k


    - 5x Waterproof Drivers (Said to power 18 leds each)​


  • All seeds are bagseed from weed acquired via different sources all across my country (Brazil). I'll number each seed and go all the way through seedlings. Maybe I'll spare the best male and the best female to have some seeds to continue experimenting with. I thought it could be fun to have a seedling race and document the whole life of each of the plants in a SOG-like system. Maybe we could bet on them like jockeys, and such. But that's obviously just a stoner thought. Right now I have 61 scavenged seeds, expecting about 20 to actually sprout (Bagseed, after all) and 8-12 females. Maybe this is a bit too optimistic, but I'll aim for that. The grow area is about 4 feet by 2.5 feet, under a kitchen table about 3,5 feet high. It has a metal structure underneath it that will act as a nice support for the lamp, so I can control the light height easily.​


My questions are:

1) Is it really worth to use copper tape wiring + kapton tape insulation? Comparing to regular wiring, is the heat dissipation that better or is it a marginal improvement? Also, is using Arctic Silver overkill?
2) I'm thinking about a concave structure to glue the leds to, in order to maximize coverage surface (And leveling the plants to match). Do you think it is any better than a flat base?
3) Other idea is to have metal pipes as coolers and mounting bases to the leds, working also as makeshift reflectors. Metal pipes cut in half, exposing the concavity. Any thoughts?
4) Instead of acquiring 2 extra drivers (To get 36 extra diodes), the idea is to get a proper driver like a Philips Xitanium. Maybe I could drive all the 126 leds with one single Xitanium, plus its current is easily controllable. Any of you have any experience with that equipment?
5)Would a wick system (sub-irrigation) work any well with leds? Since heat in the growbox is usually way lower in comparison to other systems.

Thank you very much for reading so far. I hope it's the right place to ask.

Peace
Jaya!
 

Guitar guy

Active Member
Dude I've seen some sick shit that happens in Brazil. Keep your weed to yourself or I might see a video of you on my favorite gore website.

Also, I would recommend proper wiring. It is much more stable and with the tape you may get LEDs going out or if you accidentally touch the unprotected tape you may get a good shock. And also, arctic silver isn't a glue, its a non-conductive paste that is applied between heat sinks and CPU/GPU on computers to transfer the heat from the computer to the head sink. If you use it to attach.anything, it will just slide right off. And just get something that is flat and sturdy to mount the LEDs to. Their viewing angle is enough that it doesn't require a reflector
 

Dnl.svrr

Active Member
Hey, guitar guy! I'm a guitar guy myself, too. Hehehe.
Yeah, wicked shit happens here. Mostly to dealers, though. I guess I've seen some videos like the ones you mention. As I stated, this is just a home operation and I do intend on keeping the weed to myself.
Always nice to keep that in mind, though. So I appreciate the warning. :)

I was thinking about the thermoconductive cement from the same brand, I can't remember the name now. Maybe it's Ceramique? Anyway, regarding attaching the heatsink to the aluminum tray, what would you suggest? Using arctic silver would make sense if I screw the heatsinks in? Or using any thermoconductive glue would do the trick?
Strongly considering giving up the cooper tape + kapton tape and sticking to regular wires.
Thanks for the clarification!
 

jubiare

Active Member
you've got arctic silver adhesive too, and that's about the best heat transfer you can get with adhesive products.

Copper tape + kapton tape is very cost effective and good performance effective; But if you wanna spend more money for stars and all, that's a cleaner job and overall better thermal management
 

Dnl.svrr

Active Member
Hey jubiare, I've read a lot of your posts here before signing up and thought I should personally thank you for the informative posts on this forum, some of them helped me a great deal on the beginning.
As a matter of fact I've already bought all the leds in stars, I was just thinking of as many ways as I can to squeeze more light out of the 1w leds. AFAIK leds use less power to generate a fixed amount of light in cooler temperatures, so my idea was to get the leds as cool as possible so they can perform closely to the reference chart provided by the manufacturer.
Considering this, which wiring method do you recommend?
Thanks in advance and please let me know if I'm missing anything.

Peace
Jaya!
 

jubiare

Active Member
You are welcome no worries. Well given you have got them on stars already wiring is def your best bet.

If you use adhesive arctic silver for bonding them on the heatsink, that's the best heat transfer you can get from an adhesive. I have heard from a reputable guy that you can tap on them with a screwdriver should you need to remove/replace them.

If you drill the stars down, use a good thermal paste and you have even better thermal transfer (slightly better than adhesive)

Good luck!
 

ChrisGGG

Member
Get the Phillips Xitanium, I have the $15 15-18 LED driver and a 150w Phillips. It is really nice to be able to adjust the current, plus it has a 5 year warranty. Use star/pcb to mount to then mount to heatsink, makes stuff cleaner and easier. I have a little a post about my experience here: https://www.rollitup.org/led-other-lighting/514377-diy-veg-light-build.html I've been looking for a concave reflector to use instead of lenses so you don't take the efficiency hit. I would also love to water cool the panel.
 

Dnl.svrr

Active Member
Hey, I'm sorry. It's been long since I last posted, I've been sick and having some problems at work. But everything is settled now!
I've already drilled all the 90 stars into a tray, I just have to solder them. It's more tedious and troublesome than I expected, but it seems to work fine! I used thermal paste between the stars and the tray, and big bolts that should add to the thermal dissipation.
Also, I've already ordered 90 more stars and 5 more drivers (The seller gave me a nice discount on them so they ended up cheaper than the titanium, and I couldn't find the titanium driver anywhere. I'm aiming for 2 top panels (90 stars each) and 6 side panels (18 stars each) to make good use of the high dispersion (120-140 degrees). I've documented it, will post pictures soon. What do you think of the side panels? Would another top panel with 90 stars like the first two (the one I build and the one I ordered the parts for) be more efficient?
Thanks again for all the help, wish we could meet and share a fat bomba.
 

Dnl.svrr

Active Member
So, back again. =)
The project is now set to 180 diodes and a number of extra white LEDs for side lightning. But the side lightning should be added after the first experience with the 2x90 panels.
I'm almost finishing to put the first one together, I'm not a very experienced DIYer and I'm having a busy year so it's taking more than it should. But finally I have something: The first driver is (somewhat) wired and 17 of the leds are working properly. The 18th one is probably just wired in a bad way and should be fixed soon. After one day of headache trying to figure out some issues, I decided to let it rest until tomorrow.
Anyway, here are some pictures: The first one is the blues/whites layout. All the rest is red.
Foto0004.jpgFoto0005.jpgFoto0006.jpgFoto0007.jpgFoto0008.jpgFoto0009.jpgFoto0010.jpgFoto0011.jpgFoto0012.jpgFoto0013.jpgView attachment 2240713Foto0015.jpgFoto0016.jpg

I know it's sloppy, but comments and critique are welcome.
 
Top