5H Club - Leading them 2 x 2 into the light

HalfBee

Well-Known Member
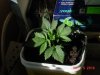
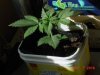
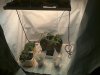
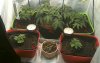
HalfBee's Herbal Happy Hobby Hive

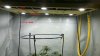
For those who have followed my Buck building threads, those designs were all dedicated toward filling this particular space. In the process, it was a DIY project to make the space usable (on a budget).

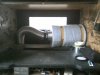
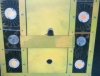
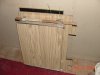
This is a computer workstation from the late 80's that I bought at auction from the county. Years later a photographer friend told me he was the one bidding against me and still wanted it. But since it's a pita to move (down 2 sets of stairs is just the start) it sat for a long while unused with a MacSE locked safely inside.
SeeTheSE.jpg
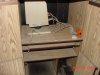
I remember seeing these in catalogs back then, but haven't been able to find them on the net anywhere. The manufacturer is Eagle, and the top section was padded for sound proofing the old dot-matrix and daisy wheel printers (remember those) with an acrylic hood. Access panels on the back for upper and lower areas lock with same key as the front and printer hood. It's on wheels that are still in good condition (not moved much before or after I got it).

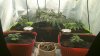
The lower section had space for a file drawer, keyboard slide out, and the other places you'd put a computer from the XT/AT era, those wide flat heavy things were mostly horizontal back then.

The upper area has a slide out shelf I didn't remove, and was lined with 'egg crate' acoustic foam that over the years degraded to a nasty consistency. Yet was removable with a paint scraper.

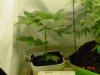
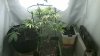
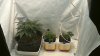
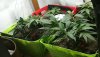
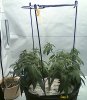
The inside dimension are 28 inches wide 24 inches deep and 43.5 inches floor to ceiling 16.33 cf.
Dimensions are close enough to a 2x2 tent for comparison.

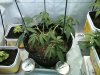
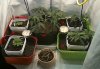
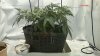
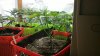
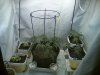
The doors have shelves that fold out, which I find too useful to bother to remove, so about 2 inches in depth is lost at the front of the cabinet, below the 1.5 foot flower zone so is not an issue.
Shelves.jpg EarlyBoxCFL.jpg PandaDay1.jpg

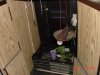
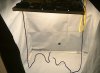
Removing the inner shelves was quick, mostly a few screws on the outside. Everything I took out got bundled and put in storage in case it needs to be re-installed. Moved the latch for the doors to the floor, it was mounted above the keyboard slider originally and mid door level.

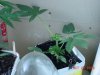
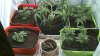
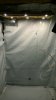
Lined the sides with panda film – disability – didn't have access to a staple gun, just a staple hammer.

***Get help*** Doing it alone, for the first time ever, under a time frame of availability, is more difficult than expected. Cut some 1 inch strips off a foam presentation board and used as buffers for the staples. Swinging this hammer type device in small quarters, at odd angles, sitting inside. Fun times.

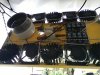
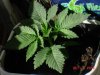
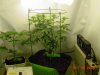
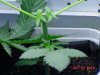
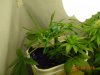
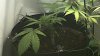
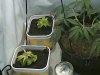
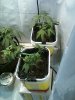
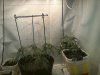
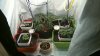
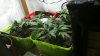
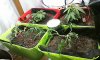
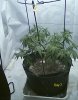
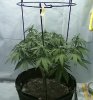
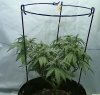
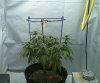
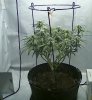
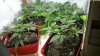
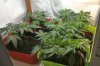
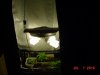
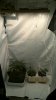
Handy Hint: put a visual marker at set heights. These lines are at 1 foot intervals and provide a guide to manage canopy heights.
The first foot is container and “hub” level expansion outward.
Six inches above is Veg height/scrog level flip point
Another foot of stretch in flower (hopefully) and our ring offers support.
Smaller plants elevated to canopy level above 1 foot shade zones

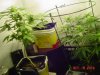
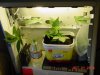
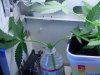
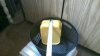
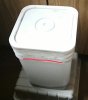
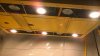
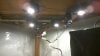
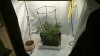
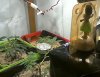
Started with a blower fan for exhaust, eventually upgraded to the $15 special at Lowes.
Broan 688 Ventilation fan (fart sucker) 7.5 x 7.25 x 3.5 with 3 inch ducting.

50 CFM is fine for this box. Since it had to be wired in anyway, I put a light dimmer into a box to control the fan as allowed by specs of the fan. Usually leave it at about ½ speed.

FanDay1.jpg Fan&CFL1.jpg Fan&LRS.jpg Fan&Cob.jpg Fan&Levels.jpg Mango&Cage.jpg

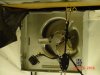
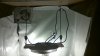
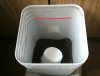
The passages were fine in width but didn't come far enough toward front for mounting the output port..

Resorted to brute force – ¾ inch wood drill a line of holes close enough to break out, then take a wood rasp to give enough rounded access for the fan port to fit and be able to connect ducting.

I won't lie... blood, sweat and tears were shed in the process. All fingers still attached... a win!
 

HalfBee

Well-Known Member
Started with the DIY pencil holder from RIU Thread and it worked a while, a bit of Ona helped too.

When build money came in, took trip to get a filter advertised at $49... of course they don't have those in stock but another $5 for a Phat filter. $55 still a good price compared to what I've found online.
Filter.jpg
Was a 4 inch, actual size is 7x12, a huge mother, and didn't want it inside so the upper section now an exhaust area. It was before, but now it takes up full width of the available space. I might still hang it suspended instead of resting on the shelf for a little more room. Originally the upper space was going to be the clone/seed area (why I kept the slide out shelf) but the acrylic hood was a bad design, and has through use, become broken in such a way that daily use would not be advisable. On the someday fix list is about all I can do for now...

An adapter connects the 3 inch ducting to the 4 inch filter. Fan rated 50 CFM and filter 200 CFM.
You can feel the air flow, but barely. When I put it in I had a stinky girl in late flower, the change was immediate... no more whiffs of wonderful escaping.

Parts of this project originated with the CXA-1507 build. The plants that suffered through that time allowed testing containers and other grow related items and to learn new skills. The CFL doubled from 2 to 4 bulbs at 2700K from d'Tree of all places (2 bulbs for a buck) now give me same deal on LED bulbs and I'd try them out too.

Harvested 4 plants under the CFLs. Each a bit better (suffered fewer experiments) than the previous.
Still experimenting but now the new Vero 18 light is in place and almost ready to rock.

Next week when the plant reaches 42 days from first topping it will be under the new light at full flower mode. Is a mixed bag of 6 Vero 18s running at 1000mA.

2x 3000K 80CRI gen7 • 2x 3500K 80CRI

1x 3000K 90CRI gen7 • 1x 3500K 90CRI

The 90CRI are lower output so putting them in the center of the bars as a blending idea. They were in stock and priced the same so adding variety over control standardization for data mining.

The plant being flipped is the next part of this journal and spent two weeks under the gen7 Cobs and three Vero 13s 5000K 70CRI gen7 running at 350mA which will soon go into their own veg area.

Every day I can see noticeable growth and rotating ¼ turn for that blue growth spectrum on one side.
I'm Happy, have a Hobby, and my Hive even has it's own drone... The Hover Cobter

Drone1.jpg
 

HalfBee

Well-Known Member
Mission: Mango Tango Bravo

Bringing it up to date on first run to flower under the new light when completed.

Mid September – Bean drop
Two of the best looking seeds from the Mango dispensary collection. About a dozen left yet.
Pheno hunt test subjects to find a female, expecting 50/50 chance.​
09/20 – Above the dirt and the countdown begins
M08days .jpg Mo_1001a.jpg Mo2_cull.jpg
10/1 – Transfer to Tub size container

And #2 is out of the race – suspect water burn early on fried the top, after 18 days of no progress the plug was pulled on 10/2.
Mo1005sun.jpg Mo1005sun2.jpg Mo1007sun.jpg

In and out of the Veg tunnel with the 1507s. The fans just don't sound right cycling up an down randomly in pitch. Spending most of the time in CFL area and getting added hours COB daily for lamp lighter perk up, nice sunny window for an hour, then back to bed another 5 hours until 1507s again kick on for 2 hours until CFL area cycle begins.
 

HalfBee

Well-Known Member
10/10 – At 21 days it goes into the CFL area for 12/12 forced determination.
While it showed vigorous growth early on, under the CFL it shot up strongly.
Mo1010flip.jpg Mo1018show.jpg Mo1018tall.jpg

10/21 – It's a girl – have a toke
Hairs showing and stacked to go. Topped at the third node for manifolding and had this nice upper section and decided to clone with new method. Since it was so big I went with two.​

The upper – about 3 good nodes on a nice stalk
The lower – nice long stem with side branching started at node with 2 good fan leaf supports.​
Mo1021top1.jpg Mol1021lower.jpg Mo1021top2.jpg Mo1022sun.jpg
 

HalfBee

Well-Known Member
11/05 – Training Trimming Topping
Next set of clones taken at node 2 – really not as big and robust as the top of the plant provided.
Now have a R for Runt and L is Lanky
Nodes 1 and 3 are left intact as per Nebula method of manifolding and tied horizonal.​

Mo1107large.jpg Mo1107chop.jpg Mol1107.jpg Mol1107.jpg Mo1107clones.jpg Mo1107clones2.jpg
 

HalfBee

Well-Known Member
11/20 – Vero Victory
Light partially built but in service for evaluation.
1000mA side • Vero 18 gen7 3000K in 80-90-80 CRI
350mA side • Vero 13 gen7 5000K 70 CRI
When next 4Up board and 1000mA LDDs arrive
Vero 18 (g6) 3500K in 80-90-80 CRI​

Mo1120VeroDay1.jpg Mo1120VeroDay2.jpg Mo1121fullhouse.jpg

I've topped and tamed clones Mt & Mb as well as the Master Mango for 14 heads?
This is a veg stage experiment, when other LDDs get here the Vero 13s will be put into their own veg area and continue to run at 350mA or possibly 700mA later on.
At 350mA these don't even make the heatsink warm to the touch.
So what heat they do generate we want to keep within the area for the winter.​
 

HalfBee

Well-Known Member
11/24 – We got our seeds from Santa at Macys...
Gobble Google Turkey Day – Am seeing daily visible growth from everything.
First clone group recovering nicely from defoliation and topping.
Second clone group looking a bit rough after I took the domes off yesterday.​

Mo1124TDay.jpg Mo1124TDay2.jpg Mo1124TDayLRclones.jpg Mo1124TDayULclones.jpg

This shows the height markers across the back wall. 1 foot and 2 foot (3 out of picture)
the crystal dangles at the 16 inch level for light above canopy indicator.
Mo1124Levels.jpg

A week until the flip for the first one, and veg full time for the others a couple more weeks...
 

HalfBee

Well-Known Member
Container sizes: Each stage doubles the amount of soil available in outward progression

Stage 1: Seeds & Clones – stacked plastic cups 8oz clearish with barrier cloth layer,
inner cup has holes in bottom for drainage and cloth wicks upward and blocks light.

Fit inside a zipper bag for humidity dome, pinch sides closed and snap a rubber band on it to keep it tight when cloning.​

Stage 2: Sexing & TortureI can't believe they get a promo plug here...

Stacked containers with barrier cloth inside next to soil, again a bit of wicking action and root containment. Little damage to root ends when transplanting later.

These fit inside a gallon size zipper bag for a couple days of humidity after transplanting freshly rooted clones.

Previous stage cup size centers well into the tub. Orient the plant so node 3 will point toward the long axis for manifolding. Clips for tie downs.

Stage 3: Veg & Flower – Still testing two sizes

Size 1 – rectangle – the tub size plug fits in the center (or as plant growth dictates) the long directions matching. Gives about 2 or 3 inches of new soil all around and becomes our new watering target to get penetration and encourage roots to spread out.

Size 2 – round – larger than the other, almost double in volume of soil. Footprint is about the same in width. This and size 1 above, fit on one side of cabinet. Two of this size and a tub size for sexing fit across. The ring fits this size best, didn't get to the ring under CFL but this time hope it is needed.
C_rectangle1.jpg C_round1.jpg C_round2.jpg

Having used these sizes for 4 harvests now (if you want to call that a harvest) through trial and error know how much water each will need when it's time to water.
Cups – couple sprays to the inside of bags to give clones humidity. For seedlings use just enough to see the water wicking up the outside.

Tubs – For these I use a 350ml small water bottle (brand doesn't matter but like more rigid bottles over the flimsy ones). Slowly poured around the plant, an inch or so from the stem, and allowed to soak in as you go along.

If the tub is 'light' it might have very little run off, usually it leaves about ¼ inch of water in the lower reservoir. Leave this until the next day (it absorbs a bit) and then either discard or pour back to top.

For transplants – clones and seedlings – The first couple of times watering the only get about ½ the usual amount poured just outside the 'plug' to encourage roots to move outward. Same thing for moving up to the larger size later.

Size 1 – rectangular – These will take a full 500ml water bottle without run off. The barrier cloth outside remains dry unless you water too close to the edges. If you water too close to edge it will run down the sides and drip out the bottom. Every 2 weeks they get a bath, put in a tub with enough water to rise 2 or 3 inches up the sides, and left for about 30 minutes to saturate and then allowed to drain.

Size 2 – round – I haven't gone to full flower with this size yet (under way) but it takes one of each type of bottle – a 500ml and a 350ml (big bottle is nute mix when applied and topped off by small of water)

Same method of a ring about an inch from outer edge moving inward to an inch from stem. Moving back and forth (outer to inner limits) for an even saturation across the wet zone. I use a siphon tube for the larger containers that maintains a set flow rate and doesn't pool water on surface, it soaks in almost immediately.


When checking on the girls last night, MT had a white finger down into the reservoir area and take it as a sign it would like a bigger container. But then looking at ML – WTF!!! - about a two inch white fuzzy/hairy nice looking root. This clone was only put into that container 5 days ago, but it's been under the Veros that entire time. Can't remember if the barrier cloth is double layer or not.

This is VERY cheap barrier cloth from d'Tree and usually double it over and lay strips both directions. When time to transplant just grab the ends of the cloth on each side and lift (or at corners). The root ball (if not grown through) is ready to go. If these penetrated 4 layers to get out, that's vigor.

Not saying it's the Veros, YET!


C_soil1.jpg C_soil2.jpg B_FullHouse.jpg

Getting ready to transplant. This shows the placement and the relative amounts of soil around each side of the newly placed plug. There's about an inch of soil on the bottom. After filling four of these, they used almost all my available soil. This bucket was filled to red line and there is about an inch left.

Good thing... only have 4 of that size basket, two of the round ones. Put the tubs in them for placement inside the box and as you can see... it's a tight fit.

Have to manage Crop Rotation – only 1 or 2 at a time moved in once a month to start flower as we move 1 or 2 out for harvest. Been holding up MM in veg until new lights ready, then it will have the entire area to itself for a month. Have a feeling these others will all want to go at once so might have to resort to scrog depending on how well they take to training.
 

HalfBee

Well-Known Member
Can't tell the players without a program:

MM - Mama Mango this is the original from seed

Clone set 1
MT - Top of the sexed plant when manifolded at node 3
MB - Bottom taken 2 nodes taken off the top cut off

Clone set 2 - 14 days after clone set 1 taken
ML - Lower (or left) this is one of the clones taken at node 2
MR - Runt (or right) this is the other node 2 clone that was smaller
 

HalfBee

Well-Known Member
Well... the new 4Up board and LDD-1000Hs arrived. Feel sorry I didn't take advantage of the Black Friday/Cyber
Monday promotions, etc. and spent a bit more on the LDDs than I wanted (extra $10 ordering from RapidLED).
You can see it's a bit larger than the old model board with the extra 12 volt driver chip slot and outputs.
4UpNew.jpg

The left side is 3500K and right side is 3000K. The 3000K look a bit more 'orange' but can't see much color difference between the 80 and 90 CRI chips (top ones in photo). But they are all running at full power and it's much brighter inside now than with the 5000K side running at 350mA.

80vs90.jpg All1000.jpg All1000Lit.jpg

Will give them a couple days under these lights and see how they like it, until I can fix up the grow spot for them.
 

HalfBee

Well-Known Member
Ok... had two full day cycles under the full Vero setup.
MM is ready to flip Friday at 42 days, there are hairs showing already, the topped tips are standing upright on their own and ready to shoot up.

1126transplant1.jpg 1126transplant2.jpg
before and after transplanting, would be tight trying to flower them all at once.
1128fullVero.jpg 1130Vero2days.jpg
This is where they were at when I lit up all the Vero 18s.
And again 2 days later. Should really move them up even canopy level but even where they are at they like it.
MT & MB almost have enough growth nodes to start topping them back for manifolding.
ML & MR also had a nice growth spurt.

Working for the weekend... Material gathering for the veg corner.
 

HalfBee

Well-Known Member
Deck the halls with panda film

Got a jump on the veg corner, lights & fans in place for testing.
There is a PC case on each side to make the space a bit smaller, the full table is 3x3 minus a corner in front. These Vero 13s at 350mA won't spread that far, but using them as spot lights mostly.
V13under.jpg V13plants.jpg
The four veg girls fit for the moment. Put them on risers (tubs) for 6 inch boost.
Will be marking heights when properly attach the panda film. Since the lights don't move here the plants have to be raised once I find the proper veg growing height.

Official Flip Day for Miss Mango
V18MM_flip.jpg V18MM_flip2.jpg
Alone at last *almost* those ends are pointed up and wanting to stretch.
At about the 1 foot level now, ring is 18 inches (6 from plant now).
Will it still be casting a shadow on Ground Hog Day? Or hibernating in a dark drying cabinet...
 

HalfBee

Well-Known Member
The Green set got a lollipop on Friday. So much crazy growth from these clones (as they were hopped up on flowering hormones from the forced determination) cut them back to just the growth tips (I hope) and tied down for canopy training.
Veg1201before.jpg Veg1202top2.jpg
The Red set got a similar treatment today. They had a good 4 or 5 nodes above the cut and was tempted to clone it again, but will see how it shapes up in cabinet first. Can always keep one of these as a mother.
Veg1203top2more.jpg
Everybody - and I mean EVERYBODY - got a liberal sprinkle of diatomaceous earth as over reaction to seeing a flying insect inside the veg area (killed it, but where there is one a swarm isn't far behind). It takes care of the creepy crawlies and gives a bit of silica when it eventually washes down.

Veg1203hula.jpg
Hula girl likes it (shaking her hips energetically) up at the edge of the room in side light & reflection. Not that her gyrations indicate brightness but the window she normally sit in I'm lucky to get a twitch once in a while in full daylight.
 

HalfBee

Well-Known Member
Not much to report in the week since the flip. Untied most of the wires.
Positioning the canopy and everything is about 2 inches upward growth.

Not stretching so far, but the tops are all point up.
MM_d3.jpg MM_d7.jpg

Veg corner - timer got installed so it's automated and on own schedule.
Everything is being trimmed down. Red set down to base levels.
Green set responding from last trim/top.
Veg1208a.jpg Veg1208b.jpg

Put up a web cam and played with a little time lapse. Not an ideal camera to work with.
The focal point isn't wide enough to cover the whole area so it's single plant cameos.
First day of each plant was 30 second intervals, now it's 300 second (5 min)
 

HalfBee

Well-Known Member
Week 2 - A little activity
Made the panda film in the veg area a bit more stable.
Arranged the baskets for better light coverage.
Veg121516.jpg
The greens are officially in veg mode and growth directed upward more than out.
The reds - MR bent horizontal on the two mains, ML has 4 mains (upper & lower).
Each will get topped one more time when they get a few more nodes in length.
MM121516front.jpg MM121516back.jpg front & back
Everything is unbound and working on arranging to their finishing position in the canopy.
Gained about 3 inches and moved the lights up about that amount.
Rotate 1/4 turn daily, center of plant is sitting directly under the 90CRI spots.
 

HalfBee

Well-Known Member
Good question...
Is part of the process to keep them in small containers.
I've used these for the CFL portion and they worked fine through flowering, such that it was...
The root structure wasn't extensive back then, but these showed great roots when I moved them up from the tub stage. Will see how the green group develops and decide for the red set if they need more space.

Don't have anything else to use right now, and haven't been looking.
Do have another of the larger round containers like the main plant is using.
Used up 90% of my soil reserve on this run already (will deal with that next year)

Going to finish out the run as it's part of starting the perpetual cycle of plants.
The reds go into box at around the 30 day point, greens follow in another 30, or when main comes out.
First of year is new bean drop that will become the next cycle with better understanding of the process.
 

HalfBee

Well-Known Member
Week 3 Update
It's now 21 days since flip. Moved lights up highest setting to see stretch at the 16 inch level.
Not much to notice, put down to the 12 inch level. Still experimenting on canopy distance.

They got a lollypop treatment. Should be final height and ring more yoyo than side support.
MM_B4trim_1221a.jpg MM_B6trim_1222a.jpg MM_buds_1221a.jpg CobCanopyCrystal.jpg

Fired up the CFL seedling cab to provide a bit of warmth.
The Vero 13s at 350mA so cool running ambient doesn't increase in semi-enclosed area.
The 700mA LDDs are next upgrade order.

Distance to canopy should be reaching the sweet spot. They are all about the same height.
The MT & MB clones have a main stem the width of a Sharpie marker.
The second set ML & MR at 14 days behind have stems the width of milkshake straws.
At the first of the (month&year) they will be 30 days into veg cycle.
Veg1221a.jpg Veg1221c.jpg Veg1221cfls.jpg
Putting all of them into flower room will be crowded, but if even enough and might scrog...
Not sure if second set can hold up another 30 days for MM to finish, too soon to call.
 
Top