400W HPS Stealth Armoire...1St Grow

Hello Everyone,

I want to make this quick and easy so please let me finish all my posts then I will be open to any suggestions, comments or questions. The armoire is complete so I will try to finish this tonight.

***99% of content from here down was all learned or inspired by a lot of pot heads on this forum or through google. Reps to all of you...You'll know who you are. Peace***

Strain: Chem Dawg (clones from Harborside in Oakland)
Growing Method: Hempy method
Nutes: GH Flora series (Lucas formula)

I've had the clones vegging for 6 days (18/6).

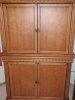
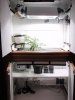
Lets start from the begging, making the stealth armoire. It won't be step by step, but there will be more than enough pics to connect the dots.


Main Components

Armoire
EDIT:
Inside demensions: 59"Hx20"Dx48"L
lovethevapor-154541-albums-stealth-armoire-picture83987-dscf0680.jpg

lovethevapor-154541-albums-stealth-armoire-picture83989-dscf0682.jpg

400W HydroFarm ballast, Xtrasun Hood, Eye Hortilux Super HPS(Enhanced Spectrum)
lovethevapor-154541-albums-stealth-armoire-picture83988-dscf0681.jpg


S&P TD-150
lovethevapor-154541-albums-stealth-armoire-picture84033-soler-palau-td100.jpg
 
Cut 8"x8" squares for my dark room louvers(Intakes). There's 2 of them, one on each side. I would not suggest putting any intakes on the back of a cab if its next to a wall. Take a look behind your computer desk or TV to see what mean. Also, cut the holes, fit them, and put them away. They are pricy.
lovethevapor-154541-albums-stealth-armoire-picture83972-dscf0730.jpg
 
Sanded down the inside of the cab and doors. I built this with a limited amount of tools, so i had to sand by hand. Also, all my cuts were made from a $19.99 Jig saw from Kmart. Anyone can do it.
lovethevapor-154541-albums-stealth-armoire-picture83971-dscf0731.jpg


EDIT: Sorry about the pic, I had dust everywhere! Oh yea, i also forgot to mention that I built this in my small living room of my 1 bedroom apt.
 
Nice work so far bro. They're a lot more work than you thought, aren't they?

Even though it takes a while to retrofit these, you'll be very proud to have your stuff growing in an elegant piece of furniture.

Here's a photo of mine: notice the locks, my favorite part, ensures that your buddy won't help himself to a quick snip.

Welcome to the club of cabinet growers who DON'T grow in rubbermaid.
 

Attachments

  • front.jpg
    front.jpg
    51.9 KB · Views: 558
  • open_cabinet.jpg
    open_cabinet.jpg
    54.4 KB · Views: 851
Now, lets take care light proofing the union where doors meet.
lovethevapor-154541-albums-stealth-armoire-picture83916-dscf0707.jpg

lovethevapor-154541-albums-stealth-armoire-picture83915-dscf0705.jpg

lovethevapor-154541-albums-stealth-armoire-picture83917-dscf0709.jpg


Cut to Length, reinstall the doors and test fit. Now just add a couple screws.
lovethevapor-154541-albums-stealth-armoire-picture83918-dscf0713.jpg

lovethevapor-154541-albums-stealth-armoire-picture83919-dscf0715.jpg

lovethevapor-154541-albums-stealth-armoire-picture83921-dscf0717.jpg


Now seal the deal with some weather sealant.
lovethevapor-154541-albums-stealth-armoire-picture83922-dscf0718.jpg


Now, some security measures, you might have to reinstall the doors a couple times to get a snug lock. I had to bent the locking arm a into an L with some pliers to make it work. Whenever I ran into an issue I would just take my time, maybe vaporize a nug, and let the issue marinate for a while. I used to be a carpenter so I'm trained with my hands, but just use your imagination for your situation.
lovethevapor-154541-albums-stealth-armoire-picture83926-dscf0725.jpg
 
Thanks dude. Nice cab. Don't mean to sound rushed, but I will finish my post first before I have a good conversation. I have an issue with my clones, but want to start from the beginning so that new growers have something to read from start to finish. That's what my intention is at least.
 
Some security(More to come)
lovethevapor-154541-albums-stealth-armoire-picture83920-dscf0716.jpg

lovethevapor-154541-albums-stealth-armoire-picture83926-dscf0725.jpg


I ended up having to bend the locking arm into an L to lock over the plastic. Sorry no pics. If someone really needs it let me know when I'm caught up to my current situation.
EDIT:
Sorry for the double posts, when I posted the first time, it would not update.
 
Added a coat of primer, and about 2-3 coats of flat titanium white. Took about 3/4 of a gallon of paint.
lovethevapor-154541-albums-stealth-armoire-picture83970-dscf0733.jpg

lovethevapor-154541-albums-stealth-armoire-picture83969-dscf0734.jpg


I used reflective waterproof tape form Home Depot to cover air gaps. Costs about $12, but trust me its worth it.
lovethevapor-154541-albums-stealth-armoire-picture83961-dscf0742.jpg

lovethevapor-154541-albums-stealth-armoire-picture83963-dscf0741.jpg

lovethevapor-154541-albums-stealth-armoire-picture83958-dscf0782.jpg
 
Some more security measures
lovethevapor-154541-albums-stealth-armoire-picture83966-dscf0738.jpg

lovethevapor-154541-albums-stealth-armoire-picture83965-dscf0739.jpg

lovethevapor-154541-albums-stealth-armoire-picture83960-dscf0754.jpg

lovethevapor-154541-albums-stealth-armoire-picture84068-dscf0859.jpg

lovethevapor-154541-albums-stealth-armoire-picture84030-dscf0863.jpg


EDIT: Do not add the these locks until your weather stripping is on. Sorry, pics of weather stripping below...
 
S&P TD-150 hookup(For ventilation)
lovethevapor-154541-albums-stealth-armoire-picture83923-dscf0719.jpg

lovethevapor-154541-albums-stealth-armoire-picture83924-dscf0722.jpg

Remember to pull the cable through the housing hole before you tape this on. Make life easier.
lovethevapor-154541-albums-stealth-armoire-picture83925-dscf0723.jpg
 
Ordor control

Do a search of a DIY carbon filter and you will understand this part easy. My filter is a replica of these but with a small twist.
lovethevapor-154541-albums-carbon-filter-picture83986-dscf0745.jpg

lovethevapor-154541-albums-carbon-filter-picture83985-dscf0749.jpg

lovethevapor-154541-albums-carbon-filter-picture83984-dscf0752.jpg

(Made my own hood hangers, saved about 2.5" in height)
lovethevapor-154541-albums-carbon-filter-picture83983-dscf0758.jpg

(Used the weather proof tape)
lovethevapor-154541-albums-carbon-filter-picture83982-dscf0759.jpg

lovethevapor-154541-albums-carbon-filter-picture83981-dscf0762.jpg

Layer of window screen mesh
lovethevapor-154541-albums-carbon-filter-picture83980-dscf0763.jpg

Now the ladies stocking
lovethevapor-154541-albums-carbon-filter-picture83979-dscf0766.jpg

lovethevapor-154541-albums-carbon-filter-picture83978-dscf0767.jpg

Cut down safely, will give you more filter coverage (If you are limited in space)
lovethevapor-154541-albums-carbon-filter-picture83977-dscf0768.jpg

lovethevapor-154541-albums-carbon-filter-picture83976-dscf0769.jpg

Swamp cooler weather stripping ($3)
lovethevapor-154541-albums-carbon-filter-picture83975-dscf0771.jpg

lovethevapor-154541-albums-carbon-filter-picture83974-dscf0772.jpg

Again I used a first layer of window screen mesh and topped it off with prefilter meterial from the pet store ($2)
lovethevapor-154541-albums-carbon-filter-picture83973-dscf0779.jpg


The filter takes up only 12" with a total filtered air coverage of 10". There is a 2" diameter inside for the activated carbon. The top is easily removed to replace carbon with ease.

My initial design had was FILTER--->COOL LAMP--->S&P TD-150--->EXHAUST. But after some trial runs found that the cab ran 4 degrees cooler with the filter at the end. I think it had something to do with the stronger swoosh into the hood.
 
Air Flow
Louvers>>>Lamp>>>S&P TD-150>>>Carbon filter>>>Exhausted out
lovethevapor-154541-albums-stealth-armoire-picture83954-dscf0788.jpg

(The pink foam is there to eliminate vibrations form the fan.)
lovethevapor-154541-albums-stealth-armoire-picture83955-dscf0787.jpg


Filter support
lovethevapor-154541-albums-stealth-armoire-picture83953-dscf0789.jpg

lovethevapor-154541-albums-stealth-armoire-picture83957-dscf0785.jpg
 
Back
Top