GrassBurner

Well-Known Member
There is a product called boracare that I really like to use in wet areas. Basically a salt that preserves the wood. Non toxic, fungicide and termiticide. Its pretty incredible. Don't use it around any plants, it will kill the shit out-of them, but since it looks like a new room you'll be fine. You could treat the frames, and even the plywood floor. Will make it last forever regardless how often it gets wet :blsmoke:
 

Hot Diggity Sog

Well-Known Member
There is a product called boracare that I really like to use in wet areas. Basically a salt that preserves the wood. Non toxic, fungicide and termiticide. Its pretty incredible. Don't use it around any plants, it will kill the shit out-of them, but since it looks like a new room you'll be fine. You could treat the frames, and even the plywood floor. Will make it last forever regardless how often it gets wet :blsmoke:
I'll check it out. Thank you!
 

Hot Diggity Sog

Well-Known Member
Quick update:

Found a few air leaks in Room #1 - all 4 of the electrical boxes that are installed on exterior walls. Pulled the outlets out and carefully sprayed low expansion foam (Great Stuff) around the outside of the boxes. I had already gotten the holes where the wire comes in. It helped a lot but its not perfect - can still feel a small amount of air coming in when the exhaust is running. Not a big deal.

Painted the benches a 4th coat of BlueMax this morning and they are starting to look great. Thinking one more coat tomorrow and then maybe a final touchup coat on Saturday if need be. The stuff dries really tacky so I'm not sure how long I should wait to do my 1st water test. Prolly going to email the company and ask. My basement temps are 59F so I've been using a radiant heater in the room on and off to keep it a bit warmer. Tonight I turned it off and turned all 36 quantum boards on. They are dimmed to their lowest setting ~ 30 watts per board I believe (I've misplaced my KilloWatt during the build). Will be leaving them on all night to get a sense of how much they affect the temps. Exhaust fan is set at 75% power.

Did the big coco rinse over the last 2 days. I did end up doing most of it in a bathtub but I did not let the rinse water and particles go down the drain. Thank you to @halfbreed421 for the caution about doing so. I ended up using the 2 bucket method where the 1st bucket has a ton of holes in the bottom and it sits on another bucket with no holes. I used hot water - as hot as my shower could get. Did a full rehydration and soak and then drained. Using hot water seemed to work much better than cold water.

Rinsed 16 gallons of coco and combined with 10 gallons of rinsed coarse perlite. Filled my pots and will go thru a PH and buffering process sometime over the next 2 weeks.

Getting close to getting started and I'm super excited.

1.jpg
2.jpg
3.jpg
4.jpg
 

Hot Diggity Sog

Well-Known Member
I haven't given any updates in a while but I've definitely been busy. I was going to write a multi-page update but I'll instead post the info every few days until it is current.

We'll start with the good news (cause there is a bit of bad news).
The watering system is more or less finished - at least the parts that are inside of the flowering room. I'm pretty happy with how it turned out. Having never built a watering system, I just have to hope that I did a good job and considered all of the important topics that need to be considered.

1.jpg

2.jpg


Air Bleed Valve has not arrived yet. Will be threaded into that pipe at the end of the main line.

3.jpg

4.jpg

5.jpg

Much more soon :)
 

Hot Diggity Sog

Well-Known Member
So...might as well share some of the problems I'm having.

#1 - The tables are not perfectly level. I can place blame on a basement floor that is not perfectly level but I won't. I just didn't double and triple check everything as I went. The legs for the benches are probably mostly at fault. I wish I had dumped some water on the benches after the water proofing but before the drainage holes were drilled so I could see where the pooling was. Well, I didn't do that so the 6 original drain holes aren't going to cut it...had to drill 4 more. After flooding the benches, I let the water drain and marked the spots where additional drainage is needed. I just finished drilling, installing 3/4" PVC into the holes and applying the 1st coat of liquid rubber on the new drainage spots.

#2 - The product I chose to waterproof the benches is called Blue Max from a company called Ames Research. I'm thrilled with the job it did with waterproofing but the stuff cures tacky - really tacky. If I place plastic pots on the benches and then remove them after a few seconds, it has the tackiness of a candy such as laffy taffee. If I leave the pots on the bench for 30 minutes, it's much worse. An indentation of where the pots were is left. I called the company and had a great talk with one of their engineers but the bad news is that this stuff is going to be tacky forever and I simply can't place anything on the surface if it's going to be moved often as it will eventually pull the coating off.

Major bummer but a few days ago I had a great idea on how to solve this challenge...will reveal once the goodies arrive.

Here's a couple pics on the new drainage holes before sealing them:
1.jpg

2.jpg

Much more soon :)
 

Hot Diggity Sog

Well-Known Member
I reached out to FloraFlex for advice on water pumps. They were incredibly helpful. I didn't end up going with the brand they suggested but the specs are right in line. I've only ever used the standard aquarium pumps so I had a lot to wrap my head around. I probably have a dozen or so water pumps ranging from 200 to 1200 GPH. My largest one is 1267 GPH I think but only 5.7 PSI. High flow, low pressure. Just not going to work for this.

Here is what I ended up deciding on and ordering tonight:

EcoPlus Elite Series 3/4 HP Multistage Pump, 1416 GPH

EcoPlus Pump.jpg

EcoPlus Specs.jpg
 

Hot Diggity Sog

Well-Known Member
I'm excited to share this update. One of the big challenges has been successfully solved.

I had mentioned recently how great the Blue Max liquid rubber product had sealed the benches but the major problem was that it cured tacky. I spoke with the company and they said it may remain tacky forever and that placing containers on the surface and repeatedly moving them might eventually peel up the coating. Major bad news! But this is what I came up with.

3.jpg


2.jpg

4.jpg

These are hard plastic tiles. Modular in design. Allows for water movement underneath. Is UV and mold resistant. Very light weight and very strong. The common use of this product is at car shows and consumer garages. Aside from my containers not being directly on the tacky surface, they are also slightly elevated now which is great so they are not sitting in runoff water. Double bonus! I only ordered enough material to do one side - I ordered the rest of what I need once I saw how awesome it's going to work.

Here's the rough layout of plant spacing and orientation.
1.jpg

Lots to do still. But starting to feel like I can see the light at the end of the tunnel. I'm going to guess ~ 2 more weeks before seeds hit the water.
 

Hot Diggity Sog

Well-Known Member
Thanks everyone!

Right now I'm working on the drain to waste design. It's 1/2 way done - prolly Friday or Saturday I'll have pictures for the next update.
Then the new RO system goes in.
Then after that I'm just waiting around for the final things to arrive such as the water pump.

Edit...maybe I'll shoot what I have done so far and share. The room is a pig sty at the moment...lol
 

Dr.Amber Trichome

Well-Known Member
Thanks everyone!

Right now I'm working on the drain to waste design. It's 1/2 way done - prolly Friday or Saturday I'll have pictures for the next update.
Then the new RO system goes in.
Then after that I'm just waiting around for the final things to arrive such as the water pump.

Edit...maybe I'll shoot what I have done so far and share. The room is a pig sty at the moment...lol
Pig sty. Very funny. Please indulge us with the dirty mess.
 

Hot Diggity Sog

Well-Known Member
lol...I cleaned up first. Here we go!

1.jpg

2.jpg

3.jpg

4.jpg

5.jpg

So here is what I was thinking about when I made this:
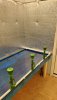
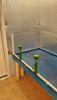
1) What happens if something terrible happens and the water pump does not shut off. Or my remediation for a siphon fails and the entire reservoir is emptied. Having (6) 17 gallon catch tubs can hold ~ 102 Gallons of water. 30 gallons more than my 70 gallon reservoir.

2) Knowing the benches are not perfectly level, any containers used to catch run-off will fill at variable rates.

3) I sure as hell don't want to manually dump buckets or tubs again.

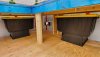
So this is basically what I came up. All 6 totes are connected via PVC so they should maintain an even and consistent water level. I only wanted one point of exit and I chose to have the water drain from the bottom of the tote out of the room - a little extra gravity will help a lot. From the outside of the room, all options are on the table. I can connect a garden hose and a valve and just run the hose outside and open the valve. Passive drainage. Should work, but untested. I can also connect the exit line to a pump and then a garden hose and do it that way.

The (10) drainage holes are probably going to use flexible 1/2" water tubing and I'll drill holes near the top of the totes. TBD.

Here are a couple of cool gadgets that I don't think I've shared as of yet:
7.jpg

A carbon monoxide and smoke detector that sends alerts to my phone. Since this room is hyper insulated, and in the basement, I could never hear a smoke alarm upstairs. In the event of a fire, I get notified. Lets hope that never happens.

And then the Pulse...this thing is pretty sweet. It's the first time I'll be using it but so far I'm loving it.
Here is a link for more info...
(No affiliation to them...just praising their product)

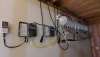
And finally, a shot of the LED Driver array and timers. It probably looks pretty messy and I guess it is kind of messy. It's the best I could do while keeping things accessible. This room is fed by (3) 20 amp circuits. Despite looking potentially unsafe, I was very careful and it is done safely.

8.jpg

I'm happy to answer questions if anyone has any. And I'm always open to suggestions and criticisms.
I appreciate you following along.
 

Hot Diggity Sog

Well-Known Member
Beautiful setup. It's obvious you take pride in your work!

I just learned about these.
Pretty cool. I have one on my wish list.
https://www.amazon.com/Auto-Fire-Extinguisher-Suppression-Extinguishers/dp/B07WW22HPL/ref=mp_s_a_1_10_sspa?dchild=1&keywords=fireball+extinguisher+ball
Wow! This sounds amazing...
HOW IT WORKS: The Auto Fire Guard Fireball removes the carbon and hydrogen present in the atmosphere - leaving the oxygen alone! The Fireball binds to carbon and prevents carbon monoxide from developing - eliminating the fire. To absorb the remaining temperature, the fire extinguisher ball binds to the existing hydrogen then absorbs up to 2,200F°- which prevents hydrogen cyanide from developing. Carbon monoxide and hydrogen cyanide are the 2 most common poisons in smoke.

Did you get one yet? I think a controlled experiment is in order to confirm that it works. Assuming it does, this is a no brainer addition!
 
Top