donnieosmond
Well-Known Member
the official (donnieosmond)
grow-cabinet weed blog...
Hey guys! I'm kinda new to the forums but today was my first official day building my very own grow cabinet which I am going to use for flowering my plants in a few months.
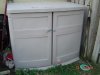
My cabinet was purchased from Your Average Tool Store for $59.99, as was the Reflectix insulation and foil-tape pictured. The cabinet is a Rubbermaid.
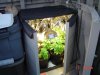
Attached to the cabinet is a 70w HPS, which is screwed into the back of the cabinet and held in place with a metal plate and nuts. To electrically install the HPS, I simply snipped the female end off your average computer cord and stripped the wires and attached them to the HPS using wire nuts (that came with it). I used a drill with a forstner bit to drill a hole in the back of the cabinet to allow the cord to go cleanly and unnoticed through the back.
Throughout this blog, I will attempt to keep an updated product list for anyone attempting to follow what I am doing for their own projects or ideas.
Supplies needed so far:
ImageShack - Hosting :: cab1xm0.jpg
ImageShack - Hosting :: cab2tj7.jpg
ImageShack - Hosting :: cab3ca1.jpg
To-do list:
Just something I've noticed: the rubbermaid container conveniently comes with an area to lock the unit from unwanted visitors... BUT after a little thought on this matter I realized that all they'd really have to do is remove the top of the cabinet which slides right off. On the top of my list tomorrow will be to purchase some very strong rubber cement to bind the unit together so that this will not happen.
grow-cabinet weed blog...
Hey guys! I'm kinda new to the forums but today was my first official day building my very own grow cabinet which I am going to use for flowering my plants in a few months.
My cabinet was purchased from Your Average Tool Store for $59.99, as was the Reflectix insulation and foil-tape pictured. The cabinet is a Rubbermaid.
Attached to the cabinet is a 70w HPS, which is screwed into the back of the cabinet and held in place with a metal plate and nuts. To electrically install the HPS, I simply snipped the female end off your average computer cord and stripped the wires and attached them to the HPS using wire nuts (that came with it). I used a drill with a forstner bit to drill a hole in the back of the cabinet to allow the cord to go cleanly and unnoticed through the back.
Throughout this blog, I will attempt to keep an updated product list for anyone attempting to follow what I am doing for their own projects or ideas.
Supplies needed so far:
- Rubbermaid cabinet $59.99
- Reflectix reflectable insulation $19.99
- Aluminum foil tape $5.99
- 70w HPS light $49.75
- Computer cord: Free for me, had extra ones.
- Wire strippers/snippers
- Electric drill with forstner bits
- Small wrench to tighten nuts on the back of the cabinet
ImageShack - Hosting :: cab1xm0.jpg
ImageShack - Hosting :: cab2tj7.jpg
ImageShack - Hosting :: cab3ca1.jpg
To-do list:
- Use composite saw to remove shelf to allow for max growth
- Install exhaust fan(s)
- Use foil tape to seal any leaks on inside of cabinet
- Figure out a way to make doors light-proof
- Install Temperature/Hygrometer gauge
- Install power strip to back of unit
- Install Reflectix insulation
- Connect unit to timer
- Start growing!!!
Just something I've noticed: the rubbermaid container conveniently comes with an area to lock the unit from unwanted visitors... BUT after a little thought on this matter I realized that all they'd really have to do is remove the top of the cabinet which slides right off. On the top of my list tomorrow will be to purchase some very strong rubber cement to bind the unit together so that this will not happen.