skeeterleg
New Member
I didnt plan on posting this or I would have taken pictures throughout the process. Since I have learned a lot of stuff on RIU I thought I would share my idea in case others may be looking for an alternative to their closet, bathroom or tent. Just apply your own requirements and build it to fit your size and needs.
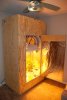
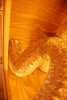
I needed a grow cabinet to have in my house or garage that would not attract attention when someone saw it and for smell control. My white widows are some dank shiat! I looked at buying a tent but to me they are not stealthy and cost a lot. So I decided to design my own out of plywood. After many hours of thought and changing back and forth this is what I came up with. After some trial and error I must say it is working quite well now. I think ounce it is painted or stained no one will think twice. It will look just like a big cabinet.
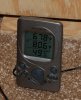
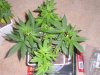
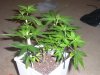
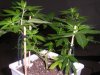
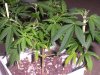
One thing I will share right from the start is it runs much hotter with no plants in it. The temperature of the room is also a factor. Here is a hint in my design. The air temp at the floor can be 5 or more degrees cooler than at 7 in a room with 8 ceilings. More on this later. On my test runs (with no plants inside) the temp would climb and climb. Once it was going above 85 I would stop and rethink the air flow. Make changes. I even took out my 600 HPS and put in my 8 bulb 4 T5. I can touch the bulbs on this thing. It was still too hot. Damit son! After a couple of days changing things and adding a second fan and it was still getting too hot. I was puzzled. I guess my idea sucked! Then I came home and opened the garage and the smell slapped me in the face. I could wait not longer heat or not! I have Barney just across the street!!! I had seven growing at the time. 4 white widow and 3 bid bud. Once the plants were in there the temps dropped down. Whoda thunkit! lol Plus the overall room temp was lower. Now we are getting somewhere!
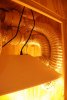
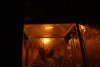
My design criteria was cost, quietness, stealth, self contained (nothing showing), smell control and portable. The cabinet is 29 x 48 x 6-5 inside dimensions. Outside is 30 x 49 x 7. I designed it to hold my reflector and 15 each (3 rows of 5) of the 7x7x9 pots with the 10 saucer with a max grow height of 48 from top of pot to bottom of light with 4 clearance. I want to grow some sativa too. I found I can put the 600 HPS about 4 to 5 from my plants with no problem with proper air flow / cooling. For stealth and temp control the intake air comes in from the bottom. Like I said the air is 5 degrees or more cooler down there. It has a double ½ floor spaced 1.5 apart with offset intake holes to control light penetration. Basically the holes in the bottom floor are centered where the pots sit on the top floor. The holes in the top floor are located in the open areas between the saucers when at max capacity of pots. I also added a ¼ gap in the top floor for air flow around the perimeter. I did some Jethro calculations for hole sizes based on my fans and duct size to come up with the hole sizes. I made the area of the holes in the top and bottom floor equal. Holes too small and it would be like a hurricane. Holes too big and not enough cooling or air flow. The walls, top and bottom floor are sealed tight except for the air intake holes. The ceiling is dropped 3.5 down from the sides. The timer, ballast, electrical strip all sit on top of the ceiling and are hidden from sight. Originally I was going to put the fans up there but changed my mind. The fans made no heat and inside they are quieter. It also eliminated duct and penetrations in the ceiling. The floor was set ½ above the end of the walls. Dont set the swivel castors too close to the wall or it will hit. Also get a couple that lock. When cutting the door out of the front panel, dont cut the corners all the way through leaving it in place. Once you set the hinges take a jig or hand saw and finish cutting the corners. This will keep your spacing. The saw blade thickness is a perfect gap size. I used a circular saw then a jig saw for the corner cut.
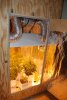
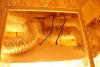
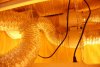
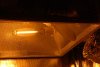
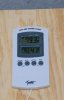
Basic theory is the fan pulls air from inside the cabinet through the carbon filter located in the top of the cabinet and then flows through the reflector and blows the hot reflector air out the top scrubbing the smell at the same time. In turn that creates a vacuum which pulls fresh cooler air in from the bottom (double floor) that directs the cool air up and around and between the plants. I leave this fan on 24/7 for scrubbing and air flow. It is working so well I had to add a speed control to slow down the fan to keep the temps up to 80 82. Since it is winter I had to add a small heater in the room to keep the temps up when the light is off. I didnt need the second fan for cooling after all but left it to move more air in the cabinet to thicken the stems. It is also directed across the bottom of the reflector glass for additional cooling. It runs on low speed and goes off with the lights. I can place my hand on the reflector and there is very little heat just above the bulb. Thats it!
I designed it to hold the reflector and stuff I already had.
S&P TD 150 fan (love this fan, quite and has two speeds. I wired a toggle in the electric box on the fan)
Sun System Magnum XXXL 6 Reflector (the cabinet will also hold my 26 x 46 8 bulb T5)
600 watt digital ballast w/ Eyehortilux Super HPS
Can 33 filter
6 duct
Basic Materials:
½ A/C plywood (maybe it was B/C, I want to paint or stain it for stealth hence the A grade)
6 each 1.5 swivel caster wheels (to hold it off the floor and I can roll it anywhere)
3 sets hinges
3 barrel bolts (had to add a third because my door warped a little)
1 hasp (to lock it and keep out nosy people)
2x 6 (cut pieces for caster supports sandwiched between the two floor panels)
2 x 4 (down the center on top of the ceiling to support light, run long ways)
1 x 4 for door stop
¾ weather stripping (to seal door and under fan mount for vibration damping)
2 x 2 misc corner supports
Screws (no nails or glue, I want to take it apart)
Reflective film (I like the stuff with the reinforcing scrim, tape it for easy removal)
S hooks
S lags
Chain
6 Self sealing round air duct connector (or whatever size you need)
The ½ plywood allows there to be no framing keeping it lighter although it is heavy as hell. You could use 3/8 or ¼ but you would need to add more framing for support especially the door.
There you have it. I hope it makes sense! lol I am going to make a few tweaks here and there when I break it down. I want to paint between the floors black to eliminate light coming out from the 600. No light gets in do to the offset intake floor design when light is off which was the main goal. I want to add a sight glass or peep hole so I can see in without opening the door.
It is working so well I am working on a combo cabinet design for germ, clone and veging now to put my T5 in. Love this light for vegetation.
I needed a grow cabinet to have in my house or garage that would not attract attention when someone saw it and for smell control. My white widows are some dank shiat! I looked at buying a tent but to me they are not stealthy and cost a lot. So I decided to design my own out of plywood. After many hours of thought and changing back and forth this is what I came up with. After some trial and error I must say it is working quite well now. I think ounce it is painted or stained no one will think twice. It will look just like a big cabinet.
One thing I will share right from the start is it runs much hotter with no plants in it. The temperature of the room is also a factor. Here is a hint in my design. The air temp at the floor can be 5 or more degrees cooler than at 7 in a room with 8 ceilings. More on this later. On my test runs (with no plants inside) the temp would climb and climb. Once it was going above 85 I would stop and rethink the air flow. Make changes. I even took out my 600 HPS and put in my 8 bulb 4 T5. I can touch the bulbs on this thing. It was still too hot. Damit son! After a couple of days changing things and adding a second fan and it was still getting too hot. I was puzzled. I guess my idea sucked! Then I came home and opened the garage and the smell slapped me in the face. I could wait not longer heat or not! I have Barney just across the street!!! I had seven growing at the time. 4 white widow and 3 bid bud. Once the plants were in there the temps dropped down. Whoda thunkit! lol Plus the overall room temp was lower. Now we are getting somewhere!
My design criteria was cost, quietness, stealth, self contained (nothing showing), smell control and portable. The cabinet is 29 x 48 x 6-5 inside dimensions. Outside is 30 x 49 x 7. I designed it to hold my reflector and 15 each (3 rows of 5) of the 7x7x9 pots with the 10 saucer with a max grow height of 48 from top of pot to bottom of light with 4 clearance. I want to grow some sativa too. I found I can put the 600 HPS about 4 to 5 from my plants with no problem with proper air flow / cooling. For stealth and temp control the intake air comes in from the bottom. Like I said the air is 5 degrees or more cooler down there. It has a double ½ floor spaced 1.5 apart with offset intake holes to control light penetration. Basically the holes in the bottom floor are centered where the pots sit on the top floor. The holes in the top floor are located in the open areas between the saucers when at max capacity of pots. I also added a ¼ gap in the top floor for air flow around the perimeter. I did some Jethro calculations for hole sizes based on my fans and duct size to come up with the hole sizes. I made the area of the holes in the top and bottom floor equal. Holes too small and it would be like a hurricane. Holes too big and not enough cooling or air flow. The walls, top and bottom floor are sealed tight except for the air intake holes. The ceiling is dropped 3.5 down from the sides. The timer, ballast, electrical strip all sit on top of the ceiling and are hidden from sight. Originally I was going to put the fans up there but changed my mind. The fans made no heat and inside they are quieter. It also eliminated duct and penetrations in the ceiling. The floor was set ½ above the end of the walls. Dont set the swivel castors too close to the wall or it will hit. Also get a couple that lock. When cutting the door out of the front panel, dont cut the corners all the way through leaving it in place. Once you set the hinges take a jig or hand saw and finish cutting the corners. This will keep your spacing. The saw blade thickness is a perfect gap size. I used a circular saw then a jig saw for the corner cut.
Basic theory is the fan pulls air from inside the cabinet through the carbon filter located in the top of the cabinet and then flows through the reflector and blows the hot reflector air out the top scrubbing the smell at the same time. In turn that creates a vacuum which pulls fresh cooler air in from the bottom (double floor) that directs the cool air up and around and between the plants. I leave this fan on 24/7 for scrubbing and air flow. It is working so well I had to add a speed control to slow down the fan to keep the temps up to 80 82. Since it is winter I had to add a small heater in the room to keep the temps up when the light is off. I didnt need the second fan for cooling after all but left it to move more air in the cabinet to thicken the stems. It is also directed across the bottom of the reflector glass for additional cooling. It runs on low speed and goes off with the lights. I can place my hand on the reflector and there is very little heat just above the bulb. Thats it!
I designed it to hold the reflector and stuff I already had.
S&P TD 150 fan (love this fan, quite and has two speeds. I wired a toggle in the electric box on the fan)
Sun System Magnum XXXL 6 Reflector (the cabinet will also hold my 26 x 46 8 bulb T5)
600 watt digital ballast w/ Eyehortilux Super HPS
Can 33 filter
6 duct
Basic Materials:
½ A/C plywood (maybe it was B/C, I want to paint or stain it for stealth hence the A grade)
6 each 1.5 swivel caster wheels (to hold it off the floor and I can roll it anywhere)
3 sets hinges
3 barrel bolts (had to add a third because my door warped a little)
1 hasp (to lock it and keep out nosy people)
2x 6 (cut pieces for caster supports sandwiched between the two floor panels)
2 x 4 (down the center on top of the ceiling to support light, run long ways)
1 x 4 for door stop
¾ weather stripping (to seal door and under fan mount for vibration damping)
2 x 2 misc corner supports
Screws (no nails or glue, I want to take it apart)
Reflective film (I like the stuff with the reinforcing scrim, tape it for easy removal)
S hooks
S lags
Chain
6 Self sealing round air duct connector (or whatever size you need)
The ½ plywood allows there to be no framing keeping it lighter although it is heavy as hell. You could use 3/8 or ¼ but you would need to add more framing for support especially the door.
There you have it. I hope it makes sense! lol I am going to make a few tweaks here and there when I break it down. I want to paint between the floors black to eliminate light coming out from the 600. No light gets in do to the offset intake floor design when light is off which was the main goal. I want to add a sight glass or peep hole so I can see in without opening the door.
It is working so well I am working on a combo cabinet design for germ, clone and veging now to put my T5 in. Love this light for vegetation.
Attachments
-
 42.3 KB Views: 520
 -
 53.8 KB Views: 623
 -
 70.9 KB Views: 510
 -
 61.3 KB Views: 438
 -
 66 KB Views: 366
 -
 52.5 KB Views: 361
 -
 54.9 KB Views: 329
 -
 37.4 KB Views: 338
 -
 60.6 KB Views: 305
 -
 72.5 KB Views: 300
 -
 35.3 KB Views: 277


