First grow from MacGuyver4.2.0.

MacGuyver4.2.0

Well-Known Member
Way back when that is...

Thought I would share some of the work I did way back when. It might give some folks out there some tips or ideas they can use in their rooms! After all, if I could do this, so CANNA YOU! :lol: I will be posting the pics a few a day (or more) time permitting, as I'm building out another room right now and time is limited.

I'll try to answer any questions you folks post as I see them. I'm no pro, but certainly can make things grow!

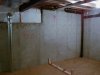
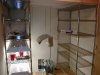
I will start with the space and rough construction, then onto cooling, ventilation, cloning, odor control and flowering. Some stealth techniques will be disclosed that proved very effective. 8)

Feel free to chime in on things you liked or didn't like...since this is some of my past work, what's done is done I'm afraid. It was a real fun learning process. I will comment on the pics and point out my mistakes, so YOU don't make the same ones I made! ;-)
 
PLANNING STAGE:

I had to scope out a location that would be practical, yet stealthy. Decided to utilize some un-used space in my un-finished basement. The area I chose was basically 10'6"x 7'x0".
Some folks will notice the 'floating' floor (it's not concrete slab). Those are common in my area due to shifting soils which leads to cracked concrete! I took advantage of this fact and used it in my room design. Notice there were no electrical outlets: this had to be addressed as well.
 
Again, not an overly large space. Remember though its not about how much space you have...vs how well you use the space you have! ;-)


In case you're wondering...I didn't spraypaint 420 on that wall either. It's actually there from the foundation pouring company! It is a measurement- 42'-0" to be exact. How cool is THAT! Kinda helped me decide on this spot to a degree I suppose. :-P
 

Attachments

  • where it is1.jpg
    where it is1.jpg
    55.9 KB · Views: 145
  • 420 on wall.jpg
    420 on wall.jpg
    56.2 KB · Views: 118
  • 420exhaust1.jpg
    420exhaust1.jpg
    54 KB · Views: 114
Looks like u can add h20 drain and maybe supply .
Does your house have natural gas? Vent the water heater in there for co2 but dont breath co2 for long it will kill brain cells fast.
 
...of the area and some building materials used.

Also a shot of a simple 4ft FL light fixture

A shot showing how small an area I really had to work with... NO worries though, I made it work out well!

Finally, I started with some bagseed stock. This was my very first grow and I wasn't going to kill good genetics with mistakes!

That's what bagseed IS good for! :)
 

Attachments

  • some bagseed sprouts to start with.jpg
    some bagseed sprouts to start with.jpg
    536.7 KB · Views: 75
  • Idea of scale with 4 ft light.jpg
    Idea of scale with 4 ft light.jpg
    405.6 KB · Views: 74
  • Area with fan and simple light.jpg
    Area with fan and simple light.jpg
    374.7 KB · Views: 60
  • Lumber and supplies1.jpg
    Lumber and supplies1.jpg
    355.8 KB · Views: 60
Once I looked around visulaizedf the space I had I started building the room into 2 rooms: One for veg one for flower.

NOTES: I'm VERY glad my new grow room is much larger. ;-)
 

Attachments

  • framing in1.jpg
    framing in1.jpg
    391 KB · Views: 46
  • framin in2.jpg
    framin in2.jpg
    405 KB · Views: 38
  • framin in3.jpg
    framin in3.jpg
    420.4 KB · Views: 42
  • framin in4.jpg
    framin in4.jpg
    398.9 KB · Views: 35
Looks like u can add h20 drain and maybe supply .
Does your house have natural gas? Vent the water heater in there for co2 but dont breath co2 for long it will kill brain cells fast.
I had a water line feed just to the left of the picture up top, decided I didn't have enough room to have running water. Glad I didn't. Also you should never vent your furnace exhaust into your house or grow room. There is CO2 in that but a larger amount of Carbon Monoxide (odorless, colorless, POISONOUS! Very deadly stuff. Anyone who tells you different is a liar.
 
With the new beans here, I've been busy with my newest rooms, so haven't had alot of time to post or even read the threads here! But since I'm exhausted, finally had to sit down and get some some pics up! :-P

Got the rooms framed in ans sheetrocked, but wanted to see how much (or how little)working space I would have. Setup the chrome adjustable shelves for the veg side (got these at Home Depot and they ROCK! 600lbs support per shelf! About $99 bucks each they're pretty much indestructable and worth every penny.

Also hung up one of the 1000 watt light fixtures to see how bright it got...even without the Panda Poly film up the room was incredibly bright. Also got real warm real quick so I took it back down and started finishing the flower side.
 

Attachments

  • LeftVegRack1.jpg
    LeftVegRack1.jpg
    432 KB · Views: 81
  • LeftVegRack.jpg
    LeftVegRack.jpg
    63.5 KB · Views: 66
  • Hortilux SuperHPS.jpg
    Hortilux SuperHPS.jpg
    386.1 KB · Views: 65
  • VegRacksandHPS.jpg
    VegRacksandHPS.jpg
    421.5 KB · Views: 72
1. Ceiling height should have been higher, I made it TOO low. :-(

2. Batwing reflectors with 1000 watt Hortilux Super HPS bulbs are extremely bright...and HOT!

3. The Chrome adjustable shelving units and floro T-8 lights I purchased are the BOMB! I use 8 racks of them today. GREAT decision. :)

4. I ended up putting Mylar on the walls, it was very reflective...but too hard to keep clean. Will never use it again for large rooms.

5. Cooling/Odor control quickly became issues that I engineered answers for. Coming up next in this thread!

6. As you can see from my avatar, I had no problems learning how to do this years ago and it is second nature now. :)
 
actually been busier than a one legged man (which I pretty much am) but figured Id get some more pics and info up! About time! :-P

As I explained earlier, the room got quite hot and stinky...and presented me with some unique engneering challenges, but nothing I couldn't handle! So...how to vent/cool both veg and flower with only ONE exhaust? Simple you make a scrubber coffin! This not only allowed the combined airflow for both areas to be scrubbed, but also muffled the fan noise quite well.

Here's some pics:
 

Attachments

actually been busier than a one legged man (which I pretty much am) but figured Id get some more pics and info up! About time! :-P

As I explained earlier, the room got quite hot and stinky...and presented me with some unique engneering challenges, but nothing I couldn't handle! So...how to vent/cool both veg and flower with only ONE exhaust? Simple you make a scrubber coffin! This not only allowed the combined airflow for both areas to be scrubbed, but also muffled the fan noise quite well.

Here's some pics:
what are the metal sheets on the top of ducting what is the purpose??? the cage thing at the bottom is that where u put the carbon filter brilo pad looking thing???
 
by the way mad reps on the design, u have me inspired to build sumthing similair for my vortex 12inch, right now my fan sits atop a filter that sucks cold air
 
But here are a few more pics:

First is the concealed doorway. I hid it behind a nice dartboard mounted to a 4x8 sheet of plywood. Worked out REAL slick. Had people over on multiple occasions to play darts...they had NO clue there was a busy growroom behind it! :lol:

Second one is the dartboard and area as seen from outside the room of course.
Still had not mudded or painted the walls yet but did get around to it later on.

Third is my room temps. Temps were right at 75-76 degrees F with the 1000 watters running AND the cloning racks on the other side as well. Humidity was a little lower than I wanted and I adjusted that later.

Last is ceiling shot of the A/C feed I had branched off to both veg and flower rooms and the single cooled exhaust that exited the top of the carbon scrubber coffin box. A removable 2" building insulation panel worked well for an access panel here.
 

Attachments

  • CONCEALED DOOR.jpg
    CONCEALED DOOR.jpg
    15.9 KB · Views: 26
  • DARTBOARD IN PLACE.jpg
    DARTBOARD IN PLACE.jpg
    419.8 KB · Views: 32
  • NICE TEMPS.jpg
    NICE TEMPS.jpg
    37.2 KB · Views: 25
  • MY EXHAUST AND COOLING.jpg
    MY EXHAUST AND COOLING.jpg
    23.8 KB · Views: 31
Back
Top