SxIstew
Well-Known Member
Just found this for anyone who is interested.
DIY Sulphur Burner/Evaporator
DIY Sulphur Burner/Evaporator
Having read about Powdery Mildew 'til my eyes bled I've come up with what I hope will be a sound, economical solution to the problem. As all roads seem to point to Sulphur Evaporators as the end-all fix for PM I eagerly looked into acquiring one. After a pretty short look I learned that these things are very simple and VERY expensive for what you get. Basically, the evaporating units are little more than a small quantity of sheet metal formed to a tube with a heat source that will allow the sulphur to vaporize and release it's hell-like goodness. The prices I ran into were staggering I thought. From $140.00 online to $200.00 local. Time to DIY for sure.
Here then is my approach to releasing the caustic fumes of perdition. I'll call it the Green Dragon. Credit for the green bulb is not mine as I copied that idea from a DIY'er that cleverly used coffee cans to make his unit.
Parts breakdown:
1- 6" recessed lighting can. $6.97
1- 6" duct end-cap $3.88
1- 100watt Green Outdoor Flood Light $5.97
1- 6' 3-conductor grounded power cord $3.99
1- Soup can .59
1- Quart container sulphur chips (Prills) $15.00
Total= $36.40
I had everything at home except the end cap and sulphur so I basically scrounged the house for anything I could MacGyver with. I'd think that anyone with an ounce or two of ingenuity could come up with better. It's that simple of a device. Just do it safely.
Here's the light can and 6" end cap (the duct coupling is not part of the assembly, it was only used to secure the cap for cutting later).

I removed the joist mounting brackets and internal components to allow for drilling.

I drilled out the existing power line hole to accomodate a romex strain relief clamp.

Soup can which will house the sulphur just above the hot bulb.

Wire the socket assembly back in. Don't fail to connect the ground!

Stuff everything back in with careful attention paid to where the wiring seats. Be careful not to pinch or chafe the wires.

Everything back in, including the 100w bulb.

The duct end cap is in place for fitting and measurement. I then used the 6" coupling from the first picture to hold the cap stable for cutting with a jigsaw. The hole is cut intentionally larger than the soup can to allow excess heat to escape. It will also use that rising heat to convectively disperse the sulphur vapor.
I am uncertain as to the appropriate distance for the can to be raised from the bulb for proper temperature (will determine that shortly), so I used a section of the joist hanging sliding mounts that were removed earlier. This will allow me to raise and lower the can conveniently so I can dial right in on the correct distance/temp.

This shows the necessary clearance all around the melting pot (soup can).

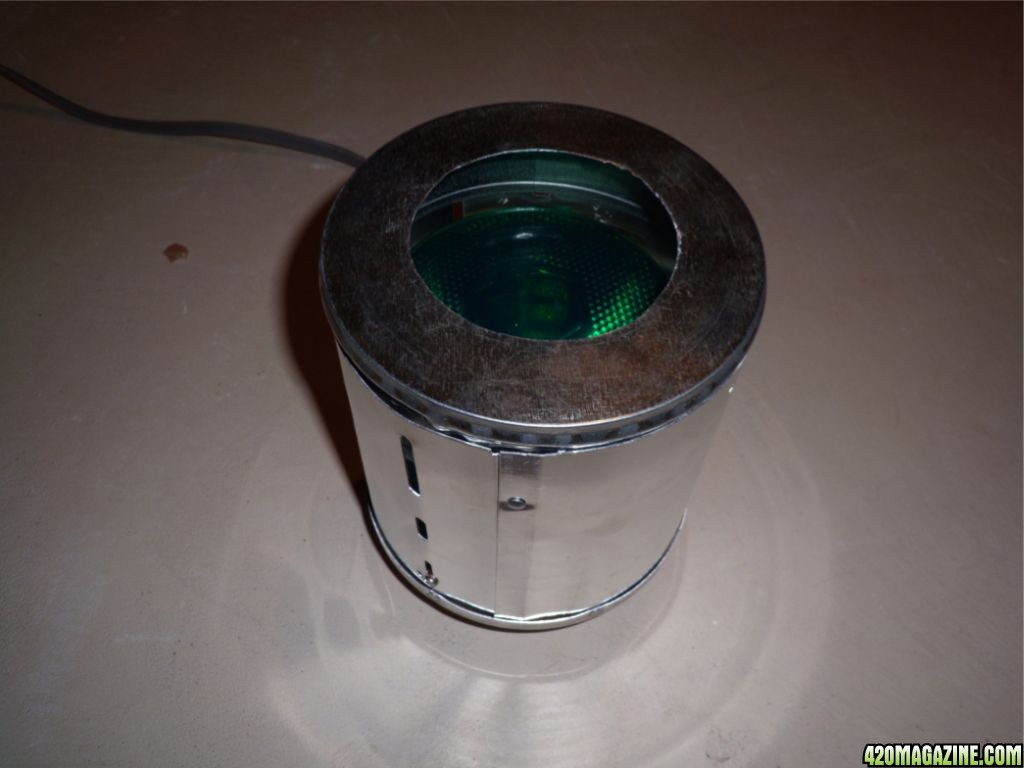
Here it is fired up for the first time.

There was a little time spent fiddling around while figuring what to use and how to put it together, but actual construction time was about 30 minutes.
Hanging safely with chains.


Evaporators should ONLY be used during dark periods. My regimen will be approx 1.5 - 2 hours every other night for a week, then once weekly or every other week for maintenance. YMMV based upon room size.
May a swift and merciless death befall my evil spores.
__________________________________________________ _______________
It appears to be breathing good. Took a peek at 15mins for safety.

Definitely up to temp now. I believe it is doing what I need it to do. The can's base is 3/8" from the bulbs surface. I forgot to mention that the rules I read for this include SHUT OFF ALL VENTILATION - RUN CIRCULATION.

Just before shutting it off.

YOU SHOULD NOT BE PRESENT while burning sulphur. This is especially so when you are uncertain of dosing levels from a DIY device. It is very important that any device you use/make should be employed judiciously and conservatively until the desired (proper) dosing level is ascertained. Safety first.
Burning Sulfur decomposes into TOXIC sulfur oxide gasses:
Sulfur dioxide (SO2) and Hydrogen sulfide (H2S).
In my case (for illustration purposes) I was wearing closed eye protection and a respirator to obtain the pictures while the unit was operating. Myself and my clothes were washed immediately after. Exposure to lungs, eyes and skin should be avoided during burning and for several hours afterward. I have read that dosing can be gauged well by observing the leaf tips. If they begin to brown that is your indicator that you've reached a point that is largely tolerable to the plant yet lethal to mildew and many insects. The effect we're going for here is selective toxicity... toxic to the spores yet not to the plant. Those are the guidelines I am using.
As for it's effectiveness, so far (after 1-treatment) I am seeing no increase in white spots on the clones that were left growing for experimental purpose. In fact there may be less. The tip ends have dried light brown. My 4 moms are affected to a much lesser degree of tip burn. This infers that young is more vulnerable than mature... an early conclusion though. I had not nor do I yet see any spots on the moms. The only downside I can see so far is the smell. Pungent best describes it for me. While about 90% of the odor has gone there is still a small whiff. I have read that this will not be the case once into smaller dosing/maintenance mode.
I hope anyone that reads this never has a need for one of these... but if you should, I hope this saves you a few bucks.
Here then is my approach to releasing the caustic fumes of perdition. I'll call it the Green Dragon. Credit for the green bulb is not mine as I copied that idea from a DIY'er that cleverly used coffee cans to make his unit.
Parts breakdown:
1- 6" recessed lighting can. $6.97
1- 6" duct end-cap $3.88
1- 100watt Green Outdoor Flood Light $5.97
1- 6' 3-conductor grounded power cord $3.99
1- Soup can .59
1- Quart container sulphur chips (Prills) $15.00
Total= $36.40
I had everything at home except the end cap and sulphur so I basically scrounged the house for anything I could MacGyver with. I'd think that anyone with an ounce or two of ingenuity could come up with better. It's that simple of a device. Just do it safely.
Here's the light can and 6" end cap (the duct coupling is not part of the assembly, it was only used to secure the cap for cutting later).
I removed the joist mounting brackets and internal components to allow for drilling.
I drilled out the existing power line hole to accomodate a romex strain relief clamp.
Soup can which will house the sulphur just above the hot bulb.
Wire the socket assembly back in. Don't fail to connect the ground!
Stuff everything back in with careful attention paid to where the wiring seats. Be careful not to pinch or chafe the wires.
Everything back in, including the 100w bulb.
The duct end cap is in place for fitting and measurement. I then used the 6" coupling from the first picture to hold the cap stable for cutting with a jigsaw. The hole is cut intentionally larger than the soup can to allow excess heat to escape. It will also use that rising heat to convectively disperse the sulphur vapor.
I am uncertain as to the appropriate distance for the can to be raised from the bulb for proper temperature (will determine that shortly), so I used a section of the joist hanging sliding mounts that were removed earlier. This will allow me to raise and lower the can conveniently so I can dial right in on the correct distance/temp.
This shows the necessary clearance all around the melting pot (soup can).
Here it is fired up for the first time.
There was a little time spent fiddling around while figuring what to use and how to put it together, but actual construction time was about 30 minutes.
Hanging safely with chains.
Evaporators should ONLY be used during dark periods. My regimen will be approx 1.5 - 2 hours every other night for a week, then once weekly or every other week for maintenance. YMMV based upon room size.
May a swift and merciless death befall my evil spores.
__________________________________________________ _______________
It appears to be breathing good. Took a peek at 15mins for safety.
Definitely up to temp now. I believe it is doing what I need it to do. The can's base is 3/8" from the bulbs surface. I forgot to mention that the rules I read for this include SHUT OFF ALL VENTILATION - RUN CIRCULATION.
Just before shutting it off.
YOU SHOULD NOT BE PRESENT while burning sulphur. This is especially so when you are uncertain of dosing levels from a DIY device. It is very important that any device you use/make should be employed judiciously and conservatively until the desired (proper) dosing level is ascertained. Safety first.
Burning Sulfur decomposes into TOXIC sulfur oxide gasses:
Sulfur dioxide (SO2) and Hydrogen sulfide (H2S).
In my case (for illustration purposes) I was wearing closed eye protection and a respirator to obtain the pictures while the unit was operating. Myself and my clothes were washed immediately after. Exposure to lungs, eyes and skin should be avoided during burning and for several hours afterward. I have read that dosing can be gauged well by observing the leaf tips. If they begin to brown that is your indicator that you've reached a point that is largely tolerable to the plant yet lethal to mildew and many insects. The effect we're going for here is selective toxicity... toxic to the spores yet not to the plant. Those are the guidelines I am using.
As for it's effectiveness, so far (after 1-treatment) I am seeing no increase in white spots on the clones that were left growing for experimental purpose. In fact there may be less. The tip ends have dried light brown. My 4 moms are affected to a much lesser degree of tip burn. This infers that young is more vulnerable than mature... an early conclusion though. I had not nor do I yet see any spots on the moms. The only downside I can see so far is the smell. Pungent best describes it for me. While about 90% of the odor has gone there is still a small whiff. I have read that this will not be the case once into smaller dosing/maintenance mode.
I hope anyone that reads this never has a need for one of these... but if you should, I hope this saves you a few bucks.