lurkmaster
Well-Known Member
First off, this concept can be expanded to whatever size as long as there is one smaller tub that fits in the larger one I originally used 18 and 10 gallon rubbermaid tubs but I like these tubs much better, just keep in mind you will probably need a bigger pump if you go TOO much bigger.
List Of Components
1x Large Itso Tub ($9)
1x Medium Itso Tub ($7)
1x Itso Tub Lid (included)
1x 200 GPH water pump ($20 at petco)
1x 360 degree sprinkler head ($.89)
1x Tubing/fittings to attach pump to sprinkler head ($2)
---------------------------
Total $39.89
This is assuming you already have net pots with lids, I use 2" net pots. I got mine for free, and you can't buy them at target/petco/home depot. I built my friends using aerogarden (the ONE piece ones work best) nets it works the same. I made my net pot lids out of a soft neoprene-like bulletin board, it is firm, but gives enough for a plant to expand its stem.
List Of Tools Required
- Power Drill
- Assorted bits ranging from 1/4" to 1-1/4" to 2" (or net pot size)
ITSO tubs WHAT are they and WHY am I using them?
ITSO tubs are from target. They are very heavy duty plastic that are solid colored and ready to use w/o painting, and just so happens to be a great size for this 2 gallon design. If your local target doesnt have them or doesnt exist you can buy them online here and here
but any kind of rubbermaid heavy roughneck tub set will do, I used to use a medium and small tub for 6 pods but just downsized. Use whatever tubs you want, just make sure you choose carefully because you want these to have a really good lip on the top to keep the water from splashing out.
Okay so now lets get started.
STEP 1

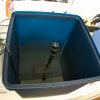
Drill your drainage holes in the small tub. I like to put mine on the outsides because that is where water usually tends to build up, don't go crazy on the holes, you can always add more later if you see that its not draining well enough. You can't undo the holes you added that you don't need.
STEP 2

Now drill a centered hole for your sprayer to come up through. (1-1/4" should be good)
STEP 3

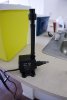
Build the pump head assembly.
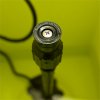
I made this one with 2 toro funny pipe to thread adapters and a funny pipe with an orbit 360 shrub head.
The way your head looks will be different depending on what kind of attachment your pump is. This is not the simplest method, they sell 6" extensions that work perfectly, I just made this because I had the parts already. But it needs to be long enough for the head to pop out and spray inside the tub when the smaller tub is firmly on top .
STEP 4

Line your pump up in the middle with your centered hole and make sure the height of the sprayer head is okay and not too high or too low. I usually fill it up with water and test it at this point (with the lid on obviously, you don't want it spraying everywhere!)
STEP 5

Drill holes for your net pots and remember to space them out as much as you can.
Taking your plants in and out is a snap you just take the top box out completely, then check/fill your res or just take your plants out to get a closer look without worrying about the roots.
Taking a peek at your roots is super simple too with these tubs, you just pop one side open, but be warned, if its running youre going to get water everywhere.
I have been running my plants with the pump on 24/7, this is essentially a spiffed up hydro grow that aerates the roots at the same time it hydrates them instead of aerating the water they are in.
You can use this system from clone or seed to harvest.
I have found the cheapest and simplest way to get plants ready for this setup is to just start them in soil, then once they are big enough to support their leaves on the net pot lid I carefully depot the plant and wash all the soil off the roots and clean out any chunks that could cause agitation, there shouldnt be much since its a tiny baby.
But you can also use rockwool cubes or any other meduim to start it.
I have only tried to root one clone in this system but it rooted in 48 hours with full strength nutes.
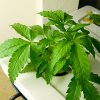
Results of Aero Setup in Flower

2 weeks later

Results of Aero Setup in Veg

1 week later

Sorry I don't have pictures of harvested bud.. but you can see how well this works.
Note, The earlier ones had blue and white lids because they were in a different tub, its been the same design all the way through.
Also I might add all of these plants were grown on 12/12 from seed and transplanted to the aero setup. The unfortunate male is 25 days from sprout on 12/12 all the way! Feel free to check my sig to see how its been going. I have made alot of changes along the way so your results will proabbly be better than mine.
List Of Components
1x Large Itso Tub ($9)
1x Medium Itso Tub ($7)
1x Itso Tub Lid (included)
1x 200 GPH water pump ($20 at petco)
1x 360 degree sprinkler head ($.89)
1x Tubing/fittings to attach pump to sprinkler head ($2)
---------------------------
Total $39.89
This is assuming you already have net pots with lids, I use 2" net pots. I got mine for free, and you can't buy them at target/petco/home depot. I built my friends using aerogarden (the ONE piece ones work best) nets it works the same. I made my net pot lids out of a soft neoprene-like bulletin board, it is firm, but gives enough for a plant to expand its stem.
List Of Tools Required
- Power Drill
- Assorted bits ranging from 1/4" to 1-1/4" to 2" (or net pot size)
ITSO tubs WHAT are they and WHY am I using them?
ITSO tubs are from target. They are very heavy duty plastic that are solid colored and ready to use w/o painting, and just so happens to be a great size for this 2 gallon design. If your local target doesnt have them or doesnt exist you can buy them online here and here
but any kind of rubbermaid heavy roughneck tub set will do, I used to use a medium and small tub for 6 pods but just downsized. Use whatever tubs you want, just make sure you choose carefully because you want these to have a really good lip on the top to keep the water from splashing out.
Okay so now lets get started.
STEP 1
Drill your drainage holes in the small tub. I like to put mine on the outsides because that is where water usually tends to build up, don't go crazy on the holes, you can always add more later if you see that its not draining well enough. You can't undo the holes you added that you don't need.
STEP 2
Now drill a centered hole for your sprayer to come up through. (1-1/4" should be good)
STEP 3
Build the pump head assembly.
I made this one with 2 toro funny pipe to thread adapters and a funny pipe with an orbit 360 shrub head.
The way your head looks will be different depending on what kind of attachment your pump is. This is not the simplest method, they sell 6" extensions that work perfectly, I just made this because I had the parts already. But it needs to be long enough for the head to pop out and spray inside the tub when the smaller tub is firmly on top .
STEP 4
Line your pump up in the middle with your centered hole and make sure the height of the sprayer head is okay and not too high or too low. I usually fill it up with water and test it at this point (with the lid on obviously, you don't want it spraying everywhere!)
STEP 5
Drill holes for your net pots and remember to space them out as much as you can.
Taking your plants in and out is a snap you just take the top box out completely, then check/fill your res or just take your plants out to get a closer look without worrying about the roots.
Taking a peek at your roots is super simple too with these tubs, you just pop one side open, but be warned, if its running youre going to get water everywhere.
I have been running my plants with the pump on 24/7, this is essentially a spiffed up hydro grow that aerates the roots at the same time it hydrates them instead of aerating the water they are in.
You can use this system from clone or seed to harvest.
I have found the cheapest and simplest way to get plants ready for this setup is to just start them in soil, then once they are big enough to support their leaves on the net pot lid I carefully depot the plant and wash all the soil off the roots and clean out any chunks that could cause agitation, there shouldnt be much since its a tiny baby.
But you can also use rockwool cubes or any other meduim to start it.
I have only tried to root one clone in this system but it rooted in 48 hours with full strength nutes.
Results of Aero Setup in Flower
2 weeks later
Results of Aero Setup in Veg
1 week later
Sorry I don't have pictures of harvested bud.. but you can see how well this works.
Note, The earlier ones had blue and white lids because they were in a different tub, its been the same design all the way through.
Also I might add all of these plants were grown on 12/12 from seed and transplanted to the aero setup. The unfortunate male is 25 days from sprout on 12/12 all the way! Feel free to check my sig to see how its been going. I have made alot of changes along the way so your results will proabbly be better than mine.