smokiedog
Well-Known Member
So after my grow room started to reek of green goodness I decided I really needed to get carbon filter installed, and fast. My grow room is 4 x 4 x 6 tall, with 12 plants growing in 5 gallon rubbermaid office trash cans under a 400 w HPS. I mention the room size and set up so you know what capacity it will handle. I really didn’t want to spend 50 to 150 bucks for a filter for this room so I took a trip to the local Depot and this is what I came up with….
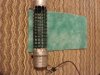
1-universal activated carbon hvac filter @ $9.99
this was pretty cool, it came with a rigid black plastic screen, a green pre-filter (supposedly catches larger particle before the carbon layer) and a black activated carbon filter. These 3 layers measured about 18 inches x 24 inches, I’m guessing, I did this a few weeks ago and never measured when I did it. I wasn’t going to post it if it didn’t work.
1-4 inch diameter hvac end cap $2.49
1-4 inch diameter hvav adapter $2.49 (I don’t know what its called but it was in the isle with all the other hvac stuff and stove pipe stuff)
besides it being cheap, the next best thing is that it is very easy to make.
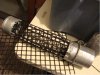
Take the plastic screen and roll it up tightly (like twistn a jibba) and then let it unroll on its own. You may need to bend any hard angled edges out of it, just roll it a few times, I used a pvc pipe to help roll it. Once rolled tightly like a tube, insert into the end cap. Figure out where you need to trim it with scissors so that an inch overlaps itself when inserted into the end cap. Trim off the excess because you want it hollow. Then zip tie the seam shut so it stays rolled up at the right diameter.
Next, insert the other end of the rolled screen into the hvac adapter (this is just a piece of 4 inch hvac adapter with a flange on it) this has tabs that bend on one side.
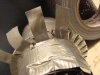
I bent the tabs over so it was secured the screen, I lucked out that tabs happened to be as wide as the 1 inch squares in the screen. I let some of the screen hang out of the other end of the adaptor and trimmed it off after, this way the adaptor and the screen support each other and stay ridgid. Bend them over, duct tape the top end cap in place and duct tape the bottom adaptor in place. Make sure you line up the filter material to make sure the fit is right.
All you basically do from here is trim off the extra filter material that overlaps the end of the filter frame and then roll the assembly up in the filter material, it should wrap around about twice. Zip tie the filter material in place and duct tape in place at either end.
Inspect your handy work and make sure there are no gaps or leaks in the duct tape.
Lastly, roll up the extra material the long way, throw a couple of zip ties around it and gently slide it into the open end of the filter.
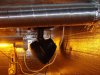
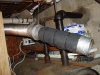
I don’t know how often it will need to be changed, but it will be as easy as removing a layer of tape and changing the filter and retaping. I have this hooked up outside my sealed grow room to a 4 inch alum dryer duct vent that goes thru the wall and connects to a 4 inch inline duct fan (I also got the inline fan at H depot for 21 bucks and the vent line was $8. So for $45 bucks you can build yourself a pretty sweet set up on the cheap.
This has changed my grow room, basement and even my kitchen upstairs from a skunky funky smelly jungle smell to no odor whatsoever.
Let me know if you have questions…
Thanx for lookn
1-universal activated carbon hvac filter @ $9.99
this was pretty cool, it came with a rigid black plastic screen, a green pre-filter (supposedly catches larger particle before the carbon layer) and a black activated carbon filter. These 3 layers measured about 18 inches x 24 inches, I’m guessing, I did this a few weeks ago and never measured when I did it. I wasn’t going to post it if it didn’t work.
1-4 inch diameter hvac end cap $2.49
1-4 inch diameter hvav adapter $2.49 (I don’t know what its called but it was in the isle with all the other hvac stuff and stove pipe stuff)
besides it being cheap, the next best thing is that it is very easy to make.
Take the plastic screen and roll it up tightly (like twistn a jibba) and then let it unroll on its own. You may need to bend any hard angled edges out of it, just roll it a few times, I used a pvc pipe to help roll it. Once rolled tightly like a tube, insert into the end cap. Figure out where you need to trim it with scissors so that an inch overlaps itself when inserted into the end cap. Trim off the excess because you want it hollow. Then zip tie the seam shut so it stays rolled up at the right diameter.
Next, insert the other end of the rolled screen into the hvac adapter (this is just a piece of 4 inch hvac adapter with a flange on it) this has tabs that bend on one side.
I bent the tabs over so it was secured the screen, I lucked out that tabs happened to be as wide as the 1 inch squares in the screen. I let some of the screen hang out of the other end of the adaptor and trimmed it off after, this way the adaptor and the screen support each other and stay ridgid. Bend them over, duct tape the top end cap in place and duct tape the bottom adaptor in place. Make sure you line up the filter material to make sure the fit is right.
All you basically do from here is trim off the extra filter material that overlaps the end of the filter frame and then roll the assembly up in the filter material, it should wrap around about twice. Zip tie the filter material in place and duct tape in place at either end.
Inspect your handy work and make sure there are no gaps or leaks in the duct tape.
Lastly, roll up the extra material the long way, throw a couple of zip ties around it and gently slide it into the open end of the filter.
I don’t know how often it will need to be changed, but it will be as easy as removing a layer of tape and changing the filter and retaping. I have this hooked up outside my sealed grow room to a 4 inch alum dryer duct vent that goes thru the wall and connects to a 4 inch inline duct fan (I also got the inline fan at H depot for 21 bucks and the vent line was $8. So for $45 bucks you can build yourself a pretty sweet set up on the cheap.
This has changed my grow room, basement and even my kitchen upstairs from a skunky funky smelly jungle smell to no odor whatsoever.
Let me know if you have questions…
Thanx for lookn