Considering PP-L Lighting in Veggie and Flower Rooms

yankeegreen

Active Member
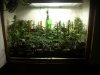
Hey guys, I am currently planning out a grow space with two separate rooms - a 3 x 4 veg and a 5 x 4 flower room (build thread) but thought I'd move some of the discussion to a dedicated lighting thread. I've pretty much decided to build my own lighting with PL-L lights in the veg room and am also thinking of using PP-L as an experiment in the flower room.

I am pretty familiar with CFL use, but the PL-L bulbs are new to me. They are ~2x more luminous than T5 and come in 2' lengths up to 55W ~4800 lumens per bulb. Like CFLs, since they don't get real hot you can get them pretty close to the plants wihtout burning. The idea is the closer the light to the plant, the more efficient use of the lumens. Like other CFL types, there is a wide range of color temps, from 3000k to 6500k. I've found some discussion on using the PP-Ls in veg rooms but very little on using them for flower.


For flowering, I am thinking about using vertical concepts and mounting a number (maybe 8?) of these bulbs vertically around a tube or octagon in the middle of the flower room and setting the plants around it. The DIY fixture would be hung from the ceiling and a fan below the fixture would help cool any hotspots. I'm thinking that 8 bulbs with a combined ~40,000 lumens should be a good starting point since the light would be used more efficiently as the plants would be inches rather than feet away from the bulbs as in other vertical setups.


Plants could be rotated periodically to face the light or trained from vegging (modified LST) to grow toward the light or a vertical SCROG could be used in flowering set up (conceptual drawing only, no consideration of reflectors, angling of lights, etc in design but suggestions welcome!).

Vertical PP-L.gif


What do you think? Any experience with PL-L in grow flower room? Any experience with vertical PP-L? Other considerations?
 

justanotherbozo

Well-Known Member
...high man, first, it's PLL not PPL, lol, not that i care mind you but if you go searching you won't find what you're looking for if you search for ppl.

anyway, here is a link to the PLL club where you will find links to some really cool grows as well as links to places where you can source all the parts you need from bulbs to sockets to ballasts, ...as well as any wiring info you might need (wiring these is a snap).

PLL Club. (if you don't know, now you know)

peace, bozo
 

yankeegreen

Active Member
Here's another option.

Vertical PL-L #2.gif

More efficient use of floor space, easier to add more lights/plants), covers more of each plant (no dark side/light side), each bulb height can be adjusted independently and distributes more light overall. Trade-offs: requires more bulbs, higher expense and each plant does not get the same amount of light.
 

justanotherbozo

Well-Known Member
Here's another option.

More efficient use of floor space, easier to add more lights/plants), covers more of each plant (no dark side/light side), each bulb height can be adjusted independently and distributes more light overall. Trade-offs: requires more bulbs, higher expense and each plant does not get the same amount of light.
keep in mind that with flouro's your light won't be as intense as an HID so the key to success with them is to grow shorter plants, frankly, all you need to do is root your clones, veg for a week after you pot them up and then flip them, believe me, if you start them at 6 - 8 inch's tall when they finish they will be 14 - 18 inch's.

...which also means you won't need 3 gallon pots, if it were me i'd be using 2liter or 3liter pop-bottle hempy's, ...here's a look inside my old flower box where i ran a high-density micro-SOG with 55x 1liter pots and i pulled 10 per week and averaged about 2 ounces every pull, ...it was very labor intensive though which is why i don't run it any more.

...this was after i'd switched to my DIY fabric 'smart-pots', ...lol, i'm having trouble finding pics of the 1liter pots but this should still illustrate what i'm talking about, ...my headroom was VERY limited in that cab.


peace, bozo
 

Attachments

yankeegreen

Active Member
Looks like you've reached maximum density in that cabinet for sure! ;-)

keep in mind that with flouro's your light won't be as intense as an HID so the key to success with them is to grow shorter plants, frankly, all you need to do is root your clones, veg for a week after you pot them up and then flip them, believe me, if you start them at 6 - 8 inch's tall when they finish they will be 14 - 18 inch's.
What I've learned from scouring all I can on PL-Ls is that they are technically flouros but are approaching intensity of HIDs. Seems this should allow the grower to break out of the micro approach with the right configuration. That's why I have gotten so excited - am I over simplifying?
 

jbmoviefan

Active Member
Other considerations?[/QUOTE]

Interesting concepts, I personally use a variety of 2700k and 6500k 40w spiral cfls for my entire process. I enjoyed the seemorebuds cfl grow tutorial and was pleased with the results following the guide produced for me. I did expand in several ways and find now that I have one of the easiest and most efficient setups a beginner could hope for. I start with a standard 48"x48"x79" grow tent. I build a 2 shelf PVC frame for the tent with an 18" step in area for working space and fan placement. This gives me two 30"x48"x30" shelves and one 30"x48"x18" shelf for new clones. I build wiring (18 gauge lamp cord) for 12 sockets inside of 48" PVC lengths and place 2 lengths over the larger shelves and 1 length over the smaller shelf for a total of 60 sockets in the tent. I use small gauge rhubarb wire and using a drill twist 4 strands of 4ft wire to create a high tension bendable/adjustable arm for each socket (this give me complete control over the placement of each bulb in the entire tent). The end result for me is a ideal flowering tent, adding 3 new clones per week creating a perfect 24 plant cycle with average yields of 2oz+ of dense sticky bud per plant. I use 3 cheap 6" duct fans, 1 for intake and 2 for exhaust controlled with a cheap temp. control unit maintaining temps between 80-85F. I used the 2liter bottle CO2 generator DIY on this site as a recent addition and have already seen increased growth and yield using 6 bottles inside 1 larger container. I grow 100% organic across the board and have had great results using this method, enough so that I recently bought a second and third tent and quit my job. I only have 15 harvests in so far (they rack up quickly when you harvest every week), but each one has been better in quality and yield than the one before, and with more than a dozen different strains growing in the same tent I never get bored. Everything about my setup is fairly standard except the adjustable wire arms, but I think they are large part of the reason I get such good results, every bulb is only 1-2 inchs away from the plants, and always at a perfect angle to expose the largest surface area of the light. Only draw back I've found is that I have to adjust the lights two times per day at about 15 minutes per visit. The whole setup was under $600, and only draws 24amp of electricity (evenly spit over 2 outlets). I put all my new clones in small veg. boxes and transfer the best 3 to the flowering tent each week. I do no pruning, training, pinching, or breaking and always get 1 great top cola and 3-5 minor colas that are equally dense as the top. Glad to show pics if anyone's is interested, thanks!
 

yankeegreen

Active Member
Other considerations?

Interesting concepts, I personally use a variety of 2700k and 6500k 40w spiral cfls for my entire process. I enjoyed the seemorebuds cfl grow tutorial and was pleased with the results following the guide produced for me. I did expand in several ways and find now that I have one of the easiest and most efficient setups a beginner could hope for. I start with a standard 48"x48"x79" grow tent. I build a 2 shelf PVC frame for the tent with an 18" step in area for working space and fan placement. This gives me two 30"x48"x30" shelves and one 30"x48"x18" shelf for new clones. I build wiring (18 gauge lamp cord) for 12 sockets inside of 48" PVC lengths and place 2 lengths over the larger shelves and 1 length over the smaller shelf for a total of 60 sockets in the tent. I use small gauge rhubarb wire and using a drill twist 4 strands of 4ft wire to create a high tension bendable/adjustable arm for each socket (this give me complete control over the placement of each bulb in the entire tent). The end result for me is a ideal flowering tent, adding 3 new clones per week creating a perfect 24 plant cycle with average yields of 2oz+ of dense sticky bud per plant. I use 3 cheap 6" duct fans, 1 for intake and 2 for exhaust controlled with a cheap temp. control unit maintaining temps between 80-85F. I used the 2liter bottle CO2 generator DIY on this site as a recent addition and have already seen increased growth and yield using 6 bottles inside 1 larger container. I grow 100% organic across the board and have had great results using this method, enough so that I recently bought a second and third tent and quit my job. I only have 15 harvests in so far (they rack up quickly when you harvest every week), but each one has been better in quality and yield than the one before, and with more than a dozen different strains growing in the same tent I never get bored. Everything about my setup is fairly standard except the adjustable wire arms, but I think they are large part of the reason I get such good results, every bulb is only 1-2 inchs away from the plants, and always at a perfect angle to expose the largest surface area of the light. Only draw back I've found is that I have to adjust the lights two times per day at about 15 minutes per visit. The whole setup was under $600, and only draws 24amp of electricity (evenly spit over 2 outlets). I put all my new clones in small veg. boxes and transfer the best 3 to the flowering tent each week. I do no pruning, training, pinching, or breaking and always get 1 great top cola and 3-5 minor colas that are equally dense as the top. Glad to show pics if anyone's is interested, thanks!

Thanks for the info. Sounds like you've worked out a productive process. Love to see the pics!
 

jbmoviefan

Active Member
I've also considered creating a large cone with a reflective interior and then lining the interior vertically with with the PL-L/straight tube CFLs bulbs and enough PC fans to properly ventilate. Basically a perfect single plant chamber, would save me time adjusting all the lights, only have to move the cone up, or the plant down. Saw a great DIY on using the ballast from one of my spiral bulbs to remotely power a standard straight tube CFL of the same wattage. I'd be more inclined to use the PL-L bulbs if they were available in a better flowering spectrum, though I'm sure I'll sample them in a new veg box I'm making up soon. I'll take some good pics of my setup tonight and post them later.
 

yankeegreen

Active Member
I was hoping for a little more feedback but I think at this point I am going to go with PL-L for the veg room and a more traditional HPS system for flowering.
 

justanotherbozo

Well-Known Member
I was hoping for a little more feedback but I think at this point I am going to go with PL-L for the veg room and a more traditional HPS system for flowering.
...i'd say that will give you a winning combination.

here's a couple pics of my new (7 months) flower op with a single 600HPS, ...i just pulled my 3rd crop from this room and each harvey gets better, i figure maybe by the 5th it'll be fully dialed in and i'm fully expecting to get a gram per watt per cycle by then.

View attachment 2488329 View attachment 2488330 DSCI0179.jpg

peace, bozo
 

yankeegreen

Active Member
Nothing wrong with that! Do you have an active exhaust for the closet or just the fans? I saw on an earlier post that you had passive intake under the floor...
 

justanotherbozo

Well-Known Member
Nothing wrong with that! Do you have an active exhaust for the closet or just the fans? I saw on an earlier post that you had passive intake under the floor...
..yeah man, i designed it to pull air from under the floor and up through the back of the space and yeah, i have a CanFan MaxFan 6inch for the exhaust, the one with the three speed speed controller built in.

...here's a few pics and you can see i used a liberal amount of Panda Plastic, lol. (sorry the pics are out of order)

DSCI0307.jpg DSCI0299.jpg DSCI0285.jpg

DSCI0280.jpg DSCI0277.jpg DSCI0172.jpg

DSCI0184.jpg DSCI0274.jpg DSCI0275.jpg

peace, bozo
 
Top