Trying My Hand At Glass Pipe Making

Status
Not open for further replies.

researchkitty

Well-Known Member
Making me think about a Pyrex/Borosilicate Honey Oil Extractor that I could easily make.......... Since you empty honey oils extract into a Pyrex bowl, one tells me temperatures wouldnt let the pipe crack, sure would be fun to watch too! Hmmmmmmmmmmm. So many ideas. =)
 

researchkitty

Well-Known Member
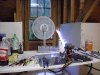
Color was fun to learn. Here's every piece except the bubbler I made. The bubbler looks so awful I think I might just throw it away or maybe have a "RIU Donkey" award where the biggest jackass on the forum gets a free shitty bubbler. :)


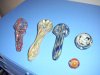
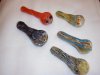
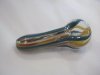
002: From left to right, my first real coloring attempt and then as we go to the right you'll see the improvements in just 3 pipes. I also made two marbles.


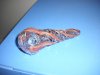
003: I botched it up, didnt make the tubes consistancy that I wanted, so I gave it a funky spiral instead. It looks like a christmas ornament except in a caramel color. It has a tiny crack in it due to the consistancy issue. Since I save all my work, on the shelf it goes!


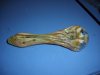
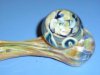
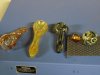
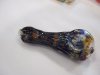
004: My new bowl pushing technique starts the hole for the bowl at the base of the head (head = bubble). This allowed me to push the bowl with thicker glass, and allows you to SEE the bowl as your smoking it, instead of the bowl being perfectly horizontal when smoking it. I'm going to be doing them all this way from now on. The little gentle swirl was pretty neat.


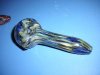
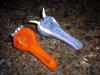
005: The color combinations for this really worked out well. The carb is a tiny bit off, but I left it that way since everyone likes carbs in different spots, so might as well make a mistake into someone elses preference!


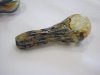
006: Hard as hell to photograph this one. It's a butterscotch-colored magic mushroom with a pomegrante base. I used dirty glass when making it since it was my first mushroom attempt, so its kinda ugly, but now that I know how, they will be better.


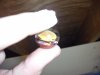
007: This marble is about 2" in diameter, maybe 2 1/8" at best. Its made by pressing a flat disc on the end of a rod (called a punty), and then layering it with the bottom colors then clear on the top. After, the bottom half was coated again in a cobalt blue color (I know, I love cobalt blue) and the accented with 3 layers of dots. Each layer of dot is melted in, then the next dot, melt, next dot, melt, and that's what gives it the blue center, light blue ring, then white outer ring. After the dots are firmly set and the marble is rounded, a tungsten pick is then used to "rake" the molten glass to give those triple dots the heart shaped swirl you see on the next photo.


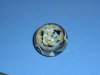
008: The back side of the marble.


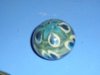
009: Blury, but you get the hint. Its sitting on the bowl of another spoon just so it stays still while taking that photo :)


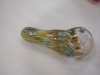
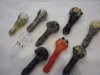
010: All 3 pipes plus the 2 marbles, but with no camera flash.


011: Sure go through a lot of soda............ =)


Next I'm going to work on adding milliforetti knobs on the pipes as well as many more color and shaping choices.

So I guess color wasnt too hard after all.................

Thanks for reading as always!

Kitty
 

Attachments

fdd2blk

Well-Known Member
way impressive. very nice progress. :clap:

i found using color helped me a lot. it helps to see where the heat is and it stiffens things up a little as well. :wink:

keep doing what you're doing. it looks great. :cool:

bongsmilie
 

jhopkins34

Active Member
Sick job, the first piece looks pretty sick, and the flash makes it look like there's a diamond in the bottom of the bowl, and both the second and third pieces are very nice as well, I think the second one looks really elegant which I like a lot, and then I love the mixture of colors on the third pipe, and both those marbles are pretty sweet
 

researchkitty

Well-Known Member
A cavity broke while blowing a pipe about a week ago, so Tuesday it now needs a root canal. :( That's why I've been a bit lazy at production! :) :)


Pic 001: Here's the newest stuff I've made...........


Pic 004: Its crayon red or crayon orange, I really forget. Most of the cane I've made from base color sticks were the blue/tan/white/purple color so this was just a straight red/orange stick to see what the differences were. I've got at least 150 colors to choose from so the choices are endless!


Pic 005: A very gently wrapped pipe, intended to be more clear than it is, but it worked.


Pic 006: Bulls-eye moretti on the ends, and more textured.


Pic 007: Instead of a spiral wrap, these are thick lines with clear surroundin them to keep the same shape. The same exact coloring scheme is two pictures above (Pic 005), but this one went left to right instead of spinning it around the pipe the entire length. This is to me one of the reasons color is difficult, because just a simple style change makes pieces look so varied.


Pic 008: Another pipe


Pic 009: So I took these pipes down to the pipe store. ........and the local pipe store bought a few. So, I've officially SOLD two pipes! It sounds silly after typing this out, but it's a major accomplishment for me to have someone actually pay cold hard cash for work that you yourself arent really sure if its good enough. He bought the butterscotch colored and the crayon red colored pipes and told me to come back in a week with any new stuff I make.

I spent all the money he paid me for the spoons on Cyclone blunt wrappers but hey its the same thing! :)

Dentist gave me some drug (Lortab?) for the tooth pain so I think I'll go upstairs and work some more. Thanks as always for reading! Everything is for sale, and cheap! :)
 

Attachments

glassblower3000

Well-Known Member
it's a long hard road....just don't give up...........p.s i'm here don't be affraid to ask me anything{iv'e been torchin' since 98)..I know all the tricks!!!good luck.
 

jrinlv

Well-Known Member
Wow huge improvement in a short time, good job.

i have blow glass before and am surprised to not see a fire extinguisher at all.
I would put down something on the floor and work table besides the mirror that is more burn proof, that's just me.
I would also work on good ventilation like a hood over your station, old light hoods work great for this, all those fumes are toxic remember.

I am super jealous of the space you have to work in, be safe and keep posting...JR
 

researchkitty

Well-Known Member
Thanks everyone! On the fire extinguisher note, I do have one, its just on a wall with nothing else on it so it'd be a boring photo! :) Everything I make is for sale, I dont think they'll be over $15 for a spoon till they look a *lot* better. $15 barely pays for the consumables and the time too, so you get what you pay for =)
 

researchkitty

Well-Known Member
My internet connection in the workshop stinks. Too far away from the wireless router for stickam to work reliable enough. Got to see each other for about 2 minutes total fdd. :(

Two more quick ones. The orange one with purple/white dots is a little sloppy -- I didnt take enough of the end of the pipe off before making the bubble shape.... but the purple horned one I'm pleased with.


Attachments

researchkitty

Well-Known Member
Lets see how this works over time................... Its shopping cart takes PayPal, and automatically only sells one of each pipe, then marks it as sold instead of for sale. Pretty neat little software.

www.kittysglass.com

Already put up a 25% off code on the site for anyone who likes it!
 

fdd2blk

Well-Known Member
Lets see how this works over time................... Its shopping cart takes PayPal, and automatically only sells one of each pipe, then marks it as sold instead of for sale. Pretty neat little software.

www.kittysglass.com

Already put up a 25% off code on the site for anyone who likes it!

nice site. :clap:

i kinda feel challenged by your progress. you are inspiring me to get off the couch. you're gonna blow right by me if i don't keep up on my game. :wink:
 
Status
Not open for further replies.
Top