Thermal Grease Application Method
- Thread starter HydroDC
- Start date
Doer
Well-Known Member
Tape has a higher Impedance. So, it can be used, but you not doing yourself a favor.What about using 3M 8810 or 8815 thermal tape? Anyone gone down this road yet?
Doer
Well-Known Member
There are polished transfer surfaces, like CPUs and there are sadly pitted surfaces like the Cree Ceramic. And we are either concerned with the very lowest impedance possible or we are aren't.
So, dab and smush is likely to get you a burned COB array, if not very lucky. And too much interface material is similar to no interface material and will likely get you a burned COB array, if not very lucky.
What we are discussing then, is throwing away electrons we paid for. Somewhere in the range is a theoretical sweet spot, Momma Bear. Not too much electron loss, with minimized chance of smoking the array. We know heat and electron leakage are related to current, but the hotter the junction the more the energy is lost that did not turn into photons.
Last edited:
stardustsailor
Well-Known Member
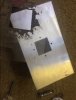
Cree CXA 3070 ( 3000K -80Ra ) for 2500 hours at 1.5 A , Ta= 35 C.
Results of Poorly applied TIM (Arctic silver 5 ) and overtighten IDEAL holder ..
Temperature of LES was well beyond 100 C .
Still none of the COBs chips was fried .
COB WAS fully operational .
Until dissection was done ...
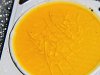
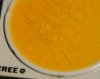


^^^ Epoxy glued chips on the ceramic board.
Results of Poorly applied TIM (Arctic silver 5 ) and overtighten IDEAL holder ..
Temperature of LES was well beyond 100 C .
Still none of the COBs chips was fried .
COB WAS fully operational .
Until dissection was done ...
^^^ Epoxy glued chips on the ceramic board.
robincnn
Well-Known Member
Cree CXA 3070 ( 3000K -80Ra ) for 2500 hours at 1.5 A , Ta= 35 C.
Results of Poorly applied TIM (Arctic silver 5 ) and overtighten IDEAL holder ..
Temperature of LES was well beyond 100 C .
Still none of the COBs chips was fried .
COB WAS fully operational .
Until dissection was done ...
View attachment 3426017
View attachment 3426019
View attachment 3426020
View attachment 3426021
^^^ Epoxy glued chips on the ceramic board.
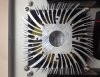
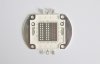
You can cut a hole in the middle of heatsink. No TIM required, No holder overtighten issue and it works perfectly fine.
But you will need to use this advanced Chinese COB.
robincnn
Well-Known Member
I aligned stencil with back of Vero 29 and marked the position of 4 hole position on stincil. Then aligned the 4 holes in stencil with the 4 holes on heatsink and applied TIM. Then Vero on top and moved it a little back and forth to even out TIM.You might try outlining the Cob on the heatsink surface before applying the paste. Done this way you would only need to insure the contact was square with the TIM layer and aim for the circle.
littlejacob
Well-Known Member
Bonjour
When i read all the problems you can get with TIM when you don't use it the good way...I think I should go with thermopads it will be better for a noob like me (and i don't want to fry my 3590's)
Thanks for sharing
When i read all the problems you can get with TIM when you don't use it the good way...I think I should go with thermopads it will be better for a noob like me (and i don't want to fry my 3590's)
Thanks for sharing
Are pads up to the heat from cobs? Ive got some for my Vero 18's at low power but baulked as I don't see them mentioned or tested?
Is the reflector with 4 contact points and 2 screws a good alternative to putting 2 screws through vero? I can't see why it wouldn't be as good as screwing or taping vero.
Is the reflector with 4 contact points and 2 screws a good alternative to putting 2 screws through vero? I can't see why it wouldn't be as good as screwing or taping vero.
beodrone
Active Member
So far in my testing the pads work just fine. I don't see any difference in temperatures when comparing with fixtures that I used thermal paste on. The large fixture I am testing has 18 COBS and runs great.
At the end of the day I feel better about using the thermal tape vs misusing TIM paste.
At the end of the day I feel better about using the thermal tape vs misusing TIM paste.
I'd think two tubes would be enough if you are frugal, AS5 is pretty thin compared to promiltech.So how many tubes of arctic silver 5 should I order for a 24 cob(cxa 3070) build?

Bhookus
Member
Thank youI'd think two tubes would be enough if you are frugal, AS5 is pretty thin compared to promiltech.
littlejacob
Well-Known Member
Bonjour
Is there a thread on Thermo pads?
If there's not, is there different types of pads? Quality, thickness, etc...
Have a great day★
Is there a thread on Thermo pads?
If there's not, is there different types of pads? Quality, thickness, etc...
Have a great day★
testiclees
Well-Known Member
Hey P,Its very easy to work with, the double sided sticky pads, and mine are still fine after a few months of 12/12
Are the pads pre cut to match the cobs? Id like to use thermal pads with adhesive on both sides for my 3590s. How do you determine the correct pad?
salmonetin
Well-Known Member
...decoding... then for my pov the cobs leds needs temp protection against hot temps... driver dimmed or totaly off....external driver temp sensor way... sens leds temps...(maybe thermistor way)...Cree CXA 3070 ( 3000K -80Ra ) for 2500 hours at 1.5 A , Ta= 35 C.
Results of Poorly applied TIM (Arctic silver 5 ) and overtighten IDEAL holder ..
Temperature of LES was well beyond 100 C .
Still none of the COBs chips was fried .
COB WAS fully operational .
Until dissection was done ...
View attachment 3426017
View attachment 3426019
View attachment 3426020
View attachment 3426021
^^^ Epoxy glued chips on the ceramic board.
...maybe similar way to protect fan failure for hot temps....with temp sensor too...
...but the best temp sensor location for cobs its for thermocouples... ...maybe a well calibrated thermistor near the cob not affected for the light helps too... ...from my inexpert pov...
...for the rest... aplication method... only needs practice... blade or stencil ... or both... some Silver 5.... sds prefered
..ultra thin layer...0.050 mm to 0.150 mm?... ...TIM thicknesses for LED arrays typically range from 0.050 mm to 0.500 mm...
...from my pov ...on both ways pads or grease... better go with a temp protection for leds on it... drivers with auxiliary external temp sensor for monitoring the led temps... some models dimming ....rest go on total off...on high external temps... ...
pd... from my pov ...i recommend thermal grease way...not the thermal pad way....
...Wilson time to shout my mouth ....bros gone...only read method actived... back to the cavern... ...what a summer ehh...

saludos
Last edited: