Testing the Aerolife True HPA AA (Air Atomized) System -First run

Atomizer

Well-Known Member
If you have enough space in the shed/garage it could work out cheaper to buy a decent used belt-driven compressor with a 200L tank (the bigger the better).
Running from 4-10 bar, a 14cfm compressor will take about 3 minutes to fill the tank and that would last for at least 24hrs.
 

Trichy Bastard

Well-Known Member
If you have enough space in the shed/garage it could work out cheaper to buy a decent used belt-driven compressor with a 200L tank (the bigger the better).
Running from 4-10 bar, a 14cfm compressor will take about 3 minutes to fill the tank and that would last for at least 24hrs.
Not a bad idea, do you think there's any drawbacks to running 100 feet of airline permanantly outdoors?
 

Atomizer

Well-Known Member
Heating could be an issue. Apart from that you`d only need a reasonable inside diameter (~3/8") to reduce losses and a regulator. You could also add a small receiver to act as a buffer if necessary.
 

Trichy Bastard

Well-Known Member
Heating could be an issue. Apart from that you`d only need a reasonable inside diameter (~3/8") to reduce losses and a regulator. You could also add a small receiver to act as a buffer if necessary.
Yes- was recently thinking I could make a small buffer tank out of some 1" pvc with the JG fittings on it. That oughtta smooth out the airflow wouldn't you think? I realize the dangers of compressed air but it's rated well higher than what I'd be running through it
 

dickkhead

Active Member
Nice to come along for the ride ;) ... The idea is to use a silent dental compressor like a Bambi or Jun-Air. I was fortunate enough for now that my craftsman is silenced enough sitting in my foamed up hydraulic chamber (what a waste to use it only for this right now-lol)... Anyway since I really want to explore this system and AA was always on my to do list- I'm giving it a go. One thing is that the compressor on an old regfrigerator is obviously silent and made to last for years. You can take it out and mod it to run on plain air into a reciever tank. There are plenty of you tube vids on how to DIY. Otherwise the silent/oiless compressors are pretty expensive anywhere from 300 to over 1k... (Not to mention heavy shipping charges). Luckily the AA nozzles don't need very high pressure (usually around 30-40 psi), but it's still nice to have higher pressures stored so the compressor comes on less, although with a silent one it's not a big deal. If you can tolerate the sound of a refrigerator, that's about all the noise it'll make.

Regarding larger chamber size, you could use a large rubbermaid trashcan if your indoors. The AA nozzles allow for alot more coverage and less mist density so you can use a larger range of chamber sizes and just adjust the pressures or siphon height and feed timings. One AA nozzle is plenty to fog a chamber that might need up to 8 hydraulic nozzles as Atomizer mentioned.
Thanks tb do you have a link to the nozzles? I'm going to try to build a 4x4x3 chamber how many nozzles do you think I'll need? 2x was going to put 4 plants on the system. I have all the gear from my old setup and was just curios how the nutes are fed into these nozzles is it sipohon or gravity I believe fat man said gravity?...
 

Trichy Bastard

Well-Known Member
Okay guys, thought I'd update you on the progress so far... I've been experimenting on ways to keep the chamber cooler and I've settled on a way to run some coils of chilled water (40f) in the bottom that seems to keep the temps 10-15 degrees cooler than the surrounding air- even in direct sunlight. I also decided to put only (2) 3" netpots in for now so the roots have plenty of room to grow and let the fog have room to move around. I may add some sites later depending on how things go, but this'll be adequate for now. The netpots are around 100mm from the sidewalls, and about 170mm from eachother.

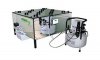
I was having a bit of a rough time figuring out how to install the cooling lines in the chamber, and have the chamber still hold water without leaking from the ports where the lines enter and exit. The problem was all the other holes in the box had threaded collars glued to both the inside and the outside walls except for these lower sidewall ones. I believe they lacked the inner threading so that the chamber would drain more thoroughly if they were used as drains. I wanted to make sure the box would hold water incase I wanted to use it as a reservoir during the veg stage so I could just recycle the nutes from there. After playing around enough I finally realized that the compression elbows from garden drip lines fit very tight into the threads, so I wrapped them with some of that "As seen on T.V. Magic plumbing tape" and screwed them in- which made a perfect watertight fit. I also found out half inch clear vinyl tubing fit into the dripline compression fittings without leaking. Yay... You can (barely) see (the red digital temp readout) of my chiller working hard on the lower right in this first shot and the castors which are installed on the chamber which makes it easy to move around and also raises it up so the drain holes are easier to run to a collection pan. Right now there is about 15 feet of 1/2" tubing coiled in the bottom recycling from the chiller. Once it's all figured out I will insulate the clear tubing outside the chamber with some foam sleeves.

IMG_0031.jpg IMG_0024.jpg IMG_0028.jpg


Here is the rootscreen I made from a custom size screen kit and some 150 tpi silkscreen. I am thinking some NFT spreader mat might be a better choice eventually since I'm out in the hot sun (it'll hold a tad more water and give the roots a little more moisture to draw from if needed) but I already had the silkscreen leftover from my hydraulic chamber build and decided to use what I had. The screen will also serve to keep the roots separated from the cooling coils and act as a filter should I decide to recirculate the nutes during veg. It's sized to wedge down into the tapered chamber just an inch or so from the bottom, and I plan to silicone around the edge to keep any adventurous roots from getting underneath.


IMG_0029.jpg


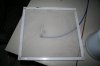
Here is the lid after I cut the netpot holes. I plan to have the one site in line with the nozzle to be at the farthest point so the mist has time to disperse and spread before squarely hitting it's rootball.

IMG_0025.jpg

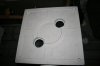
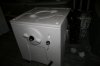
Here's the cutout piece shown to illustrate the chamber design and how it's filled with foam. The lid appears to only have one layer of foam, but the website states there are 3 plies in the rest of the chamber. I used a 3.5" holesaw to cutout the upper layer of the lid, and then cut my 3" holes in the bottom layer of plastic if the lid. This way I can drop the netpot all the way down in the chamber despite the thickness of the lid. I'm keeping the cutout pieces incase I ever want to glue and refoam so I can redo the lid however I may wish into a different configuration in the future if need be.


IMG_0026.jpg


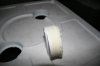
After cutting, there was foam exposed. I know firsthand how quickly the foam degrades in uv rays and sunlight, I also
worried it might eventually become waterlogged, so I applied a thin layer of white 2 part epoxy to seal it back up and protect it. I think it looks a little nicer this way too ;).


IMG_0027.jpg

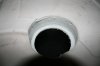
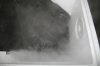
Here's the exciting part- the mist in action..! I put a black trash bag in there for contrast so the mist could be easier seen. When the lid is closed the haze hangs around for literally minutes. The real fun is going to be in finding the optimal height for the siphon tubes, air pressure and adjustments for the timer. The higher the air pressure, the more water is drawn in the nozzle, but also the higher the siphon height, the mist is less dense and in smaller droplets. I'll have to find the optimal siphon height and air pressure that creates a mist conducive to plant growth and root hairs, and then hopefully all I'll have to do after that is adjust the timings based on the plant needs and stage of growth.

:-P IMG_0030.jpg :-P
 

Trichy Bastard

Well-Known Member
Thanks tb do you have a link to the nozzles? I'm going to try to build a 4x4x3 chamber how many nozzles do you think I'll need? 2x was going to put 4 plants on the system. I have all the gear from my old setup and was just curios how the nutes are fed into these nozzles is it sipohon or gravity I believe fat man said gravity?...
There are hydraulic pressure fed, gravity fed, and siphon fed types of AA nozzles. These are siphon just like the Atomix. I already told you it is probably best to let me be the guinnea pig before anyone buys any of this stuff. No sense in wasting any cash on count of haste before we know if it'll work and grow nice aero roots for sure. Although I admit, I am more optomistic than ever after seeing the mist once the variables became close to correct. You could probably use 2 nozzles for a chamber that size and might get away with it being less deep, as the Atomix worked quite well shallower than 3 feet.
 

dickkhead

Active Member
There are hydraulic pressure fed, gravity fed, and siphon fed types of AA nozzles. These are siphon just like the Atomix. I already told you it is probably best to let me be the guinnea pig before anyone buys any of this stuff. No sense in wasting any cash on count of haste before we know if it'll work and grow nice aero roots for sure. Although I admit, I am more optomistic than ever after seeing the mist once the variables became close to correct. You could probably use 2 nozzles for a chamber that size and might get away with it being less deep, as the Atomix worked quite well shallower than 3 feet.
Yea I'm impatiently waiting lol didnt the atomix have a cone nozzle that had a small fan on it? Or a small fan in the chamber?
 

Atomizer

Well-Known Member
The atomix used 2 syphon fed AA nozzles in a 350L chamber. No fans just a couple of solenoids, cycle timer and a silent compressor. Sounds easy when you say it like that :)
early atomix.jpg
 

Trichy Bastard

Well-Known Member
The atomix used 2 syphon fed AA nozzles in a 350L chamber. No fans just a couple of solenoids, cycle timer and a silent compressor. Sounds easy when you say it like that :)
View attachment 2147699
It sort of is easy, if we just had a gander at one of those nozzles! It's like the biggest void in all of aero history...

Man that mirrored bit of kit is just about as beautiful to me as a Lamborghini is to a car fanatic... :)
 

Trichy Bastard

Well-Known Member
now that is one fine looking machine lol so now that tb has discovered these nozzles it seems like were almost there!!
hahah not quite grasshopper- we still have no idea if these nozzles are anything like the Atomix nozzles, but I'm aimin' to find out... A have to admit I'm a bit giddy at the possibility though.
 

dickkhead

Active Member
You need the skills of a tomb raider to find info on the atomix..most of it is cryptic :) HP and pressure fed AA
yea ik it realy is lol the scary part is anyone who has post on it dissapears off cyber space!! very nice would you say your getting atomix like results?
 

dickkhead

Active Member
Let me get this right weather or not it's AA or hydraulic were after a 50 micron Mist? to be doing TAG right? It just seems AA might have the advantage?.. Opinions?
 

Trichy Bastard

Well-Known Member
Let me get this right weather or not it's AA or hydraulic were after a 50 micron Mist? to be doing TAG right? It just seems AA might have the advantage?.. Opinions?
It's sort of a generalisation about the mist, but yes the mist size is what the roots like. And AA does have advantages as well as added complexities. The difference here being that these siphon fed nozzles are simpler to run (equipmentwise) than even hydraulic HPA and also offer the benefits of AA (assuming they work as we hope). So that is why I am excited...
 

dickkhead

Active Member
It's sort of a generalisation about the mist, but yes the mist size is what the roots like. And AA does have advantages as well as added complexities. The difference here being that these siphon fed nozzles are simpler to run than even hydraulic HPA and also offer the benefits of AA (assuming they work as we hope). So that is why I am excited...
Im def excited as well!!
 
Top